My blog about my wargaming activities. I collect a lot of 15mm miniatures for the American War of Independence and so collect a lot of rules for this period. I started miniatures with Napoleonics, so I have a number of armies in 6mm and 15mm figures for skirmishing. I have15mm WW II figures that I use for Flames of War, Memoir '44, and someday, Poor Bloody Infantry. Finally there is my on-again, off-again relationship with paper soldiers that I sometimes write about.

Showing posts with label ancients. Show all posts

Saturday, July 30, 2022

More Painting, More Thoughts on Downsizing, Goodbye My Friend

I have been doing a lot of painting of late, as part of my trying to figure out which scales to keep and which to shed.

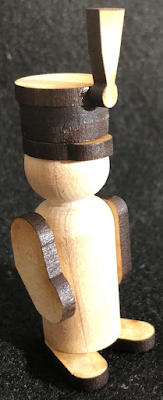
Wooden Warriors – French (Napoleonic) Marine of the Imperial Guard

One only my Wooden Warriors blog I finally made two posts. The first was about how to use my laser cutter for something other than making paint racks and wooden bases; I decided to take a different approach to making Napoleonics shakos. I did a test and then painted up this French Marine of the Imperial Old Guard.

 

6mm Napoleonics Painted with Citadel Contrast Paint

Someone on one of the Facebook groups had asked about whether anyone had tried painting 6mm miniatures with Citadel Contrast Paint. As I had done some 15mm in the past, I decided to give it a go and report on the results. I decided to try a harder subject that the standard Space Marines or Space Elves; I went with Napoleonic-era Bavarian troops.

First a couple of notes. Firstly, 6mm closeups always look horrible; they just do. You really find out how shaky your hands are when you photograph 6mm troops. You can actually see details, flaws really, that you just don't see when you are looking at them about 1' away (or farther).

I started by priming the miniatures white with Pro-Acryl white primer. It is a nice, thin white that does not clog the detail, which is important with 6mm, especially if you are going to use Contrast Paints or Speedpaint. As there are older Baccus sculpts, they are very rough and thus will take these types of paints well.
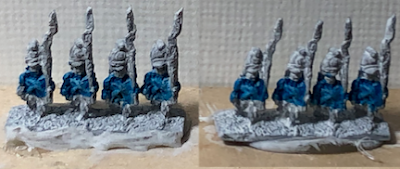
Here is what they look like, fully painted. (I later took a little more white to the trousers and cross belts to make them more solid.)


Overall I was good with the results, but I really need to look at the results of figures that are more crisp. The older Baccus sculpts are very 'rough' and I was not keen on them. But I love the newer sculpts. Also, using the gray Contrast Paint as a replacement for metallic paint is not really a good idea, so I would change that and go back to a gunmetal color.

Next up are Xyston 15mm Later Achmaemenid Persians. I bought a ton of Xyston 15mm ancients when Brookhurst Hobbies had a clearance sale and I have had them heaped in a pile of shame every since. (Greek Hoplite and Thracians are two of the armies that I vowed I would have a large collection on, one day. They would practically all be Xyston miniatures too.)

I started off airbrushing on a Zenithal primer. I started with Pro-Acryl black and fully covered the miniature. Then I swapped in Pro-Acryl white primer without cleaning the pot, knowing that it would come out gray. I liberally covered the figures, leaving only the undersides untouched. Finally I drybrushed white on top to pick up the highlights. 


Next I started carefully laying down the contrast colors, doing white touchups for areas where a darker color was laid down over an area where a lighter color was intended.


Here are the final results. For the most part I had to use light, opaque highlights over the areas with Contrast Paints to remove the 'tide pools' and 'coffee stains'. The newer Contrast Paints that have less contrast, such as the bright yellow on the purple and yellow figures, as opposed to the yellow-brown on the other figures. The former did not require yellow highlights (I actually shaded with Shade Paints), while the latter definitely did.


Overall I think the older Contrast Paints are too 'brutal' for 15mm. It is better to go with a base color and use Shade Paint or a wash to collect in the recesses. If you want three colors go with a base color as a mid-tone, highlight with a lighter color (use more contrast between the base and the highlight than you would with 28mm figures), and then wash with a darker color. The tint from the wash will tone down the mid-tone and highlight, bringing down the contrast, and match well with the shadow color it gives the recesses. For me, Contrast Paints do not seem to be the solution for 15mm. It flows too well for the scale.


The last experiment came from watching a video by Bunker6. He paints a lot of Games Workshop Epic Warhammer 40,000 figures – roughly 6mm – and he puts a lot of detail into them. I decided to see if I still had my eye and hand (because if not, the unpainted 6mm were going to be on the chopping block).

I started with the new Imperial Fist Yellow Contrast Paint because: 1) these are meant to be Imperial Fists; 2) I don't have any other yellow that is that exact hue; and 3) these are supposed to be one of the new single pigment colors that cover well and are low contrast (which is ironic for a 'contrast paint'). First off, it does cover well and the flow characteristics are generally nice, but the smaller the scale the less you want your paints to flow. As this was my base coat for the model, and nothing was going to be a lighter color, I did not care that it flowed off of the areas where I put the brush. If anything, it ensured that I did not miss a spot.

Personally I think I put in a little too much detail, but nonetheless I went forward with the exercise because I wanted to see whether the effort was wasted or not. I already consider this picture too zoomed in for tabletop view, but not so close that it looks closer than bent arm's length (the range most people generally use when they pick up a stand to look at it). I can still see the attempt at details, like the grey behind the knees (rubber parts in the armor), the black stripe on the helmet, the red glowing eyes, and the black and silver bolt gun. I can also see one other detail that you probably don't see and that is only because I intentionally painted it: I painted a yellow highlight color and a yellow shade color. Is it worth it? Not sure. But I answered my question: I can still paint 6mm troops to an acceptable table standard with my eyes and hand.

A Note About Army Painter Speedpaint

My experiments with Army Painter Speedpaint has been disappointing. Largely because they are not really acrylic paints, but some form of 'resin' paint. Water causes them to reactivate, so adding acrylic highlights over them causes them to partially blend with the color being painted on while also popping the color off of the primer, exposing the white (or whatever the primer color was) below. Not a good effect because you cannot really control it. Dana Howl (YouTuber miniature painter) was the first that I saw that suggested the way to deal with this was to mix your acrylic paint with either Speedpaint Medium or another Speedpaint color, effectively turning it into a custom Speedpaint color. A lot of people must be doing this because Speedpaint Medium is very hard to find right now and where you can find it, it is double its normal price.

One thing I have found out for sure is to not mix Speedpaint with acrylic mediums like matte medium, glaze medium, metallic medium, etc. It makes it into a gloppy mess that spreads even worse than Speedpaint, that Flow Aid or water does not seem to fix.

At this point I see Speedpaint as an 'all or nothing' solution.

Sad News

More than 15 years ago, while still trying to build a gaming club in Sierra Vista, Arizona, I was searching The Miniatures Page for players who might be within driving range, but were to the east (i.e. we were closer than Tucson, Arizona) and thus underserved, gaming-wise. I found Marv and Betsy Schmid and despite them being five hours away (in Deming, New Mexico) they said that they would be happy to hop in their camper and come to Sierra Vista and teach us this game called De Bellis Antiquitatus (a.k.a. DBA). They had numerous armies and all the terrain we would need. It was a smashing success, such that many of us started collecting DBA armies. It also led to the discovery of HOTT, me creating American War of Independence version of DBA (DB-AWI 2008) and HOTT (HOTR 2009), and even a blog (now inactive) about my DBA games.

Over the years my wife Rita and I have alternated visiting with Marv and Betsy, us going to their house or they coming to ours. Gaming buddy Don and I once dropped by on the way to a DBA tournament in Albuquerque, New Mexico for inspiration and last minute tips. We even went to a state park with a lake together to swim, camp, and game.

Part of what I have been doing of late is re-connecting with people that I haven't spoken to during the lockdowns, especially those that are not in my immediate area. That has led to some great conversations with people across the country and around the world, but sometimes it leads to sad news. It took finding an old mobile phone, recharging it, and retrieving the phone number I failed to transfer over to my new phone to finally reconnect to Marv and Betsy, only to find out that Marv had died last May of brain cancer.

Needless to say, Betsy is still trying to cope with the loss, but Marv had a large wargaming collection and she was trying to get a hold of me in hopes that I would take it off her hands. Right when I am trying to downsize my own collection… So, right after I retire next month I am going to head to Deming to inventory his collection, see what I think I can "move to a good home", i.e. what is sellable, and work with her on managing the sale of his collection. Hopefully I can sell things off on Facebook, The Miniatures Page, Fanaticus, and eBay and send her checks periodically. I know it will be a lot of work, but it is a bit of repayment to a couple that showed us a part of this great, fragmented hobby that ended up being a big part of my wargaming experience (and this blog), plus it will show me how to reduce my own collection.

In a way this is something I have been considering, and although it is a bit morbid, it is something we need to consider. What will happen to your collection when you pass? Are you sure the kids will take it? Are you sure your friends will? Do they know they are going to be tagged to disposed of your collection? Is your wife expecting to recover some of the costs of your hobby? Does she know that you "invested" in a depreciating asset? Does she know who to contact about your collection? Does she know how to sell it? Does she know a reasonable price? (Do you? When was the last time you sold?)

I posted a message on a DBA forum on Facebook to try and get a sense of what the market for painted 15mm DBA armies is. Ten years ago I used to scour eBay, Fanaticus, and TMP for painted DBA armies and paid what I felt was a premium buying them. But I stopped playing DBA after 3.0 fragmented the player base. Like Flames of War 3rd and 4th Editions, I just couldn't get into the next edition, despite buying the new rules. I was done. And with that exit went my knowledge of how viable the market was.

Fortunately, it appears that the market is still good. Not only are people still playing DBA 2.2, 2.2+, and 3.0, there is a new derivative called Triumph, but it appears that Art de la Guerra (ADLG) using the standard DBA basing. So I feel better about taking on his DBA collection to sell for her. His WW II and Arab-Israeli micro armor, however, jet age Check Your 6 aircraft collection, however, are a different story. But just like the old joke about how to eat an elephant (one bite at a time), so to with how to move someone's lifelong collection. Enough whining!

Here's to you Marv. You will be missed.


Tuesday, January 25, 2022

Modeling Skirmishers in One-Hour Wargames

Recently there have been a number of posts on the Facebook group Wargaming Neil Thomas' rules where people have noticed that their favorite troop type or army list is not available in his rules One-Hour Wargames (OHW). I have offered my own suggestions, but I noticed that some (you know who you are) like to add new rules and complexity to OHW, despite the fact that the author intentionally stripped these rules down to the bare minimum and has plenty of other rules with slightly more 'crunch' that are much better for tweaking. I have generally resisted the idea of modifying OHW, although I have created an AWI variant, one for the Austro-Prussian War of 1866, and some thoughts on how to use it for the Age of Sail. But the thought behind all of the variants were that I would not add any significant new game mechanics.

One poster to the group wanted to play the Arabs during the Medieval period, but he felt that the standard Medieval army list (3-4 Knights, 0-2 Archers, 0-2 Men-at-Arms, and 0-2 Levy) did not fit the historical model. So how should he modify the list and, given that the majority of the army were horse archers, how should he model them?


The first part, the army list, is pretty easy. Neil Thomas even gave examples of how to modify the army list models at the end of Chapter 4, Dark Age Wargaming. If you look at the lists in Table 1 of Chapter 20, the first column represents the predominate troop type. In the case of Medieval period, that would be Knights. So a roll for Knights would become a roll for Horse Archers. The second, third, and fourth columns are basically the secondary troop types, each with equal chances of occurring. In the Medieval list these are Archers, Men-at-Arms, and Levy. Archers and Levy would still be appropriate for an Arab Medieval army, but the Men-at-Arms should probably be Knights (the Arab heavy, shock cavalry), so that is another easy substitution. No severe changes and very much still in the vein of what Neil Thomas suggests players do.

The second part, how to model Horse Archers, was much more interesting to me. Before I put out what my proposal would be, let me take a bit of a tangent.

De Bellis Antiquitatus or DBA

Although my first ancients and medieval games were using WRG Ancients, 4th Edition (and later 5th and 6th Editions). I stopped gaming ancients about 1984 and did not pick them up again until about 2008, when I was introduced to (one of) the WRG Ancients successor, DBA.

I really took a shine to DBA, as did our club, due to its simplicity and small army size. One aspect of the rules that confused me, however, was that most troops that you would have thought could shoot enemy units at a distance could not. Light Horse and Skirmishers (tribal javelin throwers, Balearic slingers, Cretan archers, whatever were all lumped together) would all fight the enemy by moving into contact. Basically they looked like they were engaging in melee. Eventually I found the DBA Fanaticus forum and I asked the question: "why can't these troops shoot?" Basically the answer was that, historically, all of these troops shot from very close range, either to ensure they hit, or to ensure that their hit actually did some damage.

I looked it up and sure enough, these troops did fight from very close range. Rather than giving them very short ranges (in the order of 1" or 2"), the author chose to visually model their tactics of running up, firing, and retreating, as melee. Equally as important, the results of combat with those troops typically produced a result where if they lost, they would simply retreat rather than be eliminated.

I took that concept of visually representing this close-range skirmishing as melee, with combat results reflecting the likelihood the skirmishers would simply retreat, with me to other games. But I noticed that OHW did not model skirmishers this way at all. The author models them as shooters and when they are contacted in melee, they cannot retreat away.

Horse Archers and Light Cavalry

I don't believe in modeling horse archers as shooters. I guess I agree with the DBA model that says they don't really have enough mass and range to act like troops that stand and fire mass volleys at the enemy. Instead they charge up, loose their archers, and quickly retreat, often firing backwards as they did so (the so-called 'Parthian shot'). It is easy to model the close range aspect, require the unit contact the enemy in order to fire, essentially having them engage in hand-to-hand combat (from a game mechanic aspect).

"The bulk of the cavalry was made up of lightly-armed warriors, protected by no more than fur or hide jackets and headgear. The shock force of the Scythian host was the professional, heavily-armed cavalry commanded by local princes. Both horses and riders were well protected. They fought in formation, under discipline, and brought to the battlefield considerable experience of warfare. The engagement opened with a shower of arrows and sling-stones, followed at closer range with darts and javelins. The heavy cavalry then charged in close formation, delivering the main blow on the center of the enemy's array. … When the enemy had been broken the lightly-armed mass of the Scythian horse closed in to finish them off."
— The Scythians, 700-300 BC
"When battle began the light cavalry advanced through the gaps in the heavy jaguns [battle formations] and poured a devastating volley of arrows and javelins into the enemy ranks. At the same time either or both the wings of light cavalry began an encircling movement to take the enemy in the flank or in the rear, a tactic known as the tulughma, or 'standard sweep'. If any light troops were forced back by an enemy's determination they calmly withdrew, shooting as they went, and their place was taken by other units. Very soon the enemy would become disorganized, at which point a charge by. the heavy cavalry would be ordered."
— The Mongols

But, the primary rule in the Ancients, Dark Ages, and Medieval rules are that once contact is made, it can never be broken off. If we flip to the Horse and Musket period rules we can see that the author does model this behavior of engaging and then retreating; he does so for Cavalry in the gunpowder era. What is we use that same mechanic? What if we say that Light Cavalry can move into contact and attack, but if they do not eliminate the unit then they must retreat 6" back, out of contact? This mechanic would fit nicely with the horse archer/light cavalry tactics were are trying to model and yet is not simply pulled from thin air as the author uses this same mechanic elsewhere.

Light Infantry Skirmishers

Which brings me to the Skirmishers. Just like it makes no sense that the light cavalry be modeled as standing and firing at range, the same is true with light infantry skirmishers.

"The Greeks broke down the fortifications and charged out, but they were unable to catch the Bythynian [Thracian peltasts]. The latter fled from the charge, but kept hurling javelins from both flanks; every charge merely caused more Greek deaths. It was said that only 15 hoplites escaped from this massacre."
—The Thracians, 700 BC - AD 46

What about taking away the Skirmisher's ability to fire at range and replacing it with the ability to skirmish, as defined above. The unit moves into contact, rolls for hand-to-hand combat, and if the enemy unit is not destroyed, it retreats out of contact. Given that a Skirmisher's movement is normally 9", I was thinking that it keeps that movement rate when taking a Move action that does not end in contact, but gets a 6" movement rate if it skirmishes (ends in contact), then retreats back 6".

Enemy Contact with Skirmishers

So what happens when the enemy contacts your skirmishers (whether infantry or cavalry)? Should they be able to get their whacks in or not? I think it should depend upon a number of factors.

  • Are the chargers infantry or cavalry?
  • Are the skirmishers infantry or cavalry?
  • Are the chargers contacting frontally or from the flank or rear?
  • Are the skirmishers being contacted by more than one unit?
  • Do the skirmishers have room to retreat?

To my mind, an infantry skirmisher will never be able to outrun a charging cavalry unit, so contact will have to be maintained. A cavalry skirmish will always be able to outrun a changing infantry unit, unless some other factor comes into play. Otherwise, I think I would allow an infantry skirmisher to outrun infantry and a cavalry skirmisher to outrun cavalry, unless some other factor came into play.

If the contact is simply frontally, or from the flank, I would adhere to the rules above. If from the rear then you have been outmaneuvered so infantry can contact infantry skirmishers and cavalry can contact cavalry skirmishers. If you are contacted on two sides, your skirmishers cannot escape, regardless of who the chargers or the skirmishers are.

By 'room' to retreat I mean would the retreat movement take them off of the board. Which direction can the unit retreat? Always towards their baseline, never towards the enemy baseline nor laterally. If the retreat would take them off of the board they do not retreat and are contacted.

Summary

I know, I know. You should not tweak OHW. The whole point is for the combat model to be simple. I feel like this isn't too bad because it uses a model for hand-to-hand combat that already exists (for the Horse and Musket period cavalry) and represents Skirmishers better. Let's face it, unless it is a specific period and scenario were a Skirmisher is necessary due to terrain, you are probably like me and you groan when you roll up a Skirmisher.

Friday, March 13, 2020

One-Hour Wargames – Scenario 10 – Late Arrivals

If you were wondering why Shaun Travers (of Shaun's Wargaming with Miniatures blog) hasn't been blogging much lately it is probably because I have been taking up all his time with One-Hour Wargames (OHW) scenarios. We played Flank Attack 2 (Scenario 7) using Medievals and we just finished the first of two games of Late Arrivals (Scenario 10) using Ancients. A much different feel to the game with Ancients – Infantry hits with D6+2 but only take 1/2 hits due to armor – than with Medievals, Dark Ages, or Rifle and Saber.

More importantly, the scenario is really interesting because Blue is the defender and they have some hard choices to make.


Shaun and I again used a 6x6 square grid for the game – essential for virtual gaming if you are not using a computer program to indicate your precise position and make accurate measurements – shown in the image above.

Blue is defending the town (F6) and Red only has to occupy it at the end of turn 15 to win. Blue gets two units at the start and can setup in rows 3, 4, 5, or 6, or in the woods (E-F/1-2). Note that the mountain (A-B/3-4) is impassable.

This means that a core Blue strategy is to defend in squares C3 and C4 with Infantry and hold the enemy off. However, Blue only gets two more units on turn 5, and the final two units on turn 10. Ancient Infantry, being D6+2, has an Average Turns to Eliminate (ATE) of 3, meaning that it can eliminate an enemy unit on average in three turns. However, if the enemy unit is also Infantry, because it has has armor (1/2 hits) the ATE is 5 turns. So, this really turns into a race because it takes two turns to move the infantry to row 2, then turns 3 through 7 will be spent chewing through that front line of enemy infantry. With Blue having 3-4 infantry in their force they could easily have the second wave up to the battle line by turn 8, which would cause another 5 turns of combat, at least, to chew through that line. So simply pushing the infantry forward will not win the objective.
Please note that I have the advantage of hindsight and playing once as Blue to give this analysis. My first attempt looked something like the image below.


Trust me, the "Skirmishers in the Woods Gambit" is not a winning strategy. At D6-2 my Skirmishers were still cooking their breakfast in the woods when the Red Cavalry flew by, unscathed.

In my opinion, if Red does not have Skirmishers or does not have two Archers, I am not sure Red can win in the Ancients period unless Blue makes a mistake. If Red and Blue have Skirmishers, Blue might have to commit it to the fight at the start if the game, which would make for an interesting fight. As I said this is an interesting scenario, but there are some matchups that seem like they would always result in a Blue win because the clock runs out.

The Real Game 1


As you can see above, my first game 1 was a disaster. I did think about potentially pushing forward with the Blue Skirmishers to block enemy units from coming on at C1, but it seemed like such a low probability of success that we bagged the game early on. I threatened to play that setup solo, but have yet to.

I rolled and received three Infantry (of course!), one Archer, and two Skirmishers. To me, this was probably the worst combination I could think of. Two extremely brittle units and I would not have two full waves of dead hard Infantry.

Shaun rolled and received three Infantry, two Cavalry, and one Skirmishers. All I knew was that having Cavalry might allow him to make a breakthrough to get to the town and having a Skirmisher meant the woods were not impassable too. So my first decision was whether to use a solid line of Infantry and risk him flanking me with Skirmishers to break through faster or using one Infantry and one Skirmisher and seeing how I could contain him. I chose the former.


One of the other issues with this scenario is that Red enters from the northern road not the northern edge. This makes maneuvering out extremely hard and the introduction of the square grid does cause an issue with that, at least the way we play it.

I imagined the units stacked up in "C0", off the board. I felt like from there they should be able to move one square on, so B1, C1, and D1 would be eligible squares. But Shaun pointed out that the scenario says "via the road on the northern edge", so given that we play "in the square" the first movement point is in square C1. This caused a jam up of Red units, as you will see.

By the end of turn 2 you can see that the Blue Infantry have beaten up the leading Red Cavalry while doing almost no damage. However, I have this nasty habit of hitting units hard early on, then running out of steam while trying to finish them off. The main thing to notice as that only four of the six Red units have made it onto the board, with one Infantry and one Skirmisher still being off of the board.


By the end of turn 5 one of the Red Cavalry units had been eliminated and a Red Infantry unit was getting dangerously weakened.  The last Red Infantry unit was on the board, but the Red Skirmisher was still off! The second wave of Blue troops were on the march.


Turn 7 saw the elimination of the weakened Red Infantry in C2, but turn 8 saw the both units in the Blue front line eliminated. By then, however, the second Blue line was already in position. (Shaun forgot to bring on his Skirmishers, not that they could have gone anywhere.)


Turn 9 and 10 saw Red unable to break through the second Blue line, so with the final Blue reinforcements entering the board, Red quietly withdrew their forces.


Battle Summary


There are so many interesting combinations to think about here and how it would play out in different periods.

Medievals have mainly fast-moving Knights (D6+2, 12" movement), so unless Blue draws a force of two Men-at-Arms units (armored, thus take 1/2 hits like Ancient Infantry) the battle is not going to take place in rows 2 and 3, but rows 5 and 6.

Dark Ages have mainly Shieldwall Infantry, which take half hits like Ancient Infantry, but only hit with a D6, so it is an even slower slog through rows 2 and 3. I think it would be even harder to win as Red in this scenario during the Dark Ages.

Horse and Musket really changes things as Infantry now fire 12" with D6, so the name of the game is for Red to bring his superior numbers to bear, which is interesting given the confined space which they have to deploy to.

How do you think your favorite period (using the standard rules) would play?

What Else Have I Been Up To?


As it so happens, the writer of the blog Red Player One lives in the same area as me. He and I played a game of Starport Scum by Nordic Weasel Games and it was really fun. It has been a long time since I played a narrative (RPG-lite) scenario. The rules are very simple, but effective. My hero, Flavio, cut the anti-hero Ahnuld in half with a single stroke of his monofilament blade. That gruesome kill caused the rest of the security guards at the compound where my brother Squigi was being held. (Yes, the Flavio Brothers – Flavio and Squigi – were reunited so they could continue their criminal "plumbing" careers together.)

You can see some of Jason's cool terrain and figures over on his blog. The vidscreen of a pixelated geisha-like figure is hand-painted. Very cool.

Jason is a dangerous guy to hang around though as he is a rules junkie like me. I ended up getting copies of Starport Scum and 5 Parsecs after reading his blog. Then again, he ended up getting Battlesworn. (We were going to play that this weekend, but we ended up having to cancel.)

Although I did not give it a very strong try, I did try Star Wars: Legion and I just could not get into it. It has too many elements that I am not fond of. It is a very competitive 1v1 game where – unless you have basically bought one of everything or scoured the internet thoroughly – someone will eventually pull out something you have not seen and play gotcha! with a new special rule. Been there, done that with Warhammer 40,000, Warmachine, and Flames of War (multiple editions for each).

I finally broke down and purchased the next version of Warhammer Underworlds, Beastgrave. I continue to like that game despite not being able to get that many games in and it being hard to play solo given the amount of hidden information. But I am working on that. More later on the Solo Battles blog.

I have been doing some more painting. I am trying "comic style" which is a couple of steps beyond what I used to do as a kid, which is a heavy blacklining style.

Finally, about a third of my team at work were let go. Our company decided that they did not want to keep them and decided to let the remainder – largely a bunch of techno-geeks – take over their duties, which was managing accounts, in addition to our normal duties. I am not going to say much more than that other than to say that my blood pressure spiked, badly, and I needed to find another job because that was not what I signed up for. So I did. Rather than working for the company that makes software for the US home mortgage market, I will soon be working for a company that uses that same software, i.e. I will be a customer. My work with the product and insight into how it works under the covers really helped me leverage a new opportunity. So let's hope the grass really is greener on the other side...

Friday, July 05, 2019

Kings of War Historical

It seems like it has been a while since I have posted, so I thought I would write up some thoughts on a game I played recently. (One of the few played with other people!)

Kings of War Historical

Kings of War Historical (KOWH) is a set of multi-figure based rules from Mantic designed to be simple, fast, using lots of figures and buckets of dice. A gaming buddy has been rebasing his Romans and Germans from single-figure based (used with movement trays for Hail Caesar) and KOWH is what he decided on using them for. You can download the free fantasy version of the rules here. The core rules are the same with KOWH changing some special ability names and giving you suggestions on how to classify your historical troops.

Our test game was pretty simple as it had no terrain and we just grabbed troops. There were four Roman heavy infantry bases (no pilums), two Roman skirmisher bases (javelin-armed), and one Roman cavalry base. Opposing them were four warrior bases, two skirmisher bases (bow-armed) and two cavalry bases.

The first concept you learn with KOWH is that units can be 1 or more bases. Basically, his models were 10 figures to a base for skirmishers and 20 figures to a base for heavy infantry and warriors. Units are either 10, 20, 40, or 60 models. If you have one 20-figure base as a unit, it is a 'regiment'. If you have two 20-figure bases, it is a 'horde'. To make things interesting, I decided to use my four bases of warriors as two hordes, while my opponent kept his as four regiments of heavy warriors. I put one skirmish unit on each flank and one cavalry unit outermost on each flank. My opponent, having only one each, put his cavalry on his right flank and his skirmishers on his left.


As you can see, a pretty simple setup. The Romans moved first, and due to the distance between the battle lines, the Germans struck first.

KOWH is very much an 'Alpha Strike' style of rules, meaning that you can move forward (5" with infantry, double that for cavalry, +1" for skirmishers) and shoot and melee and force the enemy to check morale all before they get a chance to respond. Fortunately, units do not generally die on the first hit, but hitting first is a distinct advantage.

Each unit has a set of stats that determine how well you fight. Your Melee and Ranged stat is stated as a die roll, e.g. 4+ on D6. This is the die roll needed to score a hit on your enemy if you are in melee or are shooting, respectively. Your Defense stat is also stated as a die roll, and that is the roll needed for to turn each hit made by the enemy into damage. For example, if your enemy's Melee stat is 4+ then they roll their dice and each 4+ scores a hit. They then roll a number of dice equal to the number that scored hits and and try to roll your Defense value (in this example, a 5+). Those that succeed are damaging hits and are applied to your unit, either indicating the hits with markers, or ticking off boxes if using a roster.

When a unit is damaged in combat it must check morale by rolling 2D6 and adding the number of accumulated hits, then comparing that to the unit's Nerve stat, which has two values; Wavering and Routing. Equal or exceed the numbers and the morale effect is applied. (Routing means the unit is removed.)

Generally speaking, your unit's size does not affect your Speed, Melee, Ranged, or Defense stats, but they do affect your Attacks (the number of dice you roll in Melee or Ranged combat), Nerve, and Points Cost. To give you an idea of how unit size might change stats, here is an example for an Archer unit.


Archers
Unit SizeSpeedMeleeRangedDefenseAttacksNervePoints
Troop (10)65+4+4+810/12115
Regiment (20)65+4+4+1014/16150
Horde (40)65+4+4+2021/23250

Note that having the flexibility of having two 20-figure units will cost you in points compared to one 40-figure unit.

Now that you can see sample stats, you can see why it is a buckets-of-dice game. My Warrior Hordes were throwing 24 dice for each attack! You can also see that when testing morale your units can take several hits before they disappear, although low and high rolls will definitely influence their staying power.

So, let's take an example combat in the game. My Warrior Hordes were throwing 24 dice in melee, hitting on a 4+ (12 hits on average), damaging the Roman Legionnaires on a 5+ (4 damaging hits on average). The Romans had a nerve of 16/18 (if I recall correctly), so with an average 2D6 roll of 7, they would rout on the third melee round, but quite possibly waver on the second.

The Roman Heavy Infantry, on the other hand, were throwing 15 dice (if I recall correctly) as they were a Troop and not a Regiment, hitting on a 4+, damaging on a 4+, also for about 4 hits. But the Germans had a Nerve of 22/24, so a possible rout on the fourth melee round, but more likely on the fifth.

That gives you a basic idea of the combat system. Movement is very simple in that everything is straight lines with a single pivot of up to 90º (unless standing still, then you can pivot any number of degrees). Differentiation in units and armies comes through the application of "special rules", much as you would find in Black Powder or Memoir '44.

I personally think you could easily convert this to a square grid (equal to one base in width) with a minimum of rules changes, especially as the rules are always trying to square up units and maintaining distances between units (friendly and enemy). Using a square grid as a space regulator is the perfect mechanism.

As for the game, the German cavalry crushed the skirmishers on their right flank, forcing the Romans to face spare units outwards. As the German cavalry on the left got the jump on the Roman cavalry, it defeated the Romans before it was defeated in turn, so the flanks simply enveloped the Roman center, eventually destroying it.

Conclusion

I liked the game. I would use a roster to tick off casualties, rather than use dice on the board as hit counters. (I prefer a cleaner board, if possible.) I would also prefer to use a square grid as almost every maneuver, other than straight forward, straight back, or turn to flank, were of little consequence to the game.

The game played fast – easy to play two games, one for playing each side once, allowing you to play unbalanced scenarios – and there were very few things that needed looking up, other than Stat values. I would definitely play it again on a smaller board with my 15mm DBA-based miniatures.

Monday, August 13, 2012

Review of Arrayed for Battle!

Welcome to new reader La Long Carabine. I hope you enjoy reading the blog.

Well, I finished my Cold Wars reports (whew!). The only report I did not link to was Cold Wars Report (6) on my Wooden Warriors blog. In that report I published the battle report of the two games that I flew from Arizona to Pennsylvania for: Matt Kirkhart and John Acar's re-fight of the Battle of Zama using home-made wooden figures (aka "craftees") and Matt's rules Arrayed for Battle!. I did a mini-review of the rules on that blog entry, which prompted Matt to respond with four long comments. I've decided that the rules need the full review treatment, then I want to post my original comments, along with Matt's, plus any additional comments that came out of emailing him privately.

The Arrayed for Battle! rules, as far as I know, can only be obtained from the Files section of the Wargaming on a Budget forum on Yahoo. That forum is where those of us that like to make our our soldiers, terrain, and wargaming accessories hang out and discuss new ideas and techniques. It is an odd place for those rules to be, but maybe if there is enough demand, Matt will move them out to Google Docs where others can easily get to the them.

Rules Inspiration

Matt has stated several times that the basic rules are inspired by wargaming pioneer Joe Morschauser's rules. The basic idea is a unit has a combat attribute and the player must roll that value or less on a six-sided die (D6) in order to inflict a hit the enemy unit. There are very few modifiers to that roll. Morale is similar in that when a morale roll is called for the player must roll the morale rating or lower on a D6. Failing the roll results in the unit being routed (removed from the board).

Discussion with the Author, Matt Kirkhart

MK: Hey Dale,

Thanks very much for the great battle report and rules and figure reviews. Great stuff and just like with everything else on your blog, excellent "press" for the Craftees movement in general.

I thought I would throw in my thinking on the rules issues that your brought up. First and foremost, I'm a big believer in folks making the rules their own. They are at best guidelines and I think people should tweak and outright change things they do not like or that do not fit their gaming style or ideas. You clearly already know I feel this way, I just put this in for your blog readers who may not know that is my approach to rules even my own.

Second, I gotta go with Neil Thomas; any set of wargaming rules is indicative of the biases and preconceptions of the rules writer in terms of the writer's belief about warfare during that period as well as his preferences for types of play, characteristics of the game, etc. My rules are clearly not an exception. So, I will start there with my own biases and what I was trying to get the game to "play like."

I have to admit that I am in the camp of those who believe it is rather silly to have a set of wargame rules for the "ancient" period that span 3000 BC to about 1500 AD. I even think it is a bit of a stretch to claim that there was little in the way of significant weapons development that changed warfare during this very large stretch of human history, but even if one goes with that assumption it is difficult to swallow that the warfare involving the phalanx formations fighting on the open flat plains of Greece and Asia Minor was not any different than the warfare involving the flexible Roman formations against the "barbarian" tribes with their style of fighting in the rough and broken terrain of central and northern Europe, or even later than that the warfare during the Dark Ages or the Crusades. My rules are clearly influenced by my understanding of and desire to game the period of the rise and the fall of the traditional Greek/Macedonian phalanx, from about 700 BC to the end of the Successors influence. In my opinion, the rules do a pretty good job of providing a flavor for this period and type of warfare. Anything beyond this period or style of fighting would need some modifications. Could these things be addressed with the special abilities for each unit? Partly I think so, yes, but there are some more significant rules changes that are probably needed and at least one of your rules comments is indicative of this I think. Given that I'll now comment on the two points raised about the rules. I'll start with the "easy" one first.

It has not bothered me during play to leave the units where they are when they make contact (not "evening them up" in other words). Having a rule that only one enemy can be on each side makes the exact location of the enemy unit not as important. That said, I am clearly in the minority on this point, and your suggestions about evening up the units and how and when to do so I think are great and clean this up for most players. I really do not see my tendency to not want to even them up as being an important aspect of game play. It doesn't provide anything to the game that is representative of the period, make the game easier to play, etc., so this modification you suggest I think is probably good if for no other reason it reduces arguments between players during play. I'm all for that!
DH: This came up in the first game, which is why I brought it up. You are right in that the "one unit fighting per contacted edge" simplifies matters tremendously. However, there were situations in which very little edge contact still resulted in combat. This "sort of" corner-to-corner contact did not bother me, in and of itself, but with units not "evening up" you ended up with situations where a unit might have to swing very wide (taking two moves, in fact) in order to hit a flank, such as the situation below.
In figure 1, two blue units are off towards the flank of the red unit. However, as they attack (figure 2) the leftmost unit contacts with only a small portion of its edge in contact with the enemy edge. This is a legal contact, so the melee is fought.
In figure 3, as the melee continues the second blue unit, in order contact the flank edge, must swing wide and will still probably pass through the friendly blue unit unless it take two separate movements (two turns) to get around the friendly unit. Figure 2a shows why a post-melee slide changes the nature of charging and contact. On blue's turn three the second blue unit's path is clear and it can charge in one movement, without being disordered by charging through a friendly unit.

This calls into question, however, should the second unit be able to get into  flank contact so soon and so easily?
The second point raised is about units turning to face enemy who are in contact with their flank or rear if they are no longer engaged to their front or not engaged on any other side (in other words one enemy on each flank or one to the flank and one to the rear). Not turning to face is a VERY old school type rule that in my reading is only present in wargames rules before 1970. I honestly haven't read them all, but in the "classic" wargame books I've read to date I have yet to find a rule set after 1970 that does not allow a unit to turn to face the enemy. Be sure to appreciate here that why I like not turning to face is because of my own biases and preferences for understanding the period and having the game play in a particular way.

I really like not letting a unit turn to face and here is why: I wanted a rule structure that would mimic the descriptions of battle lines in the period I described above. Again, when you throw in the various flexible formations of the Roman heavy infantry and other more flexible approaches in warfare chronologically later, these ideas I'm about to state do not apply, and to me this was a significant change in the way ancient battles were fought. Anyway, I wanted a rule system that would allow movement of units to be fairly flexible until contact with the enemy occurs. At that point movement becomes greatly restricted. This I wanted to be particularly the case with heavy infantry that in my understanding in phalanx warfare in particular was something that once you committed it, it was committed and that was it. It was very difficult to "recall" a phalanx or maneuver a phalanx once it is in contact with the enemy, etc. Cavalry and light troops are described as having more flexibility even once in contact with the enemy, but not the heavy infantry. I also wanted to stress the importance of a coherent battle line in the game and the need to protect the flanks of that long coherent line. This too is a characteristic of the ancient battle accounts during the period so I wanted to reward players who maintained the battle line (which would require that units stay in line facing the same way) while using light troops or cavalry to "buzz" around the flanks keeping them protected. If you want to lose quickly with these rules the first thing to do is break your main battle line into more than one part, and the second thing to do is to leave a flank unprotected!

So, this is the reasoning behind the rule of not allowing a unit to "turn to face." I do not mean to imply that these units did not fight to their flanks and rear. They just were not able to reform the entire unit while in contact with the enemy in a way that allowed them to fight just as well after doing so as they would have had they initially contacted the enemy with their front in that direction.
DH: For me this is clearly an issue of aesthetics over time. What I mean by that is if the game mechanics are such that a unit will last in melee only two turns on average, having a unit hit in flank and not turn when contacted doesn't really both me. Having it not turn on the second round I am still okay, but for turn three and after, it starts to look strange.

In your rules, units can easily melee for more than two rounds given a basic 50% to inflict a hit and requiring three to four hits before a morale check is called for. For the flanking unit not to turn for, say, six rounds, looks strange. Of course, it is fine if it does look strange if it is giving you the result that you want, but I wonder whether it is. Units on the flank should get the flanked unit to a morale check faster, but the net effect of the current mechanic is that the flanked unit has less chance of winning; the flanking unit still grinds as slowly through the flanked as if it hit it in front.

So I looked at the mechanic (the odds to hit and how long it would take to break a unit) and figure that it is producing the result you want (i.e. a slow grinding down of a unit, even when hit in flank) and the aesthetic, and that is why I say it does not look quite right. I cannot imagine pikemen, who are armed with short swords for just such the occasion when they are outflanked, that are on the uncontacted flank, are going to keep formation and wait for the unit to break. But, then again, I don't know...
In the game there is a mechanism that allows something similar to turning to face to happen, but heavy infantry are not allowed to do it. Once they are committed to a path that contacts the enemy, that's the way they will face until they are disengaged from the enemy either through winning or losing the melee (becoming "spent" or "broken" in the rules). Light infantry and cavalry are not so committed. Light infantry may disengage (move away and end facing the enemy) and so may cavalry. In addition, cavalry can only be "re-engaged" during that same turn by other cavalry (even light infantry cannot "catch" them when they disengage). So these troops not in a phalanx formation do have more flexibility in disengaging with an enemy to their flank or rear and eventually "turning to face" the enemy, but even these units are not allowed to maintain melee contact while doing so. They literally must have somewhere to "move to" to get away from the enemy and reform facing them. This creates a flexibility in maneuver after melee contact that I think is consistent with the reports of units in ancient warfare: cavalry with the most flexibility, light infantry next, and heavy infantry without any real flexibility once committed.
I think of troops being "committed" as being different than troops in combat.
But again, the lack of a "turn to face" maneuver in the game is VERY inconsistent with modern rules, which from a game play point of view may not be such a good thing. Players count on this and it is sometimes the source of frustration and confusion when they are not allowed to do this with their heavy infantry units during the game.

So, Dale your idea to allow the unit to turn to face and be disordered is a nice one in terms of fitting in with the existing game mechanics. In fact, I think it is a brilliant use of the "meta-view" of the game as a whole as it adds in nothing new in terms of a new rule mechanic and it is completely consistent with how "disorder" plays out in the game. Would I do it in my games? I would not for the period I'm describing because for me I just don't see the heavy infantry of that period being able to accomplish that. Would I use it in other periods, say Imperial Romans fighting Germans or other "barbarians" in the rough terrain of northern Europe or Britannia? Frankly, yes I probably would. This seems more consistent with the reports from folks like Caesar and others for the warfare of that period, in particular the smaller unit conflicts that were so common.

That said, a possible modification for the "phalanx period," for lack of a better term, would be to allow a heavy infantry unit that is in contact with only one enemy unit and that enemy unit is to its flank or rear to still not be able to disengage or turn to face, but instead to fight that enemy unit with a STR of 3 instead of the normal STR of 2. It basically turns that fighting capability of the heavy infantry unit on that side into the functional equivalent of a "medium infantry" unit like a peltast unit. Historically this is probably what it looked like as they cohesiveness of the phalanx just isn't possible to maintain to the flank so you end up with these heavily armored fellows in a looser formation fighting with a mixture of swords, spears, etc., much like what a well-armored peltast unit would be doing fighting to its front. Heavy infantry usually have at least a STR 4 to their front, so they would still not be getting the full benefit of the phalanx formation, but their good armor and weapons would still allow them after the first turn anyway and if fighting no other enemy unit at the time to rally their resources and fight a bit more effectively in that situation. Similarly, the STR 3 is still greater than the STR 2 the unit would be using if there were multiple units fighting it with at least in one case the unit fighting an enemy to its flank or rear. So if it is only fighting to its flank or rear against one enemy its STR would be 3. However, if it is fighting one unit to its front and one to its flank, that flank attack STR would be 2. Against multiple enemies the psychological impact would be tremendous and they would not be as likely to be able to marshal enough resources to fight equivalently to a STR 3 to its flank or rear in that situation.

Units that are typically STR 3 to their front to start with would not get this benefit and would still be STR 2 to the flank or rear even against only one enemy unit. Usually STR 3 units are light so they would have the opportunity to disengage and face the enemy with their front anyway. STR 2 units to their front are usually skirmisher units or very light infantry (poorly armored) so a well-armored STR 3 to its front unit probably fights like a skirmish unit to its flank or rear. I'll have to give this one some more thought.

Note: this was written after Cold Wars, but for some reason not published. The rules Arrayed for Battle was the primary game I went Cold Wars for, so here it is, better late than never!

Saturday, October 16, 2010

DBAS - Scoring the Side Effects of Moves

Continuing on with the catalog of combat moves, still looking only at a single element moving. Next let's look at the single element flanking, or attacking from the rear, an enemy group.

Flanking


When we looked at a single element flanking a single enemy element, there was no obvious advantage to the contact as combat to contacting the front edge; without another element in place, the enemy element simply faces to make front edge contact. Without other factors to consider, that produces no advantage or disadvantage.

Let's look at four basic flanking moves.

DBA.DBAS,catalog,moves DBA.DBAS,catalog,moves DBA,DBAS,Moves,Catalog DBA,DBAS,Moves,Catalog
Move to Flank Contact Move to Flank Contact of Group Move to Flank Contact of Deep Group Move to Flank Contact of Supported Group

The first, Move to Flank Contact, we have seen before. Again, with no other context this move produces no greater value than the Move to Front Contact. The Move to Flank Contact of a Group, creates an advantage for the attacker in that it fragments the enemy's command (i.e. it will now require two PIPs to move the two elements where previously it only required one) in addition to creating a threat of destroying an element should it recoil twice.

The Move to Flank Contact of a Deep Group - which would apply not just to elements with base depths greater than 1/2 the base width, but also to elements in two ranks - creates an even greater threat; if the flanked element recoils once, it is destroyed.

The Move to Flank Contact of a Support Group adds an additional advantage over the Move to Flank Contact of a Group: the flanked and turning element no longer receives rear support. Whether this is advantage should be scored separately is questionable; it will be factored in with the Combat Value differential.

The more I ponder the moves the more I realize that the moves themselves are not the keys, but the list of advantages and disadvantages the move brings. If you consider named advantages and disadvantages, such as:
  • Fragments enemy command
  • One recoil will destroy*
  • Two recoils will destroy
  • Breaks rear support**
  • Combat Value differential
  • Can Quick Kill enemy element
  • Etc.
* This is effectively the same thing as a Quick Kill on the Combat Outcome Table, so should be scored the same.
** This will be a factor in changing the Combat Value differential, but is there additional reason to score this?

So, can the actual moves be ignored - thus saving me from cataloging their variations, ad infinitum - and you simply score the side effects the move will produce?

Thursday, October 14, 2010

DBAS - One Attacking Many

Last time I looked at a single element attacking a single element and didn't really find any reason to differentiate between the moves, so now I will try the same thought experiment with a single element attacking a group of elements and see what changes.

DBA.DBAS,catalog,movesDBA.DBAS,catalog,movesDBA.DBAS,catalog,moves
Move to Overlapped Front ContactMove to Double Overlapped Front ContactMove to Supported Front Edge Contact

The first move is the Move to Overlapped Front Contact. Essentially this put the attacker at a -1 disadvantage. Compare this to Move to Double Overlapped Front Contact. Although this move results in a -2 disadvantage, does it warrant being treated separately? The last is the Move to Supported Front Edge Contact, resulting in a +1 advantage to the defender.

Consider the following:

MoveCombat FactorDifference
AttackerDefender
Move to Front Edge Contact+3+3+0
Move to Overlapped Front Edge Contact+4+3+0
Move to Double Overlapped Front Edge Contact+5+3+0
Move to Supported Front Edge Contact+4+4+0

Given that the difference in each combat is the same, should the moves still be ranked separately or do they have equivalent weight, as they all result in a single element coming into front contact with a group of elements and resulting in a combat at +0? Put another way, which is more important: the move itself, or the resulting combat?

One factor in weighing the Move to Supported Front Edge Contact more heavily is that, unless the supporting element is a Pike, there is the potential for destroying two elements in this single combat. That alone warrants weighting, and thus differentiating this move from the others.

Summary

In my mind I have only found one case where the movement of a single element into combat is materially significant; all others seem to indicate that the resulting combat factors are the differentiator. I would like to hear your thoughts on this, either here or preferably on the Solo DBA Yahoo forum.

Wednesday, October 13, 2010

DBAS - Contemplating the Simplest Moves

To start let's consider the moves of a single element against a single element. There are basically three moves to contact:


Move to Front Contact Move to Flank Contact Move to Rear Contact
Moving into flank contact from the left and right are technically two different moves, but functionally they are the same given our "universe" with no other factors.

This leads me to wonder: if there are no other factors - this is simply one element on one element and no other element comes into play now, or in the near future (i.e. within the Zone of Control of an enemy element or within one move of contact) - is there really any difference between the three moves? Does it necessitate cataloging all three variations and ranking them separately?

At this point, I am willing to say yes catalog them, just to be complete. But at this point I have no means of saying one move is more or less valuable than another, so they will all be scored the same. As I catalog other moves, I think either the proper scoring will come to light, or the need to differentiate these moves will disappear.

Tuesday, October 12, 2010

DBAS - Contemplating Moves

As part of my involvement with the Solo DBA development effort, I have a tendency to get on an idea of something to try, and then try to catalog all of the variations of that idea. The latest idea to get this treatment is available moves.

Problem

A fundamental problem for the solo gamer is to determine what move - from all of the possible moves - should be taken for the non-player, or programmed side. In a game like DBA, where you have a command and control mechanism that does not necessarily allow a player to move all of their units every turn, you end up with an additional twist, which is to evaluate the chosen "best" move for one unit against that of another unit and determine which should be taken in those cases where you are restricted and cannot move every unit.

So, to restate, the problem is two-fold:

  1. Determine, from the set of moves that an element or group could make, which is the best move to make, and
  2. Determine, from the set of best moves found in #1 above, which ones to make if not enough PIPs are available to do them all.

Solution (or Attempts at Solutions)

In previous versions of De Bellis Antiquitatis Solus (hereafter referred to as DBAS), my version of rules for the wargamer to use DBA for solo games, my approach has been as follows:

  1. Determine the "best" move for any given element or group of elements. (The "best" move is the one determined as having the highest score - see below.)
  2. Score that move, based on:
    • The Non-Player General's (NPG) current mood (called the Strategic Stance).
    • The category of the move (Combat, Defensive, or Approach).
    • Conditions resulting from the move, such as whether the following combat gives you a tactical advantage, retreats you out of a losing combat, moves you towards and objective, etc.
  3. Play out each move, from highest score to lowest, until the NPG runs out of PIPs for the turn.
This process worked well, and despite the sound of it, did not take a lot of time to calculate the scores of the various moves. (After awhile, you pretty much got the feel for which move was better than another.)

Where I did not like the system was that I tried to bite off too much; I was trying to provide a different scoring system for each Strategic Stance of the NPG (there were five). My last effort was to reduce the Strategic Stance Values to three - Cautious, Moderate, and Bold - and then provide a preference to the type of move (Combat, Defensive, or Approach) based on the Strategic Stance. A simply table shows how it works.

If the Strategic Stance is......the First Preference is......the Second Preference is......and the Third Preference is...
CautiousDefensiveApproachCombat
ModerateApproachDefensiveCombat
BoldCombatApproachDefensive

As you can see from the above, the NPG's mood determines the type of move favored. As I used a scoring system I simply add +4 to the score for the moves in the First Preference, +2 to the score for the Second Preference, and +0 for those in the Third Preference.

This is a good start, but it still requires you score out all possible moves for an element or group before you can figure out what gets the first PIP.

What About...?

So, one of the ideas is to rank the actual moves and consider them in order. Essentially this means cataloging the possible moves and giving them point values. If each move has a value, it probably needs a modifier based upon how good it is compared to other like moves.

For example, consider the basic Move to Contact, where one element moves into contact with another element. If Move A results in a combat of +5 versus +3 and Move B results in a combat of +3 versus +3, should Move A be valued higher than Move B because A has a better chance of winning the subsequent combat (all other things being equal)? In the past my answer was yes (and probably still is).

Now consider a Group Move to Contact (two elements, moving as a single group, move into front-edge contact resulting in no overlaps but rather initially two one-on-one combats). If the Group Move to Combat results in two +4 versus +3 combats does that move rank higher than a Move to Combat resulting in a single +5 versus +3 combat? As you might imagine, the resulting scoring system that takes all of this into account could probably get out-of-hand pretty quickly.

So, if you go down this path of cataloging moves and assigning scores to those moves, your next basic decision is, do you:

  1. Rank the moves in order.
  2. Compare each element/group that can make that move to determine which ones get PIPs first.
Or do you:

  1. Rank the moves in order in order to assign a basic score to that move.
  2. Modify the scores based upon additional factors.
  3. Execute the moves in score order.
The latter sounds right, on face value, but is much more difficult to pull off, I think. Next, I'll look at some simple moves and pose questions on how to go about tackling these issues.

Friday, September 24, 2010

DBA Solo Game - Baltic Greeks vs. Skythians

I finally picked up working the De Bellis Antiquitatis Solus rules again (found in the files section of the Solo DBA Development forum). I am not happy with the table that scores moves (i.e. determines which move is best for the non-player opponent to make), as it is too complex. So, I decided to simplify. Rather than five levels of aggression for the non-player general (NPG), I reduced it to three. Rather than have that factor affect both the types of move preferred and the score of each move, I decided to drop the latter modifier. These changes made calculations much faster.

It also struck me, during the test below, that some moves into combat can be considered both combat moves and defensive moves. This has led me to consider cataloging all of the basic moves and naming them, so I can refer to them in the scoring system. Not sure if that is insane or not, but it is my current thought.

The game I decided upon needed to be vastly different than the previous ones - which should not be hard because they were almost all Polybian Roman versus Ancient Spanish - so I chose to use my new Skythian army. Rather than have both sides be NPGs, I decided that I would run the Skythian side and its opponent would be the NPG. Looking through the list of opponents, and what I had available, I resisted the idea of playing yet another Bad Going Infantry army (like the Thracians, of which I have two lovely armies) as it would be too similar to the Ancient Spanish with an NPG. Something really different would be the Black Sea Greeks (II/5i) - a hoplite army against a Light Horse one.

This is an interesting match-up because the Light Horse are weak in combat factors (+2 versus foot and mounted), but they quick kill Spears (which are +4 versus foot and mounted). Because of that, the Light Horse will kill the Spears 17% of the time, get no result 11% of the time, recoil 47% of the time, and flee 25% of the time. If the Light Horse get an overlap (+2 versus +3) the chances change to 28%, 14%, 47%, and 11%, respectively, so getting overlaps will be critical.

In the Greeks favor is that they have enough Psiloi to form Spear "T" formations, or three Spears in a line with one Psiloi in the rear directly behind the center Spear. This allows the Psiloi to provide rear support to all three Spears facing forward, raising their combat factors to +5. If this happens - and it should be the primary NPG tactic - the factors become +2 to +5 (8% to destroy the Spears, 8% no result, 50% recoil, and 33% flee), unless the Light Horse get an overlap while also being overlapped, in which case it is +1 to +4 (8%, 8%, 42%, and 42%, respectively). As you can see, the odds favor the Greeks heavily, but note that the worst result the Spears inflict is to force the Light Horse to flee. In order to win, the Greeks are going to have to either use their other elements, Auxilia and Cavalry, to destroy the Light Horse or they will have to start flanking them, which will break up the hoplite line and create gaps for the Light Horse to exploit.

This should be an interesting game.

Black Sea Greeks versus Skythians
Pre-Battle Sequence


1. Determine Your Army Composition
My army will be the Skythians (I/43) with 1x2LH(Gen) and 11x2LH. The army type is Mounted and the force type is Light Horse. Its condition type is that it Fears Bad Going.

2. Determine the NPG Army Composition
The NPG army is Later Hoplite Greek, Others (II/5i) with the following required elements: 1x4Sp(Gen), 7x4Sp, and 1x2Ps. This makes the army type Foot and the force type Spears. There are still three elements to select. The choices are 1x3Cv or 4Sp and 2x4Sp or 4Ax or 2Ps.

The first optional element to deal with (section 2.2.2 Selection Criteria for Optional Elements) is the Psiloi. As the force already has one Psiloi, it must select at least one more. Once that second Psiloi element is selected, however, the NPG army gains an additional force type, Psiloi Support, as it now has two sets of three Spears plus one Psiloi.

The next optional element is Spears. As the enemy force type is Light Horse, only two elements need be selected, so this criteria is met.

The next optional element is Cavalry. As the NPG army does not have four Cavalry elements it will select the one element available.

The next optional element is Auxilia. As the NOG army does not have four Auxilia elements it will select the one element available.

The NPG army is this: 1x4Sp(Gen), 1x3Cv, 7x4Sp, 1x4Ax, and 2x2Ps.

3. Roll to Determine the Attacker
The Skythian aggression is 4, while the Greeks are 1. The rolls determine that the NPG is defending.

4. NPG Determines the Terrain
Although the Greeks do not Favor Bad Going, the Skythians Fear Bad Going, so placing Bad Going terrain is to the advantage of the NPG. As the Greeks have a Home Topography of Arable they are allowed (up to): BUA (1), Road (2), River (1), Steep Hills (2), Gentle Hills (2), Woods (2), and Waterway (1).

I am still fleshing out the terrain selection and placement rules, but I thought I would give you my thought process.

First, as a BUA is allowed, I determine if that will be in play. A BUA gives the defender more control over the board as it restricts the attacker from not being able to select two sides as the favored side when determining baselines. (Essentially, it changes the odds that the defender will get the baseline that they want.) As mounted have a hard time attacking BUA, and I have plenty of Spears to defend it with, using a BUA is favorable to the NPG.

The primary advantage of the Skythians is their mobility, especially around the flanks of their opponents. To hinder that mobility it is best to place Bad Going terrain close enough to the board edges so that elements must go through the terrain. Further, it is best to use line of sight-blocking terrain to hinder the enemy's command and control, should they try to sweep around the flanks. Given my LOS-blocking, Bad Going terrain choices, Woods are my favorite. So two Woods it is.

The basic plan is for the Greeks to dominate the center of the board, anchoring their flanks either between two Woods, or the BUA and a Woods, depending upon which board edge they get as their baseline. So, using those three terrain pieces, the goal is to set it up such that:

  • There is no gap 40mm or wider between the Woods or BUA and the board edge(s).
  • The distance between each terrain piece is roughly the frontage of the Greek army, no matter which baseline the Greeks end up getting.
As the NPG is Psiloi Support and the enemy Mounted, you should already have in your mind the basic deployment. The NPG will group the elements into two sets of 3x4Sp plus 1x2Ps, garrison the BUA with 1x4Sp, leaving 1x4Ax, 1x3Cv, and 1x4Sp to be placed separately. So, that makes the frontage of the NPG army a maximum of nine elements wide, or 360mm. This will help you gauge the distance between the terrain pieces.

These factors help me determine that the BUA and two Woods will form a triangle, with the terrain pushed towards the edges, cutting off flanking moves. As I am allowed a Road, and Light Horse armies gain little advantage from them, I choose to run one up the middle, should I need to reinforce the BUA. (In hindsight, I should have selected two, so I covered all possible baselines I could get.) Here is the terrain placement for the game. (I'll go over troop deployment and baseline selection later. I just forgot to take a picture before putting all of the troops on it and rotating it.)


5. Roll for Baselines
As I am the attacker, I get to choose the favored edge for my baseline. However, because of the BUA placement I am limited to only two of the four edges for my choice. My roll indicates I don't get my choice and I end up with the BUA on my right flank, as shown in the picture above. (All pictures are taken from the Skythian baseline.)

6. Deploy the Camps
As the NPG had a BUA, it had no camp, so that decision did not have to be made. The Skythians (I) placed my camp in the far left corner, as far away from the BUA and road as possible.

7. Deploy the Defending Army
7.a. Divide the NPG Army into Deployment Blocks
As indicated earlier, with the NPG army a Psiloi Supported force type and its opponent a Mounted army type, two of the deployment blocks will be two sets of 3x4Sp plus 1x2Ps. With the BUA on the board, the third deployment block will be the 1x4Sp garrison. That leaves 1x4Sp, 1x4Ax, and 1x3Cv, none of which are defined to work together in a deployment block, so they become three separate blocks.

7.b. Divide the NPG Deployment Area into Deployment Zones
The deployment zones are:

  • The open area on the Greek left flank (the right side of the picture above).
  • The woods on the Greek left flank.
  • The open area between the woods.
  • The BUA.
Note that a battle plan goes with every terrain setup, so the deployment zones, and how they are utilized, are mostly pre-defined.

7.c. Determine the Deployment for each NPG Deployment Block
As mentioned previously, one deployment block, 1x4Sp, will go into the BUA. As the battle plan for this terrain setup calls for placing the Spear T formations in the center, between the two woods (after the battle line advances, of course) that only leaves three one-element deployment blocks to commit.

At this point, I will admit that I have no rules for determining the position of these elements. So, I am stuck with either logic, dice, or both. I choose both.

The 1x4Sp element, along with the two Spear T formations can be placed in one of three configurations, shown below.


Essentially my decision was either to place the single element on the left or right of the two Spear T formations, or to put them between them. As that element is without Psiloi support, and is thus more vulnerable to a mounted attack I chose option B; to place the element in the middle of the battle line. As I did not want the General to be without Psiloi support, it was a normal Spear element in the center.

With the General being present in a Spear T formation, I had to decide which one, left or right. As the battle plan was to advance the right flank while executing a left wheel, I felt that having the General on the flank where the advancing was going on made more sense. In addition, this was the side where the enemy would be cramped and possibly pinned against the woods, so it was deemed safer. So, as shown in B in the figure above. the darker gray deployment block contained the General (with the Psiloi directly behind it).

With only two elements left - the 1x3Cv and the 1x4Ax - it got a little easier. Both of these elements are best suited for the flanks. I was unsure of whether the Greek left flank or right flank was more at risk. The right flank could be at risk if the Skythians got good early PIP rolls and moved quickly around that flank before the "door swung closed" (so to speak). Putting the Cavalry there would help prevent that from happening, but once the line was anchored, the Cavalry's movement would be as constrained as their enemy's.

Putting the Cavalry on the left flank gave it the potential to move left into the wide open terrain, possibly making a charge if the Skythians somehow mounted a serious attack against the BUA. I

The Auxilia could start in the woods on the left flank, guarding it while the hoplites wheeled left. This would have made that end of the line very hard to attack. Putting them on the right flank makes them vulnerable until their flank is anchored on the woods, but once they were there, they had complete freedom to move about in the woods, and they might possibly even make a strike at the Skythian camp.

I rated the left flank a better spot for the Cavalry and the right flank a better spot for the Auxilia and gave the odds at 1-4 the indicated deployment and 5-6 the opposite. The 1x3Cv ended up on the left flank and the Auxilia on the right.

8. Deploy My Army
The first picture shows the deployment of both armies.

9. The NPG Army can Swap up to Two Element Pairs
There seemed to be no reason to change any element positions.

10. Determine the Initial Strategic Stance of the NPG
The process for this step is fairly simple:

  1. Calculate the Army Rating for Your Army
  2. Calculate the Army Rating for the NPG Army
  3. Divide the NPG Army Rating by Your Army Rating
  4. Lookup the NPG Strategic Stance
10.a. Calculate the Army Rating for Your Army
Basically, the Army Rating is calculated by adding up the combat factors for all of the elements in the army. However, some elements are worth more (or less) depending upon certain factors. As the NPG army is Foot,  my army rating is calculated using the combat factors versus foot.

1x2LH(Gen) +3 x 1 = 3
11x2LH +2 x 11 = 22
Total = 25

However, I said that elements are worth more or less, depending upon certain factors, and they are:

  • +1 if the opposing army has any elements that are quick-killed by this element
  • -1 if the opposing army has elements that quick-kill this element
  • +1 if the element is capable of multiple moves in a bound
As my army is entirely Light Horse, any modifiers will apply equally to the entire army. Light Horse quick-kill Spears, so as long as the NPG army contains Spears elements, the Light Horse will be worth an additional point. As Light Horse are not quick-killed by any elements that the NPG army has (at least, as long as it stays out of Bad Going terrain), it does not lose any points. Finally, as Light Horse are allowed multiple moves per bound, all the time, each are worth an additional point. At +2 points per element, that is an additional 24 points, for a total Army Rating of 49.

10.b. Calculate the Army Rating for the NPG Army
Using the same method:

1x4Sp(Gen) (+4 +1 -1) x 1 = 4
7x4Sp (+4 -1) x 7 = 21
1x4Ax +2 x 1 = 2
1x3Cv +3 x 1 = 3
2x2Ps +2 x 2 = 4
Total = 34

The -1 for the Spears reflects that Spears are quick-killed by Light Horse. The two Psiloi will be worth +1 point each on turn one, as Psiloi can make multiple moves on turn one, but it immediately disappears at the start of the NPG second turn.

Note: as there is a road in play, any element on the road temporarily adds +1 to their value due to the multiple move capability. Again, these values can fluctuate due to casualties, terrain, and enemy casualties, but the Army Rating is only calculated at the start of the NPG bound, before PIPs are rolled.

10.c. Divide the NPG Army Rating by Your Army Rating
34 / 49 = 0.69

10.d. Lookup the NPG Strategic Stance
Anything at 0.75 and below is Cautious and anything at 1.25 or above is Bold. The NPG is Cautious.

Let the Game Begin

Now that we've gotten the preliminaries out of the way, it is time to start the game. If you want to understand how the Tactical Engine, used to determine which choices the NPG will make, use the document Using the Tactical Engine in DBAS as a guide. There are extensive examples in that document.

Rather than give a blow-by-blow, I will hit the highlights.

By the Skythian turn five, the right columns surged around the Greeks' left flank. One element was trying to push past the woods and get into the Greeks' rear (or draw off some elements - doesn't quite work against a solo opponent though!), while two elements on the left were waiting for the Greek right flank to commit so they too could sneak around the woods.

First blood is drawn by the Skythians, however, when the Greek Cavalry is destroyed on an unlucky roll. Skythian 1-0.


On the Greek turn eight the hoplite battle line has made contact and literally won every combat roll after losing that first element. Of course, winning the rolls only mean recoiling or fleeing Light Horse. The Greeks will need to break ranks to overlap the enemy is they want to destroy something.

Note the Skythians on the left flank have started to move around the woods, while the element one the right had is actually in the woods, but still stuck in it. (Not too many times when the Skythians have a spare two PIPs lying around...) The Light Horse facing the Auxilia in the woods have wisely broken off from combat before they get flanked, or contacted by the Auxilia in the woods.


On the Skythian turn nine they finally get enough PIPs to really get in and attack the hoplites. Below you can see a Light Horse element hit the right flank of the Greek line. Because one Spears element had peeled off to attack the Light Horse in earlier turns, the General's element was exposed to the flank attack. Although the odds are not great for the Light Horse (2-6), a 6-1 roll would have ended this game quickly.

As it stood, the hoplite's left developed a gap which the Skythians exploited. The Skythian General attacks a Psiloi-supported Spears element, both of which were flanked. Here is where the Skythians got the good roll. The score is now Skythians 3-0, and I figure that this game is probably done for the NPG.


One the Greeks' turn nine they roll good PIPs and quickly reconstruct their battle line (save for the General on the right flank). Better yet, the Auxilia leaps forward and attacks the exposed Light Horse that recoiled from the General. As they are in Bad Going, the Auxilia destroy the Light Horse, bringing the score to Skythians 3-1.


On the Greeks' turn 10 they rolled a six for PIPs and were able to shore up the battle line. The Auxilia moved onto the right flank, the spare Spears moved towards the left flank, and the two Spears isolated on the left flank retreated, so a recoiling Light Horse would not automatically destroy one of them.


On the Skythian turn 11 the Skythians are poised for a big kill, possibly ending the game. In their right flank they have flanked a Spear while keeping the other Spear occupied.


Unfortunately for the Skythians, they lose the combat badly (being doubled). Even worse, the fleeing Light Horse ends up behind there Skythian General such that if the General recoils next combat, he is destroyed.


A note to any Fanaticus readers who saw my question regarding this situation. When I asked the question I thought the Light Horse to the left of the General had fled, but after recounting the score, it was only a recoil. However, that was after my question...
On the Greek turn 11 what should they roll but one PIP! The Greek hoplites flank the Light Horse still in combat on their left, eliminating it. The score is now Skythians 3-2. Although it looks like the Greeks are back in the game, the Greek line is shattered on the left and the Skythians are swarming all over.


The Skythian turn 12 does not grant a lot of PIPs, but it allows enough for them to move the fleeing elements from behind the Skythian General, removing the threat from a recoil. One element attacks the left end of the battle line, turning it around. Unfortunately, the hoplites hold (the result is a tie) and the game goes on. The Skythians just cannot win any rolls since turn nine.


The Greek turn 12 finds them with a good PIP supply, so the Psiloi springs from the battle line, attacking the Light Horse in the rear, helping to eliminate it. The score is Skythian 3-3. The Greeks could actually win this one!


Let's Pause for a Brief Moment to Review

At this point the Skythians have lost three Light Horse elements. As their elements were worth four points apiece, their Army Rating is now down 12 points from the original, for a total of 37 points. The Greeks are down one Cavalry, one Psiloi, and one Spear element or 8 points, putting their Army Rating at 26. Unfortunately at 0.70 that makes the NPG Strategic Stance still Cautious, so nothing changes. I just wanted to point out that these value change over time and it is possible for an NPG General to gain a little courage if things go their way early.

Now Back to Our Battle

The Skythian turn 13 proved to be the end. The Light Horse lined up with the General and swept in to attack the end of the hoplite line, where the Spears were presenting their rear, having finished off the Light Horse element last bound. In this case they must not have turned fast enough.


Skythians win 4-3!

Summary

Boy, this was one of those battles that you thought sure was going to go a certain way, but just would not seem to die. For the Greeks this is a really tough battle. They just don't have enough fast troops to be able to flank the enemy, especially when they are Light Horse. Add the quick kills in there and it is no wonder that the Greek NPG was cautious all along!

Lessons for Solo Gaming

First and foremost, this was a playtest of the solo rules De Bellis Antiquitatis Solus, trying to refine the Tactical Engine and add more to the deployment section of the rules. Although I did not do much of the latter - I still rely on generating a battle plan to match the terrain laid down, none of which have been adequately cataloged - I came to realize that a number of moves that I classified as Combat Moves can also be considered Defensive Moves, thus increasing the choices that a Cautious general can make.

What's next? Another revision of the Tactical Engine document, plus perhaps an update to DBAS itself.

Blog Archive

Blog and Forum Pages

Popular Posts

Followers

About Me

My photo
Huachuca City, Arizona, United States
I am 58 yrs old now. I bought a house in Huachuca City, AZ working for a software company for the last three years. To while away the hours I like to wargame -- with wooden, lead, and sometimes paper miniatures -- usually solo. Although I am a 'rules junkie', I almost always use rules of my own (I like to build upon others' ideas, but it seems like there is always something "missing" or "wrong").