My blog about my wargaming activities. I collect a lot of 15mm miniatures for the American War of Independence and so collect a lot of rules for this period. I started miniatures with Napoleonics, so I have a number of armies in 6mm and 15mm figures for skirmishing. I have15mm WW II figures that I use for Flames of War, Memoir '44, and someday, Poor Bloody Infantry. Finally there is my on-again, off-again relationship with paper soldiers that I sometimes write about.

Wednesday, June 29, 2011

Königstiger List

It looks like Don and I will play some Flames of War this weekend. He and I were talking and I told him that I needed to take the Königstiger list out and get its teeth kicked in by a Soviet horde list, so I would know just how bad it could get. Don said he would be more than happy to oblige me by bringing a Soviet Strelkovy list. :^)

This game will be 1,500 points. Here is the list I used last time:
  • Company Commander in Königstiger (Porsche) - two Tiger Ace skills
  • Bergepanther Recovery Vehicle
  • Platoon of one Königstiger (Porsche) - one Tiger Ace skill
  • Platoon of one Königstiger (Porsche) - one Tiger Ace skill
  • Schwere Panzer Pioneer platoon with 3 squads
  • Schwere Panzer Anti-Aircraft Gun platoon with 3 Unarmored Sd Kfz 7/1 (Quad 2cm)
  • Armored Rocket Launcher Battery with 3 Panzerwerfer 42 and extra crews
I found that there was too little infantry the last time I played the list. If the company has to defend two objectives, that leaves just armor defending one of those objectives. So, I have to squeeze in a second infantry formation and at 1,500 points that means dumping the AA half-tracks. Here is a possible 1,500 point list:
  • Company Commander in Königstiger (Porsche) - two Tiger Ace skills
  • Bergepanther Recovery Vehicle
  • Platoon of one Königstiger (Porsche) - one Tiger Ace skill
  • Platoon of one Königstiger (Porsche) - one Tiger Ace skill
  • Schwere Panzer Pioneer platoon with 3 squads
  • Motorized Panzergrenadier platoon with 2 squads and trucks
  • Armored Rocket Launcher Battery with 3 Panzerwerfer 42 and extra crews
I don't like the loss of the AA, but at 1,500 points, most players probably won't bring air support. If Don does, well, that is just one more thing to kick my teeth in and teach me a lesson. I'll just have to make sure we play the air support rules correctly this time...

The idea will be to have each KT platoon defend an objective with an infantry platoon, until the enemy is whittled down enough that the KT can go on the attack. Given the slow movement of the Königstiger, I will have to be very sure of no surprise move before I move the infantry off of an objective. The Bergepanther will operate as a leaderless platoon, led by the Company Commander when necessary.

If I get to choose a Tiger Ace skill, my first choice is to re-roll misses, with the second to have a 2+ Stormtrooper move. A 2+ Motivation is nice, but it really only comes into play for re-mounting when bailed, as the KT platoons will never take platoon morale checks. If I have to take a company morale check, it means I have either lost at least one KT and some support, or lost all of my support. That probably means I am only one turn away from losing an objective, so I see that Tiger Ace skill as being of lower value.

This should be an interesting game, and a good lesson as to why small, elite forces cannot probably win in open tournaments. The odds of running against a horde army, whether infantry or armor, is probably too high.

Saturday, June 25, 2011

German Late War Gepanzerte Panzergrenadiers

Continuing with basing and photographing my miniatures collection, I present my German Late War Gepanzerte Panzergrenadiers. This is a single platoon pictured, but I have a full, three platoon company available.

The half-tracks and infantry were painted by Dragon Painting Services in Hong Kong. I bought all three platoons from them on eBay, using their Best Offer method, so got a (slight) reduction from their normal price. I found out that the catch was that they never seem to sell the Panzergrenadier company headquarters, but they would be more than happy to paint that separately, at full price of course. I opted to paint those myself. (Pictures of them later.)

The quality of the painting is superb, and well worth the price to me. Their basing of infantry is consistent (I purchased other German platoons and they were the same), even if they are not the same as what I use. The only complaint I had is that the painters appear to be exact, in that all three platoons had the same numbers on the half-tracks (211, 212, 213, and 214). So, I can tell the half-tracks within the platoon apart, but had to devise a means to tell the platoons apart.

I decided to base my vehicles – in this case the half-tracks are on 3" by 1 1/2" bases – and use the basing as  the consistent component between painted units I purchase. Unfortunately, I have not re-based the infantry (or tried to make them consistent), so they look a little different. I may paint the outer band around the base the same green color as the half-tracks and leave it at that.

When the Earth and Steel book came out for Flames of War I noted that the Panzergrenadiers for Panzer Lehr had one Tank Hunter team per squad, so I had to go back and add them. (Pictures of them later.) That is when I discovered that matching the basing of the DPS bases was going to be a challenge. So, if I decide to paint the outer band it will be all or nothing.

I have played these troops for about a year now and I like them. The mobility and incredible machine-gun firepower makes them impressive. The three Tank Hunter teams per platoon make the Panzer Lehr version pretty beefy against armor in assault. The ability to combat attach a half-track with a 75mm cannon (from the Heavy Platoon) means that the platoon has an armored Tank team, thus enemy infantry must roll Motivation to assault. Combine all of this with the German's Mounted Assault rule and you have a pretty good unit.

The important thing to remember about this unit is that it is not an Armored Tank team, but is a Transport team, thus it can be pinned and it can be assaulted by enemy Tank teams.

Friday, June 24, 2011

German AA Halftrack

As part of my project to photograph my collection, here is the first of them that I have finished basing. There are three Sd Kfz 7/1 (Quad 2cm) armored half-tracks to protect my King Tiger and Panzergrenadier forces. Light, mobile anti-aircraft guns are great for covering a tank or half-track force as it can keep up. It also makes a good stop-gap defense supporting static infantry against assaulting infantry. With a rate of fire of 6, those 18 shots are going to hurt a Strelkovy company. And as they are armored, they cannot be pinned by enemy fire.

I bought these models from Don, who bought them painted off of eBay. They are really well painted, even though it is a simple paint job. I have them mounted on 3" by 1" bases (not a standard Flames of War size, but one I use for many half-tracks and tanks) so they are easier to grab and so the flocking adds a consistency between these and other German forces.

The figure on the left shows the small metal plate that I glued to the bottom of the gun turret, while the flat bed of the half-track contains a small rare earth magnet. This will be sufficient to keep the two stuck together during play.

A Tale of Two Hobby Shops

A bit of a 'local' entry this time. I was on vacation and I decided to stop at two hobby shops in Phoenix, Arizona (USA) on my way back home and thought I would give a mini-review. But, before that ...

I noticed something about both hobby shops that contrast to others I have seen around the country in my travels. These shops seem to be thriving largely because of the focus on the younger crowd, especially late high school and early college. Now, my view is probably skewed due to when I came into the shops (early weekday), but thinking back to the hobby shops of the past, these are certainly the crowds that were usually there and patronizing them.

It is nice to think that we old codgers, with our increased disposable income, account for more dollars in support of the shops, but I don't think that is true at all. The younger generation, although they may have fewer dollars to spend, seemingly spend a greater percentage of what they have.

Ah well, on to the review.

Imperial Outpost Games

Imperial Outpost Games in Glendale, AZ (north side of Phoenix) has expanded into the adjacent storefront since the last time I was there, so the gaming space has more than doubled. Lots of tables, looks like quite a bit of store terrain, and a fair amount of activity.

Miniatures stock consists of Games Workshop (Warhammer Fantasy Battle and Warhammer 40K), Privateer Press (Warmachine), Battlefront (Flames of War), and a few other minor elements (Dystopian Wars, Malifaux, etc.). There were no 'traditional historical miniatures' for sale (e.g. ancients, Napoleonics, ACW, etc.), nor rules of that sort.

What they did have that was of interest was a pretty good selection of board games of the 'traditional historical gaming' nature, like GMT Games titles. I almost bought Combat Commander once again. Maybe next time.

Their GW selection seems pretty extensive, taking up quite a bit of shelf space, but as I was rummaging through the stock, I noticed that a lot of boxed sets had a fair layer of dust on the top, indicating either a very dusty store or the stock not moving. (I was looking at some Empire Knights for WHFB, as it happened.)

The Warmachine/Hordes selection was also very nice, with probably the second-largest amount of shelf space (devoted to miniatures). Flames of War came in a distant third.

The store also has the typical paints, sculpting tools, flock/terrain, Magic the Gathering cards, RPGs, etc. for sale there. The unusual items were a stock of foam (not too unusual considering the proximity of Battlefoam to this business) and resin scenic bases.

A Yahoo group for the North Phoenix Irregulars, uses this store for a lot of its games.

This shop has a loyalty program which gets you a checkmark on a card for every $10 spent, and when $150 is spent, you can turn the card in for a 20% discount on your next purchase (of any size). Two things to note about this discount:
  • According to the staff (over the telephone), the discount can be applied to items you order through them; it is not just on current stock. Note: I have not tried this to ensure it is true; this is just what I was told by an employee who might not be an owner.
  • When you cash in a discount card the dollars you spend do not go towards a new loyalty card. So, if you get $250 worth of stuff and use the card to get a $50 discount, you do not get $200 worth of points. (Strange, but hey it is their loyalty program, so they have the right to make whatever rules they want.)
Empire Games

Empire Games is in Mesa, AZ and is also an impressive shop. It looks like it was once a corner store for a Blockbuster Video, so it is a huge space. Lots of gaming tables with merchandise lining the walls. This shops seems more oriented towards Games Workshop, but still has an impressive collection of Privateer Press and Battlefront. In fact, although it had about as much wall space devoted to Flames of War as did Imperial Outpost Games (maybe a little more), Empire Games had far more stock crammed into that space.

Although there were board games and RPGs at Empire Games, they had far fewer.

One item they did have that Imperial Outpost Games did not have: Army Painter Flames of War spray paint. So, I should be able to start knocking out some German armor soon...

If Empire Games has a loyalty program, they don't automatically tell you about it. So, this looks like a standard retail store with straight (i.e. full) pricing.

Empire Games also has a group with a Yahoo forum that hangs out at their shop – the Arizona Desert Rats – and they have a Flames of War forum on Yahoo.

All in all it was worthwhile visiting both shops on my way back home from vacation. I picked up a boatload of river terrain, the Games Workshop gaming mat (which has gotten great reviews and is only $30, before discount), a Panzer IV H to round out my Panzer company, some Afrika Korps dice to go with my tokens (although I don't play Afrika Korps), and some Hs 129B aircraft so that I can finally have some models of my own and stop borrowing Don's.

Saturday, June 18, 2011

German Maneuvers: A Blue-on-Blue Game of FOW

LTC (US Army) Matt Kostur and I had a game of Flames of War last night and it turned out to be quite an exciting one. As Matt only has Germans, and I don't quite have a cohesive American force, he suggested we do a 'blue-on-blue' game; a little German exercise and maneuvers.

I pretty much knew what force Matt had, but that did not affect my decision of what I would play. I knew what list I was going to use. Matt knows that I play a lot of German Grenadierkompanie and figured it would be that. At worst it might be my Gepanzerte Panzergrenadierkompanie. But no, last night it was a Schwere (Königstiger) Panzerkompanie from Earth and Steel!

My List

I have been reading the Tactica Königstiger thread on the Flames of War forum, and when I read it I said "now this sounds like my play style!" So what style is that: long range sniping; grind the enemy down; roll in and take the objective.

We were playing 1500 points, so I took the following from Earth and Steel:
  • Company Commander in Königstiger (Porsche) - had ROF 3 and re-roll misses for Tiger Ace skills
  • Bergepanther Recovery Vehicle
  • Platoon of one Königstiger (Porsche) - had Motivation 2+ for Tiger Ace skill
  • Platoon of one Königstiger (Porsche) - had Stormtrooper of 2+ for Tiger Ace skill
  • Schwere Panzer Pioneer platoon with 3 squads
  • Schwere Panzer Anti-Aircraft Gun platoon with 3 Armored Sd Kfz 7/1 (Quad 2cm)
  • Armored Rocket Launcher Battery with 3 Panzerwerfer 42 and extra crews
Matt was using (as best as I can recall) the SS (Wiking) Panzergrenadierkompanie from River of Heroes:
  • Company Command HQ with Panzerschreck team and Armored Cannons in Half-Tracks
  • Gepanzerte Panzergrenadier platoon with 3 squads
  • Heavy platoon with HMG and Mortars
  • Motorized Panzergrenadier platoon
  • Panther platoon with 3 Panthers and a Panzer Ace
  • Wimpy Rocket Launchers (AT 2 and FP 6, with no smoke!)
Matt's force would have been pretty nice - some might even say tweaked :^) - against my standard Grenadierkompanie force, but as I was running the KT Matt was a bit shell-shocked when I slid him my list. :^) (By the way, I have been using Easy Army's web-based Flames of War army builder and can definitely recommend it).

The big spoiler came when Matt rolled for his Panzer Ace and got a '6', allowing his Ace to have full ROF when moving, plus re-rolling misses, with the main gun. In addition, he allowed the platoon to re-roll missed Skill tests. :^P That Panzer Ace would haunt me the whole game.

The Scenario

We set up a table with three low hills and a monster hill (that should have been Difficult, but was not), lots of tall crops scattered about, some woods here and there, and a small village with a road. Only one woods, several crops, and three hills actually came into play; all others really had no effect.

We rolled up Encounter as the mission, with me as the attacker and moving second. I placed my two KT platoons and the Panzerwerfers on the right flank, guarding the objective there, and the HQ KT, AA, and pioneers on the left flank, guarding the second objective there.

Matt had his Gepanzerte Panzergrenadiers in the woods facing my 2 KTs, along with the Heavy platoon hiding behind a low ridge. His motorized Panzergrenadiers and the Cannon platoon (Kampfgruppe), and his 'rockets' far to their rear, were opposite my KT HQ and the AA. His Panthers were in the center, poised to pounce either left or right, and opposite my Pioneers.

Below are pictures showing a closer view of Matt's setup.


Matt's Right Flank
Matt's Left Flank

A little closer for my side of the table:

My Left Flank
My Right Flank

Matt got the first turn so he started off by moving the Cannon kampfgruppe (7.5cm mounted on half-tracks) forward to engage my Armored AA, while staying out of line of sight of the King Tiger. The Panthers slid to their right (left of the woods in the center) and got a few ineffective pot shots at my King Tiger on the hill. (Anti-tank 13 – -1 for long range – versus Front Armor of 14; can you save bounce? I think I actually heard Matt gulp.) One Panther did take out an Armored AA, however. In retaliation I moved out my rightmost King Tiger and blasted a Panther from long range, while taking out a Armored Cannon with the King Tiger on the left.


[It was at this point I stopped taking pictures, until the end.]

The mounted Panzergrenadiers eventually came out of the woods and moved off to the objective on my right. The Panthers, realizing they were never going to take me frontally, charged into the valley to also take the right objective, and potentially get flank shots on me as I attempted to defend the objective.

My Panzerwerfers continued to pound the mounted Panzergrenadiers and they slowly disintegrated. Meanwhile, shot after shot bounced off both the Panthers and the flanks of the King Tigers time after time. Eventually I had a choice: move a King Tiger to present my front to the Panther, and then get only one return shot, or take two shots and use Stormtrooper to present my front to them. Relying on getting the Stormtrooper move may not sound like a great idea, even for a Veteran, but this was the King Tiger that succeeds on a 2+. So, I took the chance and, of course, failed. (I was able to take out the second Panther, however.) By a miracle I was only hit once and the firepower check failed, so I was bailed. No infantry was close enough to threaten that turn. I succeeded in re-mounting the tank so again, I had the same choice: move and get 1 shot or take 2 shots and count on Stormtrooper. Hey, I had gotten the bad rolls out of my system, so ... My shots failed to hill the Panzer Ace and again I failed to Stormtrooper move to safety. The Panzer Ace got 2 hits this time and again he failed his firepower rolls and I bailed out (passing my Motivation when I bailed twice). But this time the Panzergrenadiers were within assault range and they captured my King Tiger! I eventually destroyed the Panzergrenadiers with rocket and machine gun fire, while the King Tiger on the hill finally put a round through the Panther's armor.

Meanwhile, on my left flank, I killed the Company 2iC leading the Armored Cannon Kampfgruppe, leaving them as a leaderless platoon. The dismounted Panzergrenadiers, who had four Panzerfausts in their lot, started moving towards my Pioneer platoon who had dug in around the objective. My King Tiger Company Commander had a choice: finish off the last vehicle in the Kampfgruppe, earning a VP but potentially having me get cut off from defending the objective; or start moving back to the objective and help the Pioneers stave off the Panzergrenadiers, who were twice as numerous (and Fearless to boot). I chose the latter option.

The battle around the second objective was intense, as Matt did an excellent job of keeping the Pioneers pinned with rocket fire. As his rockets were the wimpy kind (AT  and FP 6), they did not kill a single Pioneer stand. However, the rockets bouncing off of the King Tiger put up such a racket  that the Company Commander could not be heard over the din when he was trying to rally the pinned Pioneers. (Two straight turns I attempted to unpin the Pioneers, even with the Company Commander re-roll, and I failed.)

Even with the King Tiger attached to the Pioneers, the Panzergrenadiers found the courage to charge into assault, but each time the machine guns from the King Tiger added enough weight of fire to the pinned Pioneers to pin them in defensive fire and hurl them back. The Panzergrenadiers were making some incredible infantry saves – something like 12 out of 12 – but the fire from the machine guns were telling. When the Pioneers finally unpinned, they were able to throw 13 dice at the remaining pinned Panzergrenadiers and wipe them out. (Matt failed every saving throw on the last volley.)

At this point Matt had lost the dismounted Panzergrenadiers, the mounted Panzergrenadiers, and the Panthers. I had lost my Armored AA and a King Tiger, and my Panzerwerfers were leaderless. Matt looked at the board and said, let's play one more turn and see. He started to move his Company Commander towards the leaderless Armored Cannon Kampfgruppe to rescue them, while I kicked my King Tiger into high gear (risking a breakdown for Moving at the Double) and sped off to knock it out. Matt looked at the situation (see the photo to the right) and saw that I would make it before he did, so he conceded. (It was only a German maneuver exercise, after all!)

King Tiger Company: 4-3 win!

Summary

Wow! That was probably one of the most memorable games of Flames of War that I played. If we play it again, I am sure that Matt would do better, because he now has a better idea of how to take the King Tigers on. He started the game a little flustered (understandable, given that he expected me to bring my Grenadierkompanie!), but eventually made the moves that could have been game winning. It was just a little too late.

Ever since I read the Tactica Königstiger I have been excited to try this list. I've listened to some podcasts and read some battle reports and I get a sense that people who take "Tiger lists" are looked upon as a bit amateurish and a power gamer. Here was someone who was taking this list seriously, and from the sound of how it played, it sounded like something I would like to try. So, I started collecting the miniatures for the list – mostly by buying off a collection from a friend who is selling his Germans in order to start over – and kept reading the thread and similar ones.

So, how did it play? Granted, a 4-3 victory is nothing to crow about, but in all honesty I had never really played with that much power in a list (3 Panthers once, and a single Tiger another time), so it takes some getting used to. But, I like the aspect of maneuvering that came into play and the long-ranged sniping (twice I shot at nearly the full 40" range, both resulting in Panther kills on the flank).

What I Did Wrong

The first error came with Tiger Aces. One of my rolls was a '6', so I had a choice and I chose a ROF of 3. I should have selected either the Stormtrooper move of 2+ or the Motivation of 2+ (this was the Company Commander, so it would have helped with a Company morale check, if we had ever gotten to that point). The ROF of 3 only works if you are standing still, which if your opponent is even halfway decent, will be never. He should either be smoked or flanked, in order to make you move. Against other Germans, you also have to contend with them making Stormtrooper moves and ducking back after their shot. I don't think I ever got three shots off with the main guns. (I suppose I could have, when I was helping the Pioneers defend. I could have taken three main gun shots and one MG shot, rather than four MG shots. As they were in the open, the FP would not have mattered, but I could have re-rolled the misses. Oh well. Another mistake.)

Another mistake was a bad one, and really rookie. Despite having five Panther models of my own, I have only played them once, and I have never played against them until this game – so that is my excuse – thus I was not real familiar with the stats. Somewhere during the game I gave the Panthers an Front Armor of 14, so I started missing penetrations! When I finally realized my mistake, I made sure I got it right and the next shot took out the last Panther (the fearsome Panzer Ace).

I spoke of another error I made, and that was that I did not move the King Tiger that was flanked, in order to get an additional shot. So, let's look at the odds. One shot on the flank becomes 4/6 (to hit) * 6/6 (to penetrate) * 4/6 (to kill) chance of killing, or 45% chance. Two shots on the front is 4/6 * 5/6 * 4/6 or 37% chance to kill for each shot, so about 60% chance to kill for the two shots. (Of course, if you give the Panther a front armor of 14, that makes the chance of a kill 4/6 * 1/6 * 4/6 or about 7.5%. In light of those odds, it really did not make sense to sit there!)

The loss of the King Tiger was due to being flanked and bailing out in presence of enemy infantry within assault range. I thought that I was pounding the infantry as hard and as fast as I could without risking a Panzerfaust up the tail pipe, but in retrospect, the infantry was probably the more dangerous of the opponents, given that it could automatically kill a King Tiger that was bailed. Given that, perhaps I should have focused on killing the dismounted infantry with the King Tigers, before killing the Panther.

The problem with the Panther was that moving onto his flank, to force him to move, really did no good. He could move and shoot with full ROF. I realize that facing a Panzer Ace of this caliber was a special case, but it was the situation I had to deal with. I felt like he was the bigger threat, but now I don't know. I will have to ponder that more and test it.

My final error, which was really the second one committed in the game, was how I used the Armored AA. With no enemy air I should have held them back to help defend an objective. As it stood, the King Tiger Commander killed the Armored Cannon team; my Armored AA played no role in that. Had they been hidden at the beginning of the game and I had kept them away, they would have easily handled the dismounted Panzergrenadiers assaulting the Pioneers, or the mounted Panzergrenadiers on the opposite flank. Once the Panthers had committed to my right flank, I could have made a run for the enemy's rocket launchers in the rear, and the far objective.

All in all, I loved this list and the game. I look forward to trying it again. With 1750 points, I can definitely see getting another infantry unit so I can guard two objectives at once.

Below are my new 'babies' (click photos for a larger image).

Tuesday, June 14, 2011

Question on Tactical Exercises Post

To my Tactical Exercises and Micro-Games post Pat G. asks:
I am not an FoW player so please excuse me if I am ignorant of specific game mechanics.

In exercise 1, I am curious about why you wouldn't use the mortars to smoke out the German trench line before pushing the SMGs and FTs up. This would reduce their exposure to return fire and allow defeat in detail of individual German bases.

Another option would have been to pin the Germans using static fire from the rifles and HMGs, hammer the trench line with HE and flank with the SMGs using cover if possible or if not, detailing a couple of mortars to make concealment on one flank with smoke.

For scenario two, I would again want to use a lot of smoke to isolate the APCs and allow the FTs to get up close and personal.

Extended HE fire from the mortars is also an option but would depend on how FoW handles open topped APCs - in some rules they become coffins when hit with plunging fire.

In any event - an interesting read and a good practice to adopt - regardless of rules set.
First off, thanks for asking Pat. Although a blog is not a very good forum for interaction, I am always happy to receive feedback.

So, let's start with the first question. Why did the Soviets not smoke the Germans prior to the assault in order to limit return fire? My first response is that this would be a great tactical exercise for the attacker, so they can compare and contrast the results between using smoke and not using smoke. In this specific exercise, the Soviet mortars in Flames of War do not have enough smoke shells in order to make what they call a smoke bombardment. So, they do have that option.

Nonetheless, let's discuss that option, as it is an interesting one. First, what are the game effects of a smoke bombardment in Flames of War? They are:
  1. Anyone fired upon where the line of fire passes through the smoke is considered concealed (16% harder to be hit).
  2. The smoke is thick enough that if the line of fire passes through the smoke, targets beyond 6" from the firer are hidden, and thus cannot be fired upon.
Given those two game effects, a smoke bombardment lowers the number of hits by 16%, which is significant, but due to the German deployment (see last entry's Figure 2) where the second line is within 4" of the first line's front edge, the smoke would not significantly block the fire.

The key to the Soviet attack is to ensure you pin the Germans on the turn of assault. This reduces the Germans' fire from 2D6 per team to 1D6 per teams, so up to 7D6. As the Germans are only hit on a '6' and you need five hits, that means you have to toss 30 dice on average. That means 10 SMG stands, which the Soviets don't have. Alternatively, one single HE hit by the mortar or by a Flamethrower will pin the platoon.

Sometimes Flames of War is a game of nuances. If the Flamethrower is within 10", it gets 4D6 to try and pin the Germans (and also kill the target team, by the way). If it is outside of 10", the mortar has to do the dirty work. Either way, if the Soviets don't achieve the pin, the hard choice is whether the assault goes in anyway or not. That will probably depend upon whether your company got a bloodied nose or beaten up on its ways in.

So, in direct answer to question 1: Soviets don't have smoke and even if they did, smoke does not have as powerful an effect, therefore you cannot really defeat the German platoon in detail using that method.

Regarding option 2, this comes down to understanding the math behind the game system you are playing, which only reinforces my point of why you want to play out these tactical exercises. What you suggest seems very reasonable; the question is whether the math of the game system supports it. As it stands the Soviets need a '6' to hit the Germans because they are concealed, gone to ground (keeping their heads down until the last minute, as they did not shoot), and in foxholes. The mechanics for Flames of War is similar to Warhammer 40K in that the firer rolls to hit and for each hit the target gets to roll for a save. Being in foxholes allows the target an additional save.

So, each firer has a 16% chance to hit, a 33% chance to overcome the target's save, and a 16% chance to overcome the foxhole save, giving each firer just about a 1% chance to remove the target stand. The return fire from the Germans to the Soviets running around in the open has a 16% chance of removing a stand. Clearly, firepower is not the way to go.

In Flames of War assault is the great equalizer. Now assault does not necessarily mean crossing bayonets any more than it means that in the horse and musket era. What it does mean is a firefight at very close range where grenades and such come into play. Why is it the great equalizer? Because it:
  1. Removes the infantry save from the equation.
  2. The chance to hit is based on the attacker's skill, not the defender's.
Put very simply, assaults kill in Flames of War and it is mastering that which will increase your chance of winning.

For the second scenario the mortars did fire HE and succeeded in getting the half-track crew to bail out twice. (It actually had a chance to destroy the half-track, but the mortar's rolling was not good enough for that to happen.) But that is actually pretty lucky, especially given that the half-tracks were moving, so it is harder to zero-in.

Thanks for the comments Pat. I am glad you found it an interesting enough read to respond, even though you don't play Flames of War.

Monday, June 13, 2011

Tactical Exercises and Micro-Games

When I was a kid, and trying to learn how to be a better player with the wargaming rules Column, Line, and Square, a good friend taught me to run 'tactical exercises' as a way of learning. Basically a tactical exercise is a very small slice of a larger battle - such as taking a single unit and attacking a defended town, or taking two units and attacking a hill defended by one unit - and playing that out until you got it to work. My friend always used to say that a battle is just a number of these tactical exercises strung together and that if you could not make it work in an exercise, you were never going to make it work in a bigger battle with more points.

Interestingly, sometimes you would not succeed in the exercise, or find that it was so bloody that the unit was essentially expended in the combat, but that too was a lesson in and of itself. It teaches you when the odds are against you and you should avoid those particular match-ups. They basically help you understand what happens in a game and why so that when the situation comes up in a larger battle you know better what the outcome will be and what you might need to change in the equation in order to get the result you want.

I've carried that forward through today and still play these micro-games in order to understand how things work. My most recent example was defending against a Soviet Strelkovy company with mortar support in Flames of War. This scenario came up in a recent game, which I blogged here, and as it was the first time I faced such a tactical situation, I was a little put out about what to do, and worse, what to do the next time I faced the same situation. So, the easiest way to approach it was to micro-game it out, running a Strelkovy company in attack and give them (off-board) mortar support.

I started off by costing out the Strelkovy company and mortars. The company consisted of 24 stands (Confident Trained) plus had two PTRD teams and two Flamethrower teams attached. There were six 82mm mortars in support. All of that came out to about 625 points. As this was an attacker-defender scenario, I decided that I could only defend with about 1/2 the points (reflecting that 1/2 of my forces were in Reserve). The first force I ran was a standard German Grenadier platoon with (off-board) 81mm mortar support (from Fortress Europe) and the second a German Gepanzerte Panzergrenadier platoon, without any support.

The setup was simple: the Soviets get the first move, starting 24" away from the Germans, who start in Fortified Positions. The Germans are allowed to move away from their starting positions, but if the Soviets make it to the German start line and the Germans are not within 4" of it at the start of the Soviet turn, it is assumed that the Soviets have reach an objective and the game is over. Loss of the platoon, for either side, also indicates the end of the game.

The goal is not to think that this situation represents exactly a small slice of a larger battle - interactions with other units that may support with fire for a turn or two, or may take over an attack started by a faltering unit, can change the outcome in a larger battle dramatically - but rather that if you cannot handle this basic situation, you probably are not going to be able to handle a more complex one.

Exercise One

The first thing I had to think about was deploying the Germans in their foxholes. I knew I would get a template on me and I knew the end result would probably be an assault by the Soviets against the dug-in and stationary Grenadiers. This raised a question: do you want the Grenadiers to spread out, to limit the effects of the Soviet assault (i.e. teams are not within 4" of assault contact points, limiting who can participate), or do you want them to be closer together? For this exercise I decided that I wanted the German teams to be close enough so they could support one another in assault. I chose the following formation:


The idea is that the front edge of the teams in the second 'rank' are within 4" of the front edge of the teams in the front 'rank'. This would allow the second rank to strike in assault, but limit the casualties of the Soviet first strike to the front rank only. Once I started playing it, however, I also realized that I had to temper that with possible losses from the mortar. Although it is unlikely I would lose anyone from the mortar (needs to hit on a 4+ but can re-roll misses, then needs to fail 3+ save, and finally need to make a Firepower check of 6, so about a 4% chance), if enough teams are under the template then the chances are greater over the course of the exercise. So, my formation looks as follows:


All teams are within 4", front-edge-to-front-edge, but not so close that a straight-on template would hit two teams. (An angled template would hit two, and possibly three, however, but there is nothing you can do about that.)

So, with the German deployment done, it was time to think about the Soviets. If you are choosing the option to equip one platoon with SMGs the basic question is where to place them, in the front rank or the second? The same question needs to be answered with the Flamethrowers, PTRDs, and HMG teams. In this particular exercise I put a rank of SMG teams in front, leaving the Rifle/MG and Flamethrower teams in the second rank, with Command, Rifle/MG, PTRD, and HMG teams in the third rank. The overflow Rifle/MG teams ended up in a partial fourth rank. Each rank was either seven elements wide (nominally a platoon).

In the end I found out that with this force the formation above was not the best, as the SMGs could not fire, given their poor range, as they were approaching the defenders. Also, as the Soviets take casualties, they start to have to bunch towards the center in order to maintain Command Distance. These factors contribute to the second rank sometimes losing the ability to fire, unless the Soviet player is very careful in stand placement.

The plan for the German Grenadiers was to 'turtle' and stay Concealed, Gone to Ground, and Dug-In by neither moving nor shooting and holding fire until the Defensive Fire against the assaulting Soviets. The mortar would be used to pin, and possibly kill, the Soviets on approach. (Although the mortars almost automatically pin every turn, failing to do so only when they fail to range in or get a string of unlucky rolls to hit, the chance that the Soviets will unpin the following turn is 75%, so they frequently just shrug off the effects of the mortar. It does, however, sometimes work, and 50% of the time forces them to kill an additional team to unpin. It all adds up.)

So, starting at 24" means the Soviets receive fire for three turns (at 18", 12", and 6"), unless they get pinned and cannot recover. When the Soviets finally launch the assault they take anywhere from 4 to 15 dice in Defensive Fire, depending upon casualties and whether the German platoon is pinned. Given the Germans' chance to hit is 67%, the average result on the high end is that the Soviet assault will be pinned. The Germans should not expect that, however, unless the mortar has been particularly effective, the Soviet saves particularly bad, the Kommisar particularly ineffective, or the Soviets unable to pin the Germans before sending the assault in.

In my game it was a very close run thing, but the Germans did win, throwing back the first Soviet assault by pinning, and only losing two teams before the Soviet company broke. It is clear, however, that if the Soviets had been following up with another Strelkovy company, even a weak one, it would have rolled over the German line. But, in my mind this showed that given the right circumstances the Soviets could swap a company for a German Grenadier platoon. If that one platoon was all that stood between the Soviets and an objective, then that was not a good result. I would have to find another option for beating the Soviet infantry horde.

Exercise Two

This exercise assumed a few more things, primarily that Winter was not in effect, therefore not penalizing the use of vehicles. This was important because I used a German Gepanzerte Panzergrenadierkompanie, chock full of half-track mounted MGs and MG teams. What is different is that the Germans cannot afford to have a mortar platoon in support, so pinning will be even harder; the Strelkovy company will need 10 or more hits rather than just one hit from the mortar.

The basic German strategy was to stay in the half-tracks, keeping outside of assault distance until they are almost on the objective, then assault the Soviets at a weak point. With five half-tracks, each with a hull MG and a passenger-fired MG, the Germans would be throwing 20 dice a turn. With a 67% hit rate, an average of 13 hits should occur, so the Soviets will likely have to roll to unpin every turn. In addition, about four of those 13 hits should turn into casualties. The Soviets should need about four turns to close – the Germans can stay out of reach about one additional turn due to their mobility – so that should rack up about 16 hits, not counting losses from pinning re-rolls or additional turns due to failing to unpin. This is enough to break the company.

As an aside, one thing to consider is purchasing the Gepanzerte Heavy platoon so you can combat attach the 251/9 (7.5cm) half-track to your Gepanzerte combat platoon. This addition will require the Soviets to make a Motivation check to assault, as it now contains an Armored Tank team.

In the exercise I played, it turned out pretty much as indicated above. The Soviet mortar platoon was able to force a half-track to bail on two separate occasions, but only on one was it unable to immediately remount. Of course, that occurred on the turn the Soviets were within assault range of the bailed half-track, so I dismounted the MG teams and pulled them back, along with the rest of the half-tracks. The Soviets however were pinned by the German MG fire and failed to unpin. The following turn the German drivers, realizing the error of their ways, made the re-mount roll and the MG teams re-boarded. The end came when the half-tracks charged for a mounted assault, with MGs blazing. The Soviet company failed its second turn of rolling for Platoon Morale and despite the Kommisar's urging, missed its re-roll too. So, I did not get to try the German Mounted Assault rule.

So, the Gepanzerte Panzergrenadiers are definitely more adaptable. Being able to use a moving foxhole (of sorts) while still flinging large amounts of firepower helps a lot. The mortar fire still hurts (these are Transport teams, after all, not Tank teams), but as most movement is rearward (all except the first turn) you can almost ignore the pinning effects.

In this game I found out that you should put the Soviet Rifle/MG teams in the front, so they can shoot 1 die per team while advancing, and soak off hits into the SMG teams, the reverse of what you want for the German Grenadiers.

Summary

Again, tactical exercises are a way of trying different ideas without the complications of a full game. By focusing on such a small part of a battle, you don't get distracted by all the unrelated results occurring. You are essentially experimenting on a specific item and gauging the results. It is also a good way to focus on and remember special rules and their effects. For example, I initially forgot that half-tracks are not Tank teams, but Transport teams, and thus the idea of combat attaching the 251/9 suddenly made a lot more sense. (By the way, the mortar half-track fulfills the same role, as it is also a Tank team.)

The best thing of all: these take very little time to run. I ran both of these exercises in the course of a single afternoon. Very little setup is required, and clean-up is easy too. Give it a try.

I would like to hear from you what you think good match-ups would be – something that produces interesting and illuminating results – especially if it is against a Soviet Strelkovy company attacker.

Sunday, June 05, 2011

Sending Them to the Rear

One of the local gamers here (Ira) always keeps his artillery's transports around in games of Flames of War. He would never send his transports to the rear for safety as he would always use them to soak up hits made against his battery. He tended to do it with halftracks, trucks, any transports really, because he felt that a hit taken by a truck was worth the morale loss than a hit taken to an infantry, artillery, or tank team.

It was while I was working through a tactical exercise using Soviet Strelkovy versus everything German that I finally understood why he came to that conclusion. I am not sure his math supported his rationale, but I thought I would pose the issue here, because I think it might answer a few questions people might have about casualties, and their effect on morale.

Platoon Morale Check

So, let's start with the basics: the platoon morale check. Let's say you have eight teams in a platoon; the platoon first checks morale when it has only three stands left, right? Maybe, maybe not. Let's review the rule. It says that when more than half the platoon is destroyed, the platoon checks morale. However, it provides a definition of "more than half" that you really need to examine.

Teams are rated as combat effective or not. Some of what does not count makes sense – bailed and bogged vehicles, for example, are not allowed to move and fire, so don't count as combat effective – but some are less intuitive, such as combat attached teams and transport vehicles that are armed. The basic rule is count the number of combat effective teams remaining versus those destroyed (not simply removed from the table). If the combat effectives equal or exceed the teams destroyed, you are safe from a platoon morale check. So, one can imagine that a unit is divided into four boxes.


Combat effectives are those teams on the board that count in the positive, non-combat are those on the board and count as neither negative or positive, sent to the rear are those off of the board and count as neither negative or positive, and finally destroyed, which are those teams off of the board that count in the negative. In the picture above, the count is 4-0, four combat effectives on the board and no destroyed.

If a combat effective is destroyed, the count changes to 3-1, and would look like the following.


Something peculiar occurs when a combat effective is destroyed: the count changes by two. If you look at the combat effectives as a positive number and the destroyed as a negative, a 4-0 count yields a sum of 4 (4 - 0). However, when a combat effective is lost, the count changes to 3-1, with a sum of 2. That change of a single combat team, from 4 to 2, shows the count change of 2. However, the loss of a non-combat effective results in a change of only one.


Here the count has gone from 4-0 to 4-1. That is because the half-track never counts in the positive (as a combat effective), but counts in the negative when destroyed. So, one could say that Ira was right. The loss of a transport yields an effective loss of 1, while the loss of a combat team yields an effective loss of 2. Losing three transports for example, does not yield a platoon morale check; the score is still 4-3.


But the same three losses, applied to the combat effective teams, makes the score 1-3, resulting in a platoon morale check.


So, Ira is correct, right? Keep your transports around to soak up hits. The loss of each transport yields a net change of 1, while the loss of the combat effective yields a net change of 2.

Exceptions

There are some exceptions, of course, and being aware of what those are, and why they are exceptions, will help you make the right decision on whether to keep the transports around, or send them to the rear.

The first exception to note is that transports and attached gun teams typically do not survive as well as infantry. With both having a 5+ save, and the infantry having a 3+ save, you will lose transports at twice the rate infantry, so there is no real net gain.

The original example, however, was keeping the transports around to save the artillery battery. Again, if the battery has Gun Shields, they still have an additional save that the transports do not, so your losses in transports will usually be twice or more than that of the guns, so from a morale viewpoint you are not saving anything. If the guns do not have Gun Shields, German Nebelwerfers or any of the smaller pieces such as mortars, then the losses amongst the gun and the transports would be the same, so it makes sense to take the losses in the latter.

Loss of Combat Power

Of course, Ira's argument was always about the trade-off of the loss of combat power versus how long before a morale check was required. The loss of transports might mean the battery checks sooner, but while it stays on the board its combat power is undiminished. A loss of a single gun, when it drops the battery strength from 6 to 5 or from 3 to 2, is significant.

Priority Target

All of this, of course, is mitigated by using the Priority Target rule and stating that the priority are guns, infantry, or whatever. Many people forget that rule until it is too late, and they see their shots being soaked up by transports, or worse, into infantry rather than the artillery battery.

However, all of this came up when I was using the Priority Target rule in order to pick off some combat attached, man-packed gun teams from a horde of infantry (yes, they had a Firepower rating of 4 or better) when I was wondering whether that was the most effective use of my hits, and this whole line of thought came about. (Yes, it was better to go after the guns, in this case PTRD anti-tank rifles and Maxsim HMGs, as they had lower saves than the infantry, and thus inflicted casualties faster. But that is when I noticed that I needed to inflict twice the casualties...)

Conclusion

Personally, I stick with my original assessment of sending artillery battery transports to the rear, especially when they are unarmored. It is too easy for my opponent to remember to call Priority Target and hit the battery with the good firepower, then have weaker fire go after the trucks.

The choice is a little harder when it is US Armored Rifles or German Gepanzertepanzergrenadiers that dismount from their half-tracks. The US Armored Rifles can usually always afford to keep a team in the half-track and man the machine guns, as can the Germans, so sending transports to the rear means sending weapons to the rear, in addition to permanently losing your mobility for the remainder of the scenario. Only if I am in a situation where the enemy is anti-tank heavy will I absolutely send them to the rear, once the infantry has dismounted.

Tell me what your criteria for sending transports to the rear. Are you in the Ira camp?

Wednesday, June 01, 2011

Battle of Burtki (Korson Pocket Campaign)

Shawn, Don, and I played a Flames of War game as part of the Korsun Pocket campaign, provided by Battlefront on their website. I got stomped.

The background for the battle is that this is the start of the campaign and the Soviets are attacking, trying to cut off the Germans in the pocket. If enough of the battles go the Soviet's way, they win, whereas if enough go the German way, they win the campaign.

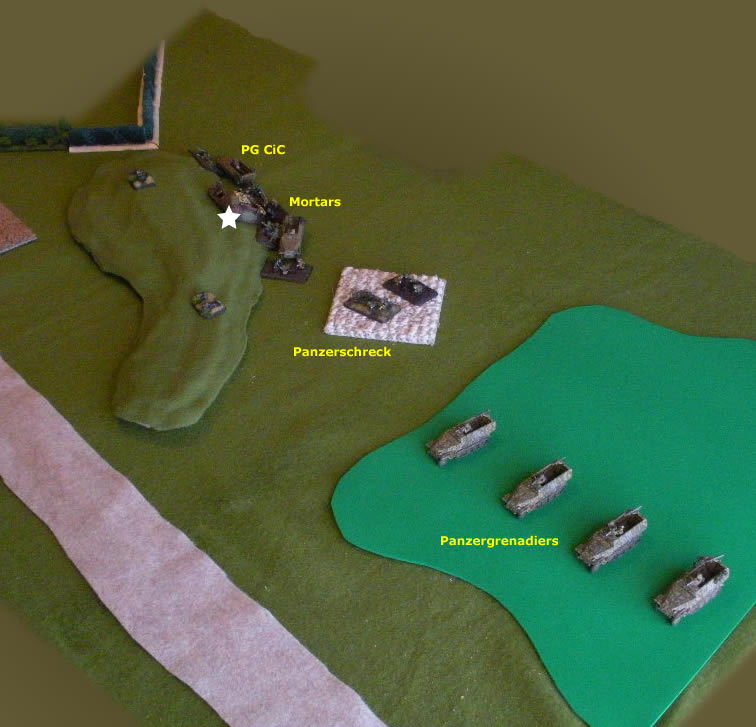
Burtki is a small Ukranian village in the steppes with two small streams running to either side of it. The blue lines are the streams (Very Difficult terrain) with a ford in the center (Difficult terrain) that was only two vehicles wide.

The small brown rectangles represent the village of Burtki. Each building had the capacity to hold one vehicle, one large base, one medium base, or up to two small bases. It would provide concealment and bulletproof cover. As they were all one story buildings, units on the tall hill (dark green area) could see over them, as per the rule book.

The small, light green patches represent fields, which as they are turned, represent Difficult terrain.

Finally, the large green area is a three tier hill, which is very tall and easily hides any vehicles where the line of sight passes through the area for any depth.

The blue lines at the top of the drawing represent the Soviet deployment area. However, due to a miscommunication between the Soviet commanders and their inability to read the scrawling on a German map their found, they misinterpreted the Final Line of Departure and, rather than deploying 20" on from the Soviet baseline setup only 12" on. This put the Soviets on the wrong side of the stream and thus had (in the final analysis) a minor impact on the game.

The red lines at the bottom of the drawing represent the German deployment area, with the light green lines representing the area where the two objectives could be placed.

The Opposing Forces

The Germans (me) elected to run a Sperrverband company for this battle. I was very conflicted about what to take and had developed about five 1500 point lists before settling on the following:
  • Company HQ
    • 2 Panzerschreck Teams attached out to the Pioneers. (Note: I blew my deployment and forgot to put them on the board, so they never showed up.)
  • Sperr Pioneer Platoon
    • 3 Squads
    • Command with Panzerfaust
    • Pioneer Supply Vehicle
    • Minefield
  • Speer Mortar Platoon
    • 2 Mortar Sections (4 8cm GW34 mortars)
  • Veteran Tank Hunter Platoon
    • 2 Hetzers
  • Sporadic Air Support
    • Stuka Ju87D (Bombs)
  • Assault Gun Platoon
    • 3 StuG G
  • Sperr Platoon
    • 2 Squads
    • Command with Panzerfaust
    • 2 HMG Teams
  • Sperr Platoon (as above)
  • Motorized Artillery Battery
    • 3 10.5cm Howitzers
The Company HQ (except for the 2 Panzerschrecks, as previously noted), Sperr Pioneer Platoon, and Sperr Mortars were deployed at the start, while the Veteran Tank Hunter Platoon was in ambush. Only the Assault Gun Platoon made it onto the board from Reserves before the game was called. In the four turns of playing, the German air support showed up in the first two turns, both times with three aircraft. (My luck with aircraft continues to hold.)

I don't have the specifics on the Soviet force, but they were 2,000 points, most of which got tied up by the stream. Of the units the Soviets had, only the following played any role in the battle:
  • 1st Strelkovy Company
  • 2nd Strelkovy Company
  • Tankovy Company
  • Maxim HMG Platoon
  • Mortar Platoon (Large)
  • Artillery Battery (Large)
As this was the first time I ever played against Soviets, or even saw non-Guard Soviets played, I must say it was pretty awesome to see all those stands.

Deployment

The Germans set their objective deep in the backfield, across the river, to ensure that the Soviets could not get to it quickly or easily. Meanwhile, the Soviets set their object far forward and on the German left flank side of the village.

As the Germans only had three platoons they could put on the table, I placed the dug-in Sperr Pioneer platoon in front of the objective and the dug-in Sperr Mortar platoon behind the objective. The Veteran Tank Hunters were in ambush behind the crest line.

The Soviets deployed their infantry on the German left flank side, with their mortars all the way to the back, and the tanks, assault guns, anti-tank guns, and artillery on the German right flank side. Everything was behind the stream, rather than forward of it.

The Soviet plan of attack was rather straight-forward: one Strelkovy infantry company would move forward up their right flank and soak up hits, creating a fire line in the center through which their Maxsim HMG platoon could fire to tear up the dug-in Sperr Pioneers. Both the mortars and the artillery were to bombard the Pioneers for the sole purpose of pinning the troops, with the occasional casualty for good measure. The armor assault was to move up the Soviet left flank, sweep around the hill, and potentially take the rear objective, or failing that, hold off the German reserves.

The German defense plan was for the Sperr Pioneers to hold out until reinforcements, mostly in the form of the Sperr platoons with the high concentration of MG assets. The real problem was that there were just too many good assets in reserve.

Soviet Infiltration Move

The Soviets were allowed an infiltration move (a Reconnaissance Move, in Flames of War game terms) at the end of deployment. As the deployment zone should have been 20" from the baseline, and with an additional 6" to 12", the Soviets potentially could have started 4" (armor) to 10" (infantry) from the limits of the German deployment area, and as close as 12" to 18" from the forward objective. Given that fact and that the Soviets start with all of their force and the Germans less than 1/2, I am not really sure how the Germans were expected to have a chance at winning.

As it stood, however, with the Soviets starting back behind the stream, they started more than 32" away from the forward objective. The Soviet armor got about 4 tanks across the ford before it was clogged with bogged T34s.

Turn 1

The Soviet infantry double timed across the ground, getting everyone out of the river, save for the mortars who continued to support from the rear. The armor sloshed around a bit and approached the village tentatively, calling in artillery fire against a hapless Pioneer team stuck out on their flank. No casualties were incurred, but the Pioneers were pinned and did not recover in their turn.

The Germans cheered heartily as three Stukas swooped in and bombed the Maxsim HMG platoon, inflicting a few casualties and pinning the troops. The Hetzers popped up and fired four shots, killing a single T34. Things were looking somewhat good despite there being a lot of lead facing the Germans, who were not reinforced.

Turn 2

The Soviet infantry continue to move forward, taking a few pot shots at extreme range with no effect. Mortars and artillery continue to fire and pin the Pioneers while the lead elements of the Soviet armor fire upon their foxholes. A few unlucky rolls sees the Pioneers start to take casualties and crumble.

The Hetzers continue to pound away at the Soviet armor, but only one T34 is bailed. In two turns of fire, the rolls to hit are 1-1-1-6 and 1-1-2-6. Hopefully the fire will get better. Meanwhile the Sperr mortars hit a stand or two of charging infantry, pinning them, while three Stukas come in for a second pass, destroying more Maksim HMG gun teams. The Soviets simply shrug it all off. They don't seem to be worried.

Still no German reinforcements.

Turn 3

The Soviet infantry gets in close enough and makes their first assault, which successfully wipes out a number of Pioneers. On the opposite flank the Soviet tanks assault the isolated Pioneers, easily running them over. They survive their platoon morale check.

The Hetzers pound away again at the Soviet tanks and score 1-1-3-6 on their rolls to hit. Again, all it produces is a bailed T34.

Although the Germans did not see the return of their beloved Stukas, an Assault Gun Platoon showed up and charged to the stream, firing at the Strelkovy, who are starting to penetrate the German defensive perimeter around the forward objective. Their fire causes a casualty, but their Stormtrooper move into the stream causes one assault gun to bog.

Turn 4

The Soviets continue to assault forward, clearing out almost all of the Pioneers, and starting to work on the Sperr Mortar platoon. Only the heroic efforts of the Company Second-in-Command beats off the attack. Meanwhile Soviet artillery and massed T34 fire forces both Hetzer crews to bail out.

On the German turn I roll for air support and get none. I roll for reserves and get one unit (my choices are artillery or infantry). I am unable to unpin the mortars or the pioneers, and the Hetzer crews refuse to go back into their tanks. I concede the game as the Soviets are on the objective and I am contesting it with only two mortar stands and two command teams.

Summary

There seemed to be no way to overcome the huge advantage in points the Soviets had. It was stupid to give the Soviets a 4:3 points advantage when I was faced with having to keep forces in Reserve. That made the advantage closer to 8:3, which is simply too much.

The massive numbers of bog attempts made the game somewhat interesting, at least for a short while, but I could see where if you had to do it enough, it would get tedious fast. (See Rules Mistakes below.)

Rules Mistakes

The biggest rules mistake was concerning the campaign itself. I did not realize that there was a campaign system at the back of the rule book called Axis of Attack. Those rules help clarify the material given in the Korsun Pocket document tremendously. Without it, I am not sure you can really play the campaign; certainly not correctly.

So, what were the mistakes? The board should apparently have been covered in snow, which would have made the entire board Difficult terrain (even the streams would have been downgraded from Very Difficult to Difficult). This meant that all armor and guns would have had to bog check every turn they attempted to move. Also, the infantry would not have been able to double time when they did.

I did not realize that the list taken was going to be used throughout the entire campaign. So that means that I need to stick with the reluctant Sperrverband throughout, which could be a pain to deal with. Reluctant Veterans may be cheap, but they are horrible in static defense because they are unlikely to unpin.

Other Mistakes

A big mistake on my part was to fire long-range shots at the approaching Strelkovy. I got a few hits, one or two of which might even have resulted in a casualty, but by losing Gone to Ground the Soviets could hit me on a '5' rather than a '6', effectively doubling the casualties against me and making it easier to range artillery in against me. That hurt! The trade-off just wasn't worth it.

Several times I forgot the Hetzer's Stormtrooper move and thus exposed myself unnecessarily to shots from the Soviet armor. Of course, the turn in which I was hammered by the artillery and tanks I actually remembered to make the roll, but failed. "Anything but a '1'..."

I think the greatest mistake of all was what I started deployment with. The Sperr platoon, with their four MG teams and two HMG teams, would have fared much better in defensive fire than the Pioneers with their Rifle/MG teams (24 dice instead of 12 dice, or 8 dice versus 6 dice if pinned). The Pioneers tank assault never came into play as they were knocked out before they got a chance to counter-attack. Also, Flamethrowers cannot fire in defensive fire, so they were a complete waste. (Point to remember for the future.)

Also, it was questionable whether the Sperr Mortars were the second choice to take. I needed a template weapon and I felt like I needed the availability of a smoke bombardment. Both the mortars and the howitzers gave that capability. I chose the mortars because they would have had to walk on the board, but would not take bog checks crossing the ford or the stream. The artillery would have to take those bog checks, but they would have at least moved further each turn. Even though it probably would have had little effect, the artillery would have been able to direct fire in defensive fire though. So probably should have had the artillery on and had the mortars move and Stormtrooper onto the board.

The final question is whether the Veteran Tank Hunters, which numbered only two Hetzers, were better in ambush than three StuGs. I would have gotten 50% more shots to fire with the latter, but they would have had to withstand the fire of the Soviets every turn, while on most turns the Hetzers could Stormtrooper out of sight after shooting and then move back in with full rate of fire to hit the T34s. It just looked like too good of a set of special rules to ignore. Of course, I could have had the mortars come in with ambush, and left both armored units to come on in reserves, but with no long-ranged anti-tank weaponry on the board at the start I would not have felt comfortable about my survivability.

Lessons Learned

This is always the hardest part: what did I learn from the game. As I had never played against Soviets, this gave me a good taste of just how big the problem is (pun intended). With units of 24 stands and needing 13 infantry kills, trying to break platoons doesn't seem likely. The 3+ infantry save is what makes it so hard, so you basically have to avoid that, and that means assaulting that mess.

My original list was a StuG Battery with Begleit Riders. I need to do a simple paper-and-pencil exercise and see what happens when you have a single platoon of StuGs and Begleits and take it against a Strelkovy company, given both one template weapon in support. Personally I think you would just get overwhelmed, but until you try it out you just don't know.

As it stands, the tactic of the day is to stay gone to ground until the Strelkovy actually assault, him hoping you are pinned when the assault goes in and you hoping you are not. Your defensive fire hopefully produces enough hits to pin the attackers, forcing them to back off.

With the Sperr platoon, assuming you are at full strength and not pinned, you would be throwing 24 dice. Hitting 67% of the time should produce about 16 hits, allowing you to pin them. (Five of those hits should convert to casualties.) The Pioneer platoon, however, would be throwing 12 dice, getting 8 hits, and 2-3 casualties; not enough to pin.

Given the lack of HMGs in the Sperrverband company, perhaps purchasing the light anti-aircraft weapons would have been worthwhile. Food for thought.

Blog Archive

Blog and Forum Pages

Popular Posts

Followers

About Me

My photo
Huachuca City, Arizona, United States
I am 58 yrs old now. I bought a house in Huachuca City, AZ working for a software company for the last three years. To while away the hours I like to wargame -- with wooden, lead, and sometimes paper miniatures -- usually solo. Although I am a 'rules junkie', I almost always use rules of my own (I like to build upon others' ideas, but it seems like there is always something "missing" or "wrong").