My blog about my wargaming activities. I collect a lot of 15mm miniatures for the American War of Independence and so collect a lot of rules for this period. I started miniatures with Napoleonics, so I have a number of armies in 6mm and 15mm figures for skirmishing. I have15mm WW II figures that I use for Flames of War, Memoir '44, and someday, Poor Bloody Infantry. Finally there is my on-again, off-again relationship with paper soldiers that I sometimes write about.

Showing posts with label small space gaming grid. Show all posts

Tuesday, October 17, 2023

Dan Mersey's 'You Command' Series

The 'You Command' Series of Rules

Dan Mersey, who wrote the titles Song of Arthur and MerlinLion Rampant, Dux Bellorum, and The Wargamer's Guide to the Desert War 1940-1943, along with many others, has a series of wargame rules called You Command. They are billed as "a series of light miniature wargames. When you play a 'You Command' game your goal is to defeat your opponent by out-thinking them tactically using the innovative Tactics Chart and then by out-fighting their model army on the tabletop battlefield."

Each of the titles have progressed to a "big battle" gridded wargame where the player represents the top of the command chain, the overall Commander. As such your role is to choose where and how to focus your troops and control the battle's momentum, ignoring the minutiae of unit-level tactics or the exact armament of your troops. (Put another way, a lot of tactical detail is abstracted out of the rules.) The battle is fought out on the tabletop as well as the Tactics Chart. Your focus is on winning at the highest tactical level rather than getting lost in the details of weapon types and armor saves.

Troop types are very broad and dependent upon the period you are playing. (So far they are the Dark Ages Britain, Medieval Britain, and WW II, although the WW II version and the earliest Medieval version is not played on a grid.) For Dark Ages there are four unit types: Mounted, Armored Foot, Unarmored Foot, and Skirmisher. For Medieval he expands it to Knights, Sergeants, Foot Knights, Spears, Long Spears, Warriors, Missiles, and Levy. The troop type essentially indicates two things: its starting Battle Strength; and the special rules that apply to it.

Battle Strength (BS) is the heart of the combat system. A top-tier unit starts with a BS of 5 (+1 if your Commander is attached to that unit), second-tier has a value of 3, and the lowest tier has a value of 2. The BS represents not only the number of hits a unit can take, but its offensive power. In combat the unit will roll a number of dice equal to their current BS. Thus, as units take hits their BS is reduced and they roll fewer dice when they attack. Combat is a simple roll of your attack dice, requiring a 4+ to hit (5+ if they are in cover or a Shieldwall). Note that combat is by area (square) so you add up all of your units' BS values and roll that many dice, counting hits. Your opponent then removes that many BS from their units in the area, i.e. they choose how to distribute the damage. Once a unit's BS is reduced to 0, the unit is removed from the board. (In this regard, it has a very similar mechanic to One-Hour Wargames (OHW). Unlike OHW, however, your offensive power goes down as your hits go up.)

As indicated earlier, the table is gridded with squares, but they are offset. (The author admits that you can use hexes if you want.) As you will see in my test game I used a regular square grid. Although I don't think it matters greatly, it could if there are large numbers of ranged troops involved.

The field of battle is rather small, being 5 rows by 4-5 columns. However, each square must be large enough to contain up to three of your units and three enemy units. So when I played using my homemade 12mm troops, I was using 6" squares as my troops are on 3" x 1 ½" bases. Still, this allows me to use a gameboard as small as 30" square, which is very convenient as my local gaming store's tables are 30" deep.

Terrain in an area affects the entire area, not matter how much of the area it covers. Here is how the terrain breaks down.

Woods and Villages: the defender in ranged and close combat are hit on a 5+, while the attacker is hit on a 4+.

Hills: the defender in close combat are hit on a 5+, while the attacker is hit on a 4+.

Note that the "attacker" is the side that is shooting into the area (even if they are already in that area). In close combat it is the one that initiated the close combat (and thus strikes first). These designations can change from combat to combat, depending upon who initiated the combat.

Also note that a Shieldwall (see later) overrides this attacker/defender difference. When a Shieldwall is employed, both sides hit on a 5+.

Streams, Fords, and Marshland: these areas impede movement. To move out of one of these areas each individual unit must roll a 4+ on 1D6 in order to succeed (failure means the unit stays in the area).

Deep Streams and Deep Marshes: these areas impede movement as indicated for Streams, Fords, and Marshlands above, and affect combat as per Hills.

Rivers: these areas are impassable to all units.

Bridges: count as open terrain across Streams, Deep Streams, and Rivers.

So I have covered all of the basic parts, now let's get to the most important part, command and control, or his Tactics Chart.

First off, the Tactics Chart is period specific. This one is for Age of Penda (Dark Ages Britain), but most are very similar. The 'secret sauce' tends to be in the Special Tactic boxes.

The game has a pretty simple turn sequence. One player has the initiative and is designated as the first player. The first phase is the Tactics Phase. Each player is given two to five tokens based on their Commander's competence. Starting with the first player each place one of their tokens on one of the squares above. You may not choose a square already containing a token, thus there are a limited number of actions you might be allowed. Once both players have placed all of their tokens, the game moves to the Actions Phase.

During the Actions Phase, starting with the first player, they pick up one of their tokens from the Tactics Chart and take the action indicated on that square. Players continue to alternate until all tokens are removed. A player cannot pass by not taking a token, but they can choose not to perform the designated action.

The last phase is the End Phase. This is where you determine if the scenario's victory conditions have been met, and if not, if the initiative changed hands.

The Tactics Phase

Here are the basics for each Tactic.

Seize the Initiative: Because the player with initiative selects tactics first, and plays their action first, having the initiative can be very important when the action gets hot. Is it worth spending one of your tactics token to ensure you get the initiative next turn?

Shoot: this allows you to target one area with ranged combat. Shooting distance is up to one square so every firing unit adjacent to the selected area can fire on it. If the target area contains friendly units, however, only the missile units in that area may fire.

Rally: all friendly units in the designated area may recover Battle Strength. Roll a D6 for each unit and reference a table to see whether you recover 0-2 BS.

Battle: all friendly units in the designated area may attack the enemy in the same area. Once they roll and damage is assessed, the enemy units get to battle back if they were not eliminated.

Move: all friendly units in the designated area may move one area. Units do not all have to move to the same area.

Special Tactic: this is a catch-all for allowing the game designer to add period flavor and specific tactics where he wants to limit the usage. A good example is "Shieldwall", which means that all combat in the designated area requires a 5+ to hit. Another is a "Charge", which is a combination of a Move and Battle in one action. (Moving into an area with the enemy does not automatically trigger close combat. You must play a Battle tactic to initiate close combat.)

Because you are limited to only placing one token in any given square, claiming a tactic also denies it from your opponent. Sometimes you will find yourself claiming a tactic that you cannot use at the moment, but might use in reaction to your opponent's actions, or simply you don't want them to take that action. Good examples are "Rally" and "Seize the Initiative", which only have one box each.

The Actions Phase

As with the Tactics Phase the Action Phase starts with the first player using one of the tactics tokens. Once that action is fully resolved the second player uses one of the tactics tokens. This continues until all tactics tokens have been used.

These rules do not use the usual rules for activation. A unit can take as many actions as the player has tokens, if he chooses. The player could, for example, select the "Move" tactic four times and then during this phase use that action on the area containing the unit, effectively allowing it to move four squares that turn.

Most actions complete immediately, i.e. you fully resolve it before moving on to the next action. However some actions last through to the end of the turn, like "Shieldwall". There are very few of the latter, however.

Summary

Comparing these rules to something like OHW you can see a lot of differences, despite both combat systems being relatively simple. OHW versus You Command.

  • Activate all units versus only a limited number of units.
  • One action per unit (move or shoot) versus potentially multiple actions per unit to no actions.
  • Close combat occurs automatically when a unit moves or is already in contact with an enemy unit versus being a separate action which can occur more than once per turn.
  • Unit loses no offensive combat power as it takes hits versus direct correlation between damage and offensive power of a unit.
  • I would say one uses freeform movement and the other a grid, but I have long converted OHW (and some players) to a grid!
  • Fixed sized army versus points-based army.
  • Fixed player order versus shifting player order.
  • 1D6 with modifiers for combat versus buckets of dice.
  • Straight IGO-UGO versus alternating unit/area activation.
I am sure there are more, but that is a good start.

Test Game – Age of Penda

Age of Penda (AoP) is the Dark Ages Britain version of Dan Mersey's You Command series. It was published in 2021 and follows Scottorum Malleus and Scottorum Malleus IV, both Medieval Britain versions in the You Command series. (The other two in the series are Armour Storm (WW II) and Arrowstorm (Scottorum Malleus updated).)

First let me state that I did not play it straight. (Bad Dale!) I did not make a gridded offset square gameboard, but simply used my 6" square grid gaming cloth. I don't believe it made a difference, but I will discuss why later.

Secondly, I did not have enough troops for a 'standard' sized game – 80 points – suggested by the author. Mine was smaller at 60 points. (There was a 20 point option I could have selected for both sides to fudge it, but that just seemed silly.) I honestly don't think this made any difference. The author indicates a game is typically 6-12 units, and both sides had the minimum count.

Thirdly, I had no missile troops. In AoP the only troops that can normally fire are Skirmishers, and I did not have any made yet. I do have 15mm DBA Dark Ages armies that I could have used, but they do not mesh well with my 12mm wooden troops, so I went without shooting. Because of this lack of shooting I don't think using a normal square grid affected play. Only shooting combat take place from area to area, so an offset grid means a unit can be attacked from six adjacent areas. Given that the enemy is likely to be coming from your front that is more realistically only from two adjacent areas. But a normal square grid means attacks can come from eight areas, or three from the front. So I can see where this difference could be significant. All future games will be on an offset grid, as the author intended.

The Scenario

Come on. Kill the enemy, of course. Per the rules an army with 6-7 units routs when it is down to two Warrior units or less, while all larger armies route when down to three Warrior units or less. (Note that only Skirmisher units are not counted as Warrior units, and neither side had Skirmishers.) So the Normans lose when two units remain and the Anglo-Saxons at three units remaining.

The Map

As it so happens, all of my randomly rolled and placed terrain ended up on the edges. The hill did come into play, however.

Turn 1

The Normans started with initiative as they had more mounted and skirmisher units than the Anglo-Saxons did (3 to 1). I placed the tactics dice as indicated in the figure below. (Normans will use white dice and the Anglo-Saxons green dice. The number of pips indicate the first, second, third, and fourth placement if you are curious, but have no significance in the game.)

As it was the first turn I did not really care if the Normans retained the initiative. However, as I was pondering the Anglo-Saxon (hereafter referred to as 'AS') placement, I thought that them seizing might allow them to control the Tactics Chart (TC), as that is when combat will likely begin. Further, by grabbing the Battle tactics, if the Normans did engage on the first turn, the AS might be able to strike first. Finally, if there were casualties, the AS could recover with the Rally tactic. Then again, if no combat occurred it would not be much of a loss as the AS intended to keep their right flank anchored to the hill.

The Normans begin with a Special Tactic called "Rush", which allows mounted and skirmisher units in one area to move two squares rather than the normal one.
The AS spend their Seize the Initiative token and calmly wait. The Normans move their Foot forward.

The AS see that the Normans still have one Special Tactic available, so they could do another "Rush" with the mounted units. They decide to burn one of the Battle tactics as they continue to wait.

The Normans do indeed "Rush" with their mounted units, moving two squares to be in the same area as the AS cavalry. Note that close combat does not automatically occur just because the units are in the same area as the enemy.

That said, the AS play Battle so that they can attack first, before any Normans can battle back. The AS have a BS of 5 and thus roll 5 dice looking for a 4+. They score 3 hits. This lowers the Normans BS from 16 to 13, so they only roll 13 dice in return, also requiring a 4+. They score 3 hits also. (Ouch!)

Note that when the Normans took the three hits they could distribute the hits amongst the three units however they wished. As I learned later, you never want to reduce a unit to 0 unless absolutely necessary as the unit is removed and cannot be rallied.

The Normans used their last move to advance the foot troops. The AS tried to Rally the cavalry, but did not succeed. The AS cavalry is badly damaged having only 2 BS remaining.

Turn 2

With the AS having the initiative, here is the tactical play. The AS want to retain the initiative, so that is their first play. The AS were also able to lock up all the Special Tactics and one of the Battle, but at the cost of not getting a Rally. They could have gotten a Rally, but as the cavalry is so outnumbered it did not seem worth it. However, they could have taken it to deny the Norman cavalry a change to recover. I am already liking the impact that a player's decisions have on play. They are meaningful and impactful to the game's results.

The AS decide to use their Battle against the Norman cavalry. It may not be much, but at least they get to strike first. They inflict one hit before the 12 dice in return obliterates them.

The Normans move their foot troops forward, sending one unit up on the hill to check the two AS levy units there from making a flank attack against the advancing Normans at the base of the hill.

The AS foot, see the victorious Norman cavalry rout the cavalry covering their flank, use a Special Tactic to "Form Shieldwall!". Note there are special rules that dictate whether a unit can form shieldwall, such as there being no mounted or skirmisher units in the area when it is formed. From that point until the end of the turn, all combat in this area requires a 5+ to hit. (As an aside, I got this incorrect initially, thinking that only the units in shieldwall benefit from the 5+ cover, but that is not the intent. All combat slows down when the shieldwalls go up.)

The Norman cavalry uses a Move tactic to enter the area with the shieldwall. Combat does not occur yet.

The AS use the Special Tactic "Drive Them Back". This is essentially a Battle tactic but the attacking units get 1 extra die per unit. This allows the shieldwall to inflict 4 hits while only receiving 2 in return. (Although, I am pretty sure I played it wrong, with the Normans hitting on 5+ while the AS hit on 4+. Oh well.)

The Normans used Rally first, then used their only Battle tactic to hit the shieldwall again. With only 4 BS to the two AS units, the shieldwall quickly collapses and the units rout.

Things are really looking bad for the Anglo-Saxons. That said, the Norman cavalry is fairly blown. They have slowly been whittled down by four successive combats. The next units in the AS line are the Warlord and his Huscarls, and they are fresh (11 BS).

Turn 3

The AS still have initiative but this time they want to lock out the Normans, if at all possible. They start by locking down the Special Tactics blocks while the Normans Seize the Initiative and Rally blocks. Once the  AS had taken one of the Battle blocks the Norman had to ask himself, was it really worth grabbing the last Battle? Without moving first there was no one to fight.

The AS have an advantage on the hill, so I decide to try a "Charge" (Special Tactic), which requires that you first Move at least one square, then Battle, all in one action. Note that this is two units versus one or 6 BS versus 3. But, because it is a hill, the attackers hit on a 5+ and the defenders on a 4+. So the weight of numbers did not help much; both sides inflicted one hit.

This convinced the Normans to shift their foot troops from the base of the hill to the top, in order to stop the attack in its tracks.

That freed up the AS Warlord to charge with his retinue against the exhausted Norman cavalry, hitting them for 5 while only taking 3 in return.

The Normans have had enough, so they retreat (and eventually restore some hits with a Rally).

This leaves the Battle on the hill, with the Normans still not finding their stride, despite having the numerical superiority now. That said, the two AS levy units have 1 BS apiece remaining.

This is how the battle is shaping up at the end of turn 3. The Normans have lost no units while the AS have lost three. One more unit and the AS rout. With the levy being as weak as they are, next turn is probably the last.

Turn 4

The Normans desperately need to Rally their cavalry, so that is the first selection. The AS know that if they do not get the initiative back they cannot stay in the game unless they get a Rally, so they need to Seize the Initiative. If they can survive this turn, that is …

Amazingly, the Normans strike first on the hill and … whiff!

The AS levy quickly move off the hill, forcing the Normans to chase them.

The Normans decide to Rally the cavalry first, knowing that the AS are not going to go anywhere. The levy, however, decide to go into Shieldwall, so maybe they can continue to hold on until next turn.

The Norman foot advances down the hill, marching up to the shieldwall.

The final battle occurs and the Normans rout the remnants of the levy, taking only a single hit. With two Warrior units remaining, the Anglo-Saxons army is routed.

What I Messed Up

The two areas that I messed up were shieldwalls and hill combat, both involving modifying the to hit roll in combat.

With Shieldwall all combat in that area, until the end of the turn, requires a 5+ to hit. Both sides, regardless of who initiated the shieldwall, regardless of unit type. I think the justification is that the side with the shieldwall is turtling, so not only are they harder to hit, but they have a harder time hitting. I can get behind that idea.

With the hill (or woods or villages) the idea is that the "defender" is uphill of the attack. But because this area is abstract you need to think of it as rough ground where the one receiving the attack has a temporary advantage. So the attacker is 5+ to hit and the defender is 4+ to hit. But this lasts only through the current action. If they next action the other side does Battle, they are now the attacker and thus they are disadvantaged. It is nuanced. So the battle on the hill could have seen the levy stand their ground there and simply never perform another Battle action, i.e. attack. They would have had the benefit, but would only strike after the attacker. Again, I can get behind this abstraction.

@WargameCulture on Twitter/X mentioned that he thought the use of a non-offset square grid would have an effect on the game. As I stated earlier, I think that would only come into play with ranged combat, but I am willing to move to an offset square grid. I have already started making a dedicated 30" high by 40" wide 'You Command' gameboard to get rid of that question altogether.

Summary

As I indicated in my last blog post, Age of Penda scratched the itch I was trying for with my Saga Lite. It solved the puzzle of tying damage to offensive power, while keeping a simple combat system (bucket of dice like Saga instead of 1D6 with modifiers like OHW). Most importantly, it brought the element of pre-planning a turn that Saga is so famous for. Not only will this series of games find its way onto my tabletop, but you can probably expect an American War of Independence variant called Give Me Liberty, the Hell With Death or some such. I would love to see how a Horse & Musket game, when ranged combat is brought to the fore, rather than being a peripheral element.

The Rating

I haven't done this in a while.

Dramado the rules create tension during play? 4 out of 5

For the most part, combat actions have a 50-50 success rate. But the asymmetry of close combat, where the attacker inflicts damage before the defender battles back leads to more tension than the standard melee where both sides strike simultaneously. One would think that this would also lead to the dreaded 'Alpha Strike' – where one side moves in from outside of combat range, then attacks before the other side can act – but the rules making movement and combat separate actions the norm tends to remove this problem. It can happen, but it is 'special'.

Drama also occurs during the planning stage, not just the action phase, as players try to outwit their opponent by developing a viable plan while in turn denying their opponent their best plan.

Uncertaintyare there enough elements that introduce uncertainty into the game?  3  4 out of 5

The primary mechanic that creates uncertainty, other than combat, is whether you will be able to carry out your plan with the units that you want to act with. When you find that your opponent has taken a tactical option you wanted, can you alter your plan, recover, or will this turn simply be a wasted turn?

The fact that the rules intentionally abstract away so many tactical elements – facing, outflanking, enfilade, etc. – it takes some of the uncertainty from combat. What uncertainty in combat that there is, is due to the randomness of the dice.

Engagingdo the rules allow the player to make meaningful decisions that lead to consequences? 5 out of 5

The meaningfulness of your actions start with the planning, where you decide do you want to achieve a plan of your own, or disrupt what you think is your opponent's plan. Do you spend one of your precious action seizing the initiative, which will not help you until next turn?

Then, having set out a selection of actions, the order that you play those actions, and in which areas, definitely can be meaningful. Should you delay your troops attack to rally first? If you do, they may form a shieldwall, blunting your chances of routing them in a single round of combat.

Unobtrusivenessdo the rules get in the way? 4 out of 5

No. The rules largely make sense. You likely will make a mistake or two in the beginning, but that is only because these rules are so different from what you probably play normally. We all 'read into' rules and how that is interpreted is largely a function of the rules we have played in the past. Once you understand what was abstracted away from the game, and justify why they rules are 'correct', it will be easier to play.

Heads Upare the rules playable without frequent reference to a quick reference sheet? 4 out of 5

Other than a few specific wordings that I re-read during the game, the only time I referenced the rules consistently was to read the options for the Special Tactic. Once you have played enough games, you will likely not even need that. However, the one area that you may find that you keep referencing is the unit roster. Every unit has 1 to 6 Battle Strength and these get ticked off during gameplay. If you have a system for reflecting a unit's current BS without distracting you then this probably won't be an issue for you. (I used a roster with a single die reflecting the current BS of the unit, placed on the roster, not the table. The dice on the table were to show losses, only for the battle report. I would not normally use them otherwise.)

Appropriately Flavoreddo the rules 'feel' like they represent the period or genre being played? 4 out of 5

Ultimately the period flavor comes from the unit types you can select and the options available behind the Special Tactic tactic. Age of Penda provides 8 different options, of which you are supposed to only choose four. Arrowstorm provides another 10 options, some of which overlap AoP. Armour Storm naturally uses a completely different Tactics Chart, given the emphasis on armored warfare.

Both AoP and AS provide army lists, with their corresponding Special Tactic choices. At this point it would take a lot more game play to be sure that the games would have appropriate period flavor, but it seems like it would. I know that I intend to push this back to Ancients and forward to Horse & Musket, so that should indicate a belief you can build that flavor into it, around the game's core mechanics.

One final note: the author indicates that some of the core rules might change slightly to reflect period differences. For example, in AoP a unit can move out of an area that contains enemy units, whereas in AS they cannot.

Scalablecan the rules be scaled up or down – in terms of figures or number of units played – from a 'normal' game? 3 out of 5

A standard game in AoP is 80 points, with players getting four tactics tokens. You can opt to have three tokens and spend an additional 20 points on troops, or have five tokens for a cost of 20 points. In general that means that means that you are acting with potentially one area per token (although in some turns, less than that). An area can contain three units and the board is five areas wide at its widest so having more than 15 units at the start means having units start the game off-board.

The limiting factor with a standard game is more about the tokens than how many areas the table consists of. Tokens equals action, so you can have more units and more area to operate in, but you are still only going to move a certain portion of your army each turn.

That doesn't mean you can't create additional rules in order to scale the game. The simplest is to use the old medieval 'battle' system whereby the army is divided into portions with each portion having a separate commander, which in turn could have its own tokens and a Tactics Chart to share with his opposing commander. Think of it as Left Wing, Center, and Right Wing, each having a Tactics Chart and the commanders there having their own forces and tokens. That also provides a solution for team play.

Scaling the board can also happen. In the end having more squares generally means the game will take longer as it will take more moves before the two sides contact.

There are other ideas to explore, like scaling the Tactics Chart, i.e. adding more boxes. Right now I think the chart is pretty well tuned to two players with 2-5 tokens each, so I probably would not change that.

Out of the box, though, these rules have a specific scale intended and the author provides no guidance on changing that.

Lacks Fiddly Geometrydo the rules require fiddly measurements or angles? 5 out of 5

It is a square grid. There are no angles or measurements.

Tournament Tight™ Rulesare the rules clear and comprehensive, or do the players need to 'fill in the blanks'?  4  3 out of 5

Let me start by saying that my preference is towards tighter rules, where everything is spelled out clearly by the author, not looser rules where the author leaves certain mechanics up to the individual players, gentlemen's agreements, and a roll of the die where agreements cannot be found. So a high value means 'tight' and a low value means 'loose'. If you like looser rules, subtract my rating from '6' and that would probably be your rating!

Tight rules are generally required because the rules are complex or not very straightforward. Although I initially misinterpreted some rules it was because I did not fully read the rule or assumed that it was similar to something I had already played, or fit some rationale in my mind. For example, my first read of Form Shieldwall! was that it was formed one side and that side was 5+ to hit and that there no benefit for the other side. Why would the other side get shieldwall benefits just because you formed a shieldwall? Once you realize that a shieldwall creates a benefit and a penalty, it makes more sense.

Fewer and simpler rules make for tighter rules and fewer arguments. Using a grid also makes for fewer special case rules, as does abstracting away thinks like facing, flanks, formations, and so on.

Solo Suitabilitydo the rules have elements conducive to solo play? 3 out of 5

There are no hidden elements to the game so that alone usually grants the rules high solitaire suitability. The three decisions that need to be made are: what choices will the non-player commander choose on the Tactics Chart; what order will actions be played; and which area will benefit from the action being played. The rules in the You Command series answer none of those questions so a solo player will be forced to develop his own mechanisms to answer these question. This is pretty standard with miniatures rules, thus garnering its average rating.

Component Qualityare the components provided made with quality? 3 out of 5

I am not aware of whether these products can be purchased as books, but I purchased mine as PDFs. There is no hyperlinking of the table of contents to pages. The graphics are functional but minimal (which for me is a good thing, making it printer friendly). The layout and text is easy to read. All very standard to me.

Recommended.

UPDATE: I have changed the ratings for Uncertainty and Tournament Tight™ Rules. This is explained in my next blog post.

Friday, November 18, 2022

Attended MillenniumCon 2022

Now that I am retired, I can finally travel without feeling like I have to rush. Well, at least the reason for rushing has changed. It used to be that I needed to get back to work and now it is that my wife needs to get back to work! Equality, baby!

The original goal was to go to Fall-In 2022 in Lancaster, PA – a mere 2,200 miles/32 hour trip, each way – and make it a road trip across the U.S. but too many things fell through. I was going to combine the trip with a visit to my father, who was 94 at the time, but he passed right after I got out of the hospital. So we decided to wander around the West before heading to MillenniumCon 2022 in Round Rock, TX.

We started from home in Huachuca City, AZ and headed for the Apache National Forest to stay in Alpine, AZ, making it in after dark. From there we stopped at Chaco Culture National Historical Park where they have a number of cliff dwellings of the Pueblo people. When you think of American Indians (Native Americans, if you prefer) you tend to think of Hollywood's depiction in Westerns, but Chaco dates from AD 900 through 1150, well before what we think of as American Indians after the American expansion.

We did not stay there – there is really nowhere to stay as it is in the middle of nowhere – as we were on the way to Durango, CO. We had a timeshare unit there so it was really comfortable, but we were there for the Durango Train. Unfortunately the trains do not run for the first two weeks in November as they switch from the Fall to Winter theme and do maintenance on the trains. Guess when we arrived! Not only that, the museum is closed too!

To make up for that we decided to take a side trip to Mesa Verde National Park. This is another Pueblo culture site, dating from AD 600 to 1300. It was a beautiful drive and when we got to the top we found the museum … closed for renovation! I was feeling irritated by that until I heard another guy remark that this was his fourth time to Mesa Verde and every time he was there it had been closed for one reason or another, so I did not feel quite as bad.

My wife wanted to see Meow Wolf in Santa Fe, NM so we headed there next. Basically it is an interactive, experimental art project that you walk through with room after room of different themes.

My wife has also wanted to take me to Carlsbad Caverns National Park in NM and we finally went. Unfortunately, the bats were already gone for the season so we did not see them. But trust me, after walking 1 ½ miles in a cave more than 750' underground in a very humid 57º, the last thing I wanted to do was come back and watch bats in low light (as the come out/come back from hunting).

With those adventures under our belt we were getting close to the start of the gaming convention, so we made a dash for Austin, TX, which is a short drive from where the convention was being held. We stayed at a Wyndham timeshare downtown, was held hostage by salespeople, and eventually given a $150 gift card and promptly spent it on a very nice dinner at a posh place.

With my wallet screaming Uncle after buying yet more timeshare points it was off to Round Rock, TX for MillenniumCon 2022. We stayed there through the weekend then headed back home, stopping only to sleep in Van Horn, TX. Whew!


MillenniumCon 2022

This is definitely a smaller convention, as far as U.S. gaming conventions go. There were about 1-2 dozen games going on at once. What I had not realized is that there was a section to sign up for games before the convention started. When I got there and saw all of the sign-up sheets, they had all of the player slots full, some even with the stand-by slots full! I basically could not sign up for a game and be assured of a spot unless it was in one of my gaming buddy's games. (Not because his games were not popular, but rather because he would make a spot for me.)

My buddy is a real fan of Two Hour Wargames (THW) rules and he has been trying to refine Morale Napoleon (MR) and All Things Zombie (ATZ) for some time now. I think ATZ is in a good place now – it feels very episodic – but MR is closer to THW's old school 'wargame' designs rather than the newer RPG-lite designs. I promised him I would help him playtest any ideas he had and we played about six games of it. I think it is a better design now, by far, but think it still has some testing necessary, by people other than us.

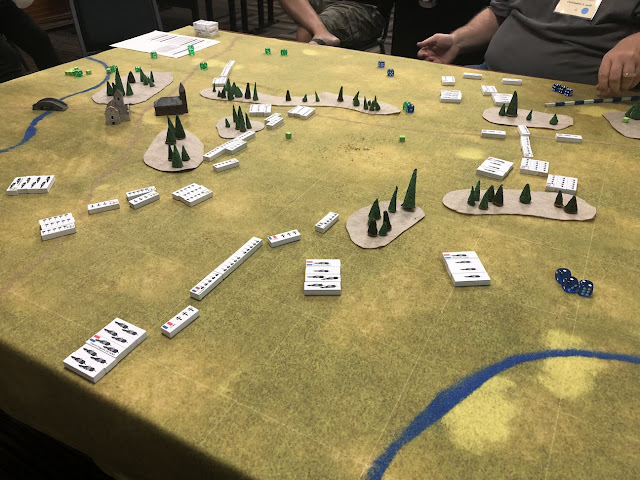
A game of Morale Napoleon in progress.

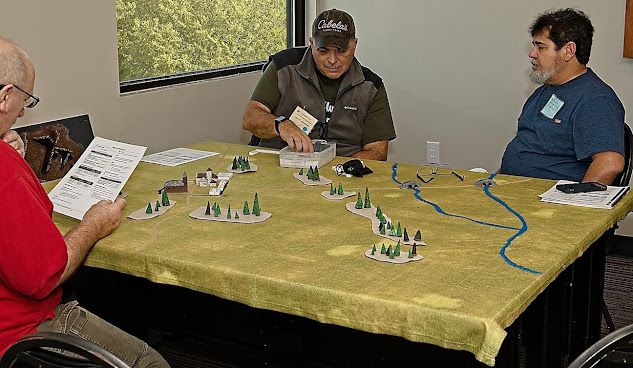
One of the games of Morale Napoleon that I did not participate in.

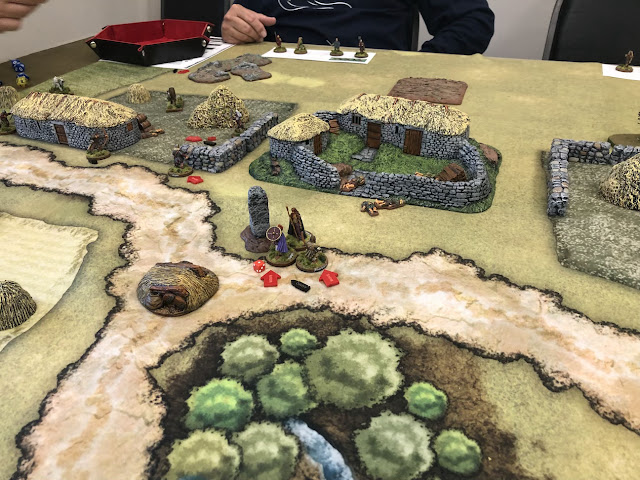
One game that I did play in that was a standout was Raid on Downly Green put on by Faron Bell and his son, using the rules A Fistful of Lead (FoL) and the supplement Might and Melee, both of which I have been experimenting with of late. The scenario takes place in late 9th Century Britain and raiders are attacking a village to steal their treasure and capture their Witcher woman. I was on the raiding team – in fact I was playing the raid leader – and we ended up slaughtering the defenders. We did not get the treasure, but we did get the Witcher woman, in addition to wiping out ⅔rds of their force, by the time the game was called.


Why this game was a standout was definitely because FoL is a great set of rules for convention games (easy to teach, element of suspense) and because the figures and terrain used was outstanding. It almost made me buy 28mm terrain at the vendor booths!

My leader drags the Witcher woman away to the longships.

Speaking of vendor booths I tried to limit my purchases to terrain, rules, and scenario materials, but failed in some instances. I did not find any rules whatsoever that interested me – I was hoping for an old cardboard box filled with old rules – but I got one very interesting book filled with scenarios on the War of 1812 between Great Britain and Canada and the U.S. I look forward to converting them to other rules, probably Tin Soldiers in Action and One-Hour Wargames for mass battles and Fistful of Lead and One-Hour Skirmish Wargames for skirmishes. Unfortunately, there was little terrain for 15mm other than Battlefront terrain for Flames of War, which I have plenty of. There was a lot of laser cut MDF terrain, but all of it was 28-32mm. I talked to the guy about that and he told me that he used to make models for 15mm, but they just did not sell. Further, he does not sell the digital files so you can cut your own. So all I walked away with were three books, one paint set, and some miniatures I regret buying and will probably end up selling.

I also got two more games of Tin Soldiers in Action (TSIA) in, playing the classic scenario Hook's Farm (from H.G. Wells' rule book Little Wars). The first game I was attacking and was absolutely slaughtered, so no pictures of that! The second scenario, however, I was defending and it turned out quite different.

Justo delayed coming onto the hill until turn two. This allowed me to press forward with my infantry and defend in depth.

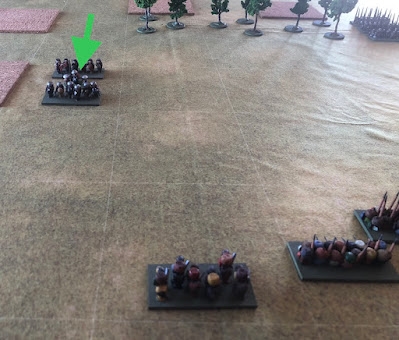
You can see Justo's cavalry in the lower right corner. He snuck around the flank, but lost the draw of the cards and my cavalry switched to counter his move and I decided to pull my artillery out of the line and canister his cavalry.

This next picture shows Justo's beaten cavalry turns later. My cavalry charged him and forced him to rout. It then turned around and made a desperate charge at his artillery (with supporting infantry no less) and ended up overrunning them against all odds.

When the sun went down I was still in possession of Hook's Farm with units that had been severely mauled by his infantry and artillery fire. Again, this was a very different game from all of the others I have played with artillery chasing cavalry to canister them and light cavalry charging artillery and actually pulling it off.

One of the reasons for the renewed interest in TSIA is that I have been corresponding with the author, Rüdi, and he has new rules to cover from ancients to modern era (and beyond?) and he wanted us to reacquaint ourselves with the rules before attempting his Hastings scenario. More on that later.

Ironically, I took a few pictures at the convention, but it was mostly of the terrain boards and not of the games in progress. Also interesting is when people come up to a game in progress and look, but rarely ask questions, even when you attempt to engage them. The one exception, for me, was when Justo and I were playing TSIA with these handmade wooden figures. People did not care about the rules or the scenarios, but the miniatures. They are such a curiosity these days, especially when people are now 3D printing whole beautiful armies and here I am gluing beads together and painting them. I have never had anyone criticize them either, and you know how some people can be, pointing out that "…you have only painted five buttons when the 1812 uniform had six!" The 'harshest' comment I have ever gotten was 'it seems like it would take so much time to make them' or 'I could not paint something that small'. No one has ever refused to game with them nor made fun of the cartoonish terrain I use (which is strangely appropriate for the figures). (By the way, I used my laser cutter to cut out those board and score the grid on them.)

I have long realized that this, wargaming, is not a single hobby, but multiple ones. For me, I continue to like to make my own minimalist figures with large heads and small bodies.

Saturday, April 09, 2022

Campaign to Battlefield and Back Again

 Last week I finally got enough of the preliminary work done on the Map Campaign – refer back to that post if you have not read it already – that I was ready to game out the first tactical battle. Unfortunately, because Westonia caught Eastonia flat-footed, it is not going to be much of a battle, given it is ten companies versus two. Nonetheless, one goal of this campaign was to create scenarios that I would not normally concoct when playing face-to-face, such as uneven battles and, well, this was about as uneven as it was going to get. Nonetheless, I did not want to throw troops away. So I needed a way to fairly deal with a situation where troops might want to voluntarily retreat from engagement.

In the campaign played on They Joy of Wargaming (TJOW) YouTube channel, he generated the tactical map of the tabletop – influenced by the terrain on the larger map where the engagement took place – then used each side's Commander's Competency Rating (CCR) to determine who had the tactical advantage, and thus could pick their baseline (with their opponent generally getting the opposite side). From there I would play the battle, but if a side wanted to voluntarily retreat because of their position being untenable, if they could roll their CCR or less on a D6 (rolling every turn), they would have the option to retreat off of the board.

As I indicated last time, I was still trying to figure out how to move from the campaign map to the tabletop and back again. Primarily, because I could be dealing with very few troops, which rules would I use that could deal with something as small as ten companies versus two, to 5-10 Regiments per side? Playing One-Hour Wargames (OHW) was pretty much what I decided upon, but how to scale up and down.

Modeling Campaign Units in OHW

The Solo Wargaming Guide (TSWG) uses Regiments of five companies, so I decided to equate that to one full-strength (15 hit) unit in OHW. Initially I was going to allow the use of independent companies on the battlefield, but decided against that, as it is against the spirit of the OHW rules, in my opinion. All companies of the same type must be consolidated into Regiments. Regiments not at full strength will have fewer than 15 hits. That said, not all unit types are created equally in OHW.


In the Horse & Musket period rules there are four unit types: Artillery, Infantry, Skirmishers, and Cavalry. Two of the four unit types – Infantry and Cavalry – equate to the Regiments of Line Infantry and Regiments of Line Cavalry, respectively, that are listed in the campaign's force rosters. An Artillery unit equates to an Artillery Battery in the campaign. This only leaves the companies of Light Infantry and squadrons of Light Cavalry to model.

In OHW the Skirmisher unit type is pretty weak. It has 15 hits, has cover benefits when in terrain, and moves faster as it represents unformed infantry not constrained by formation and 'dressing the line'. One important note that Neil Thomas makes is "Units of Skirmishers are only half the size of close order foot, and their musketry is correspondingly less effective." An OHW Skirmisher unit is thus 2 ½ companies in size, not five companies. So now, this give me a tactical choice: I can either run five companies of Light Infantry as a Regiment, which in OHW is an Infantry unit of 15 hits, or as two Skirmisher units, each of 15 hits. (The extra hits reflect the inherently lower casualties that skirmishers take due to their dispersed formation and the ability to use lesser cover not typically reflected on the tabletop.)

So, the Light Infantry is now modeled, what about the Light Cavalry? I decided to allow the same sort of options: they could either form up into five squadron-strong Regiments of Cavalry or 2 ½ squadron-strong Skirmisher units. Yes, I am going to allow a mounted Skirmisher unit. It will fight exactly like a normal Skirmisher unit – including the ability to fire (while mounted) – but will have a 12" move as Cavalry units do. Does that make them better than normal Skirmishers? Yes. The reason I will not downgrade them in some way is because I do not want to add any additional rules, and because their numbers are constrained by the campaign itself.

Conversion to OHW Units

As stated above, Regiments of Infantry and Cavalry consist of five companies/squadrons, which nets them 15 hits in OHW. For every company or squadron short the unit loses three hits in OHW.

For Skirmishers, however only 2 ½ companies/squadrons are required. Given that everything in the campaign is modeled as whole companies, how do I model the ½ companies? I don't. If a Skirmisher unit only has two companies (80% of 2 ½), it will be a Skirmish unit with 12 hits (80% of 15 hits); a one company Skirmisher unit will have 6 hits.

Conversion Back to Campaign Units

With 15-hit Infantry and Cavalry units, for every three whole hits lost – whether permanently from deaths or temporarily from wounds – the unit will lose one company/squadron from the campaign. With Skirmisher units, they lose one company/squadron for every six whole hits lost.

For units that have fractional company/squadron losses, I will use dice to determine if the company/squadron is lost, e.g. an Infantry unit lost five hits, resulting in the loss of one company (3 hits) and a fractional loss of another company (2 hits). I roll a die for the fractional loss and on a 1-4 (D6) the company is lost while on a 5-6 it is not. This should help alleviate some bookkeeping, requiring only the tracking of companies and types and not of men.

What do you think?

Please note that I have started using Amazon affiliate links for any Amazon product I feature in my blog posts. You don't have to use them, of course, but anything Amazon gives me does not affect the price you pay, so using it contributes to my caffeine-fueled blog posts' funding.

Wednesday, March 09, 2022

Abstracting the Battlefield

Abstracting the Battlefield

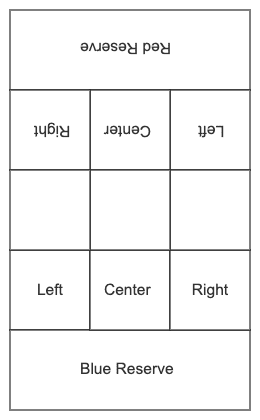
Recently I noticed an increase in the number of blog and Facebook posts about '3x3' gaming. Wondering what it was I did some more research and found that it is basically abstracting the battlefield away into a square gridded battlefield of 3 squares by 3 squares (hence '3x3'). Actually, it is slightly more complex.

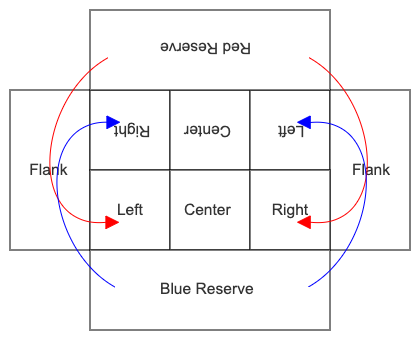
As you can see in the diagram above, the board is comprised, by row, of you side's Reserve area, your baseline, the center 'no-man's land', your opponent's baseline, and your opponent's Reserve area.

The board is further sub-divided into a left flank, center, and right flank. This effectively makes nine separate positions where units can maneuver and fight one another. All area terrain would be contained within a grid, thus defining the terrain for all of that particular grid location; there would be no areas within a grid where units would be 'in' the terrain while others were 'out'. Linear terrain would generally take the form of being 'on the lines' between areas.

The reserve areas are considered off-board and touching the left flank, center, and right flank of that side's baseline row.

Generally movement is simplified to foot troops moving one grid orthogonally (never diagonally) and mounted, fast, or vehicular units moving two grids. Close combat occurs by moving into the enemy's grid, small arms ranged combat is one grid away (again orthogonally), and longer-ranged weapons two or more grids away.

Although these boards are represented as a grid of squares, I consider this more of an area movement game than a square gridded game, but that is me.

The more I thought about this 'new' style of game, the more I realized that I had played it before, more than two decades ago. The game was called Dixie and it was a card-based wargame put out by Columbia Games. As a game Dixie was simple, but fun, but what hurt it was that Columbia Games was trying to capitalize on the collectible card craze that Magic the Gathering had started and had produced randomized decks, making it more expensive to collect the whole series. (They later realized the error of their ways and produced full sets people could buy, but I think it was too late by then.)

Dixie came out with three versions, each representing a different battle in the American Civil War, but all followed the same basic rules. The image above shows the abstract battlefield that it used. You will note the similarities to the 3x3 format. The primary difference is that there is no 'no man's land', or middle row. Each side goes straight from its baseline to the enemy baseline.

Dixie did add an advanced rule that allowed a player to make a flanking attack, moving straight from the reserve (the player's card hand) to the enemy's left and right baseline area, but these flank positions were not proper areas where units were held; it was more of a visualization to help you understand how a unit could go straight from the reserve to the enemy's baseline.

Another game that drew upon this concept — and gave credit to Dixie as inspiration — was GMT Games' Sun of York, also a card-based wargame, only this representing the battles of the War of the Roses.

As shown in the image above, this has been the most 'complex' of the designs to date (that I am aware of). It is similar to the 3x3 model, having three rows and three columns, along with a red and blue reserve, but also having separate red and blue flanking positions. Further, the flanks contain units and those units can push into the enemy flank positions. (No combat occurs on the flanks, however.) As with all other formats, you can never push units into the enemy's reserve area.

Conceptually, I think I actually like a mixture of the Sun of York and Dixie models. I like the single flank areas of Dixie, but I prefer them to be actual positions where units are posted. The archers in the woods at Agincourt come to mind. I do prefer the 3x3 grid for the main battle area that both 3x3 and Sun of York share. I am not sure why 3x3 does not account for flanking attacks. Perhaps because it envisions itself as being a portion of the total battlefield while both Dixie and Sun of York are reflecting the entire battle?

Another element that might define the scope of the action is the stacking limit applied to each cell of the grid. I think most players allow only two units in the 3x3 model while both Dixie and Sun of York allow four (plus Leaders).

Representing Campaigns and Battles

Recently I started playing Marvel United (MU) — a superhero versus supervillains game — with my wife (she has taken pity on me while I am still recovering from foot surgery and cannot go out and game with others) and it also abstracts the battlefield. If you think about the storylines in comics it is generally a series of battle vignettes in various locations between the superheroes and the supervillain's henchmen, with an occasional short fight between the superheroes and the supervillain before a final big fight between them that generally (hopefully) ends in the supervillain's defeat. MU models that by making each area of the map a different location where battles can occur, with each location not being broken down any further as these are not mass actions but rather skirmishes between a few people on each side.


Characters move around the map (shown in the image above) from location (six large squares arranged in a circle) to adjacent location, clockwise or counter-clockwise, with some characters able to move to any location due to their powers (typically flying) or equipment, fighting the opponents found there. Once enough missions have been completed (defeating thugs and henchmen, rescuing civilians, performing heroic tasks, etc.) the final battle can commence and the superheroes can start dealing damage to the supervillain. It is a very interesting game model that I will be reviewing on my Solo Battles blog at some point, but I think it shows an innovative way to reflect the cinematic battles that occur over time, but not the same location.

Summary

Games like these allow players to quickly fight battles and get to a decisive result very quickly, minimizing the fuss and muss generally required with rules that have players carefully measuring movement and ranges, changing formation, and jockeying for position to optimize tactical effectiveness. In these games simple rules determine how units within an area face off and combat one another. The most optimal formation is considered to be automatically used by the unit commanders (which you are not; you are the overall commander), so all such details are abstracted away.

If you like these sort of games, they not only allow you to get into and resolve them very quickly, they are often designed to be gamed in a smaller space, such as a folding table. I personally like them because they also allow you to stay seated for most of the game, much like a board game does. But that is because I am an old man who will have back pain by the end of a multi-hour gaming session.

If you have seen other format of these area-type game boards, let me know. I know that the AWI miniatures rules that I reviewed, The World Turned Upside Down, promised to be an area map battle game, and that was what definitely drew me to it initially. Ganesha Games' Of Armies and Hordes is similar to MU in that the areas are more for the campaign and the battle is fought out in that single area location. You could easily combine those campaign rules with something like the 3x3 model to 'zoom in' and fight out the battle once you determine which area on the map the conflict occurs. (Hmmmm...)

Wargames are Puzzles

Recently I watched a video on how to play MU and the narrator said "Marvel United games are basically giant puzzles. You pick the supervillain that you are going to fight and they have specific characteristics — henchmen, attacks, hit points, ways they can be defeated, victory conditions, etc. — that you look at the determine which team of heroes and tactics you should select to defeat them. That is the puzzle solving part of the game experience." I thought about that and recognized that wargames are effectively the same. They are complex puzzles to be solved.

I know that when I wrote about Tactical Exercises and Micro-Games back in 2011 I was alluding to this idea. When you have the task of taking a house (skirmish) or a town (mass battle game) within a larger battle, the taking of that structure is a puzzle. There is a certain way to approach the task, you need a certain amount of troops compared to the defending force. You run these micro-games performing these singular tasks in order to understand the 'formula' for success.

For example, when I was 13 or so and playing Column, Line, and Square (CLS, a figure-heavy set of Napoleonics rules) I would generally bash my troops against a town trying to take it and always losing. One day an older gamer said "let's just play you attacking a town" rather than playing a larger game that had all kinds of elements, like roads, woods here and there, some walls and hedges, and so on. He said all that other stuff are distractions. "Right now, you need to focus on how to take that one building." So, that is all we had on the board, one building and nothing else. He took some points and bought Russians and I had more points (because I was attacking) and I bought some French. Got slaughtered. Rand it again and still got slaughtered. He said "Why were you slaughtered?" I realized the math of the situation — the minuses I had to contend with for firing at troops in cover — and came to the conclusion that if I truly needed to take the house, I did not have enough troops to overcome the penalties. So we started playing the same game with me getting increasingly more points. Eventually I won and I came to realize that there are some puzzles you cannot solve, i.e. attacking a town in CLS with only a 4:3 point advantage will always result in a loss, so the winning move is to figure out how to not attack the town. After that weekend of playing the same simple battle a dozen times and reaching my Eureka moment, I became a much better player. That was also when I realized that I liked wargames not because I like playing games, but because I like solving puzzles.

The problem with many rules though is that they throw so many variables into the mix, then beat the puzzle right out of the game. Most players cannot work through the probabilities of a dozen turns worth of dice rolls to determine the odds of winning. (I certainly cannot.) Adding other factors like troops defending terrain (-1 to firing for cover), and whether they will even be able to reach that cover before you have a chance to fire (because of variable movement rates) and many rules get reduced to games of chance. Don't get me wrong, I am not saying to remove all elements of chance (although I do play and did review various deterministic rules), but some rules just go to far.

I have talked with a number of gamers, however, that feel the opposite. Whereas I like to analyze games, in fact that is a particularly strong element of my enjoyment of gaming, others tell me that they enjoy more the rolling of the dice and seeing how the battle unfolds. Sure, they like to win too, but if the 'story' was a loss but fun that is far more preferable to a boring win. I have been accused many a time of being too over-analytical and taking all of the fun out of gaming, but that has only made me realize the two general types of players: puzzle solvers and gamers.

What about you? Are you looking for rules that are puzzles or games?

Thursday, March 26, 2020

One-Hour Wargames Scenarios – Filling in the Blanks

In the last blog post Shaun Travers and I played scenario 10 in One-Hour Wargames and it turned out pretty disastrous for the attacker (Red). Although I like to flip the scenario and play it the same way, the way we played it just felt wrong. I do believe that some of the scenarios don't "work" with all periods, but in this case the math just makes it so hard to get the Red Infantry engaged against the defenders who will inevitably will Blue Infantry units. (There is a risky gambit involving defending initially with one Infantry and one Skirmisher, but that is beyond the scope of this discussion.) Basically, it takes turn three to four before Red can engage the Blue defenders. A big problem is that entry via the road is a huge bottleneck. How much of a bottleneck did Neil Thomas really intend this to be?

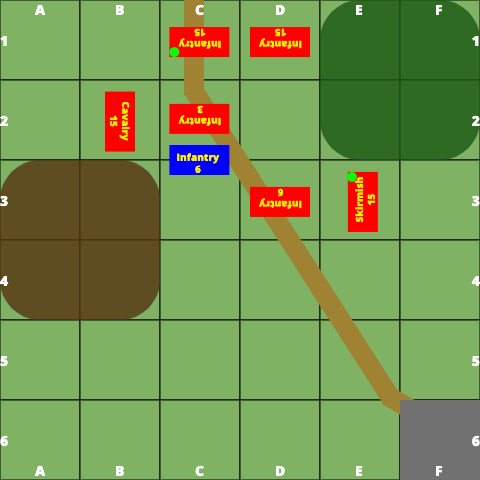
When Shaun and I played the first time we assumed that "entry via the north road" meant that the first square the unit had to move through was C1. This meant that, at best, you were going to occupy four squares on turn 1. (B2 and D2, only if you had Cavalry; C2 if you had Cavalry or Skirmishers; and C1. Basically all of the squares indicated by Red arrows in the image below.) Note that it means that by the end of turn 1, Red would only have one Infantry unit on board, two by the end of Turn 2, etc. Given that the Blue defenders could start in C3 and D4, and could theoretically push into C2 and D2 on their turn (although would be unlikely to do so), they could really jam up Red forces until this first line of defenders was eliminated. As was shown in the last blog post, if they do not accomplish that quickly enough, Blue can reinforce the line such that Red will never reach the town, having to break through two lines of defenders.


So, what's the alternative? Shaun and I talked about the concept of using an off-board square, in this case square C0. The idea is that all of the Red units start in the square north of the northernmost road square, just off board, i.e. square C0. If you did that, the number of squares that you could move to on the first turn are not only the ones with red arrows, but the blue ones too. More importantly, units with a 6" movement can move on and occupy squares B1, C1, and D1. This is three times the number than if you consider square C1 is the first square of movement (red arrows only).

How will this affect the game? Quite a bit.

The Game


Red's first turn looks a lot better than the last game. There are four units on rather than three, two of those being Infantry. (If I had rolled two Cavalry, I would have had another unit on the board too.)


My basic plan is to use the Skirmisher unit to flank Blue defensive line and break it faster. (Interestingly, Ross MacFarlane played the same scenario and had the same force that Shaun had when playing Red, used his Skirmisher to also make a flank run, but to secure the town instead.)

By turn 3 everything was engaged.


By turn 5, Red breaks through the portion of the line closest to the town.


Just in time for Blue to bring on their first reinforcements. Mind you, by this time in the first game it was obvious that these reinforcements could make it close to the original battle line, but Shaun, seeing that I had already broken through, decided not to advance but rather to occupy the town.

Infantry in the Ancient period take 1/2 hits as it is, with defending a town yielding another 1/2 hits. It is going to take some time digging them out. In fact, the only way to win is probably by attacking it from two directions.
As a side note, in square grid combat you have to attack from F5 and E6. If the attack comes from E5 (which is legal) it essentially makes an implied pivot that 'hides' its left and right flanks (squares E7 and G5).
Turn 8 saw the Blue Cavalry charge out and attack the Red Infantry that was attempting to move on its flank. This was a strong move by Shaun because with the Cavalry in E6 and its front facing D5, that puts its right flank in square F5.
Again, that is a quirk of the square grid rules we use, but the best way to look at it is that OHW only allows one unit to attack per face and to get on the flank each unit must have a square in between each attacker. So a unit could be in square E5, but it would not be able to attack the Blue Cavalry.


By Red turn 10, Red had the attack on the town secured. (I am not sure why Red Infantry in C5 is facing South and not West.) The Blue forces coming on can only enter from A6 or B6 and with the hill impassable, they have to go through me to disrupt the attack on the town.


By the end of Red turn 13, the town was secured.


This was a far-cry from the result in the first game (turn 10).


Summary


To me this was a huge difference in the result. The pendulum swung dramatically from "no way for the attacker to take the town" to "no way for the defender to retake the town". All because of the change of a single rule. (Shaun may disagree, but I remember that neither side had better rolls in either game, but this second game did result in both sides having bloodier results.)

I am curious. How do you interpret the rule that "all Red units must enter the board via the road"? When playing the scenario without a grid, you probably use the same method as we used here, which is that all Red units are artificially stacked up on the point where the road intersects the board edge. This is equivalent to the "square C0" concept Shaun and I used.

More importantly, does anyone map out the road march order and penalize the rearward units movement based on how far back in the march order they are?

Blog Archive

Blog and Forum Pages

Popular Posts

Followers

About Me

My photo
Huachuca City, Arizona, United States
I am 58 yrs old now. I bought a house in Huachuca City, AZ working for a software company for the last three years. To while away the hours I like to wargame -- with wooden, lead, and sometimes paper miniatures -- usually solo. Although I am a 'rules junkie', I almost always use rules of my own (I like to build upon others' ideas, but it seems like there is always something "missing" or "wrong").