My blog about my wargaming activities. I collect a lot of 15mm miniatures for the American War of Independence and so collect a lot of rules for this period. I started miniatures with Napoleonics, so I have a number of armies in 6mm and 15mm figures for skirmishing. I have15mm WW II figures that I use for Flames of War, Memoir '44, and someday, Poor Bloody Infantry. Finally there is my on-again, off-again relationship with paper soldiers that I sometimes write about.

Tuesday, December 22, 2020

Review of Hardwired: Cyberpunk Espionage and Mayhem

 I purchased the miniatures rules Hardwired: Cyberpunk Espionage and Mayhem some time ago, along with the expansion The Tsim Sha Tsui Expansion. These are by Patrick Todoroff, who also wrote Zona Alfa for Osprey. The description for the rules are:

Corporate wars, shadow ops, cranial jacks, cyber-augmentations… you’ve been here before. You know how this goes.

A table top war game set during the Corporate Wars of 2069 in the mega-city of New Kowloon.  Miniatures agnostic. 1 - 6 players, Co-op or Solo Mode. Made for 15mm - 28mm miniatures.

Given my last post, you can probably guess where this is going...

Overview

Players have 4 Agents, which can be selected from 5 Specialization Protocols (SPs):

  • Ronin - ranged combat specialist
  • Razor - close combat specialist
  • Splicer - hacker and drone controller specialist
  • Sawbones - medic and support specialist
  • Shiver - psionic

Think of an SP as an RPG "class".

Although Agents can do actions from any specialty (exception: only Shivers can perform psionics), your SP will determine if you get a bonus die when trying to perform the action.

That brings us to the core mechanic, which is that almost every action requires you roll a die and score a 4+ in order to succeed at that action. Want to move? You need to use an action and then roll a 4+ on your die. What to hit someone with your rifle? You need to use an action and then roll a 4+ on your die. Note that there are a few modifiers for most action types. For example, shooting at someone in cover would penalize you with a -2 to your roll.

The second core mechanic is the number of actions you receive every turn. Each Agent starts with one free Move and three Actions every turn. As you become wounded, it removes the number of actions that Agent receives every turn and reduces the dice pool (described later). The enemy forces - called Hostile Security or H-SEC - get a number of actions based upon their Tier level. Tier 1 have one action, Tier 2 have two and Tier 3 have three actions.

The third core mechanic is that each Agent gets a dice pool of a D6, D8, and D10 each turn. These dice are used to determine if you succeed (rolling 4+) at the action you are attempting. So that means you get one action using a D6, one using a D8, and one using a D10. Again, you need to roll a 4+ on that die in order to succeed at the action you are attempting. So if you use your D8 to shoot at an H-SEC, you need to roll a 4+ to hit them, otherwise it is a miss. Note that the Agent's free Move is not an "Action", so it does not need to roll for success (using a die).

The reason you specified an SP for your Agent is because each SP has a bonus for certain actions. For example, the Ronin is a ranged combat specialist, so when choosing a Shoot action, rather than rolling one die (of whatever type selected) the Ronin would roll two of that die type. If either die succeeds, the action is successful. (Nothing special happens if both succeed.)

H-SEC always use a specific die type based on their Tier for all of their actions. So a Tier 1 gets one action using a D6, Tier 2 gets two actions using D8 for each, and Tier 3 gets three actions each using a D10. (Ouch!)

Finally, when it comes to combat and damage, Agents all have 3 Wounds, while all H-SEC have 1 Wound each. A successful attack, whether ranged or close combat, inflicts a single hit on the target. When a target is hit they get to make a Defense/Dodge roll to see if they can avoid the hit. Unavoided hits inflict a single wound. Once your wounds are down to 0, you are dead.

That's the basics of the combat mechanics. The turn sequence is IGO-UGO with Agents always acting first. H-SEC forces get reinforcements every turn, with each wave of reinforcements always moving to cover on the turn of their arrival. Reinforcements escalate in deadliness, with turns 1 and 2 bringing on Tier 1 forces, turns 3 and 4 bringing Tier 2, and turns 5 and 6 bringing Tier 3 forces. (Games generally end after turn 6 is completed, so it forces the players into a sense of urgency to complete the mission and not dawdle.)

Details

So, with the core mechanics out of the way, let's get into the details and how these rules make them "appropriately flavored" for the cyberpunk genre. After all, it is more than just cool figures and gritty terrain.

Skills

Even though each Agent has a Specialization Protocol (SP, i.e. "class"), every Agent can pretty much do everything, except for psionics (which are limited to those characters that have that innate talent). Everyone can shoot, fight in hand-to-hand combat, hack, control drones, act as a medic, etc. It is just that some SPs are better than others at some of those actions than others (as indicated by receiving a bonus die when rolling for success). I feel like this reflects that Agents will have "skill chips" that allow them to perform tasks that "normals" might not be able to.

CAPs

Another representation of "skill chips" are Combat Augmentation Programs or CAPs. These are pre-installed, skill-specific pieces of software and hardware that all Agents have. Again, all SPs have access to all CAPs so an Agent can attempt to use any of them that they wish. Note that activating a CAP is an Action, so it takes time,  uses a die, and you must succeed on your die roll. As with actions, some SPs are better at certain CAPs than others, so when rolling for success they roll two die of the type chosen for the action.

CAPs are divided into Cyber (where a Splicer gets a bonus), Combat (where a Ronin or Razor gets a bonus), Support (Sawbones), and Psionics (usable on my Shivers, which receive the bonus).

Cyber CAPs cover things like infiltrating, shutting down, or asserting control over the enemy network, drones, and cyborgs. It also includes piloting remote drones.

Combat CAPs cover things like targeting software, augmented reflexes, sub-dermal armor, and shields. All means of boosting ranged and close combat attacks or your defenses.

Support CAPs cover adrenal boosts, medical skills to heal wounds, overwatch software, and the ability to give an action to another Agent.

Psionics are limited to Shivers only. They have their own abilities that act as an overwatch skill, a mental attack on enemies that can kill, cause fear, or confusion, and a defense that makes the Shiver harder to target with attacks.

One final note: although every Agent can try any and all CAPs during the course of a mission, each can only successfully use each one once per turn. You cannot, for example, successfully use targeting software twice and then on your third action shoot a target. You can successfully use different CAPs in the same turn, however.

Equipment

Before the start of every mission each Agent can change their equipment load-out. Every Agent has three equipment slots with gear taking anywhere from 1/2 to 2 slots. Equipment falls into the category of Cyber, Combat, and Support.

Cyber equipment are essentially Intrusion Countermeasure Electronics (ICE) called Macros, and assist in infiltrating, overloading, or hijacking targets, or in piloting remote drones.

Combat equipment is either Smart Ammo (better ranged attack), Monofilament Blade (better close combat attack), or Micro-Grenades (two one-use ranged attack with various effects).

Support equipment are either drugs or drones. Drugs can either heal or boost you (but you subsequently crash when the effects wear off).

Drones occupy two equipment slots, so you really have to want one, but it effectively gives the Agents another model to use, but it uses the drone controller's actions, so it is questionable about how useful it is. While controlling the drone the only thing the operator can do is their free Move every turn. Drones basically can, for every action given by the controller: move twice; move once and perform one other action; or perform two actions. So in one regard it is more efficient as you are spending one action by the controller to get two actions by the drone. There are various configurations of drone that you choose from before the mission starts. Each drone has two hardpoints with each hardpoint containing either a D8 weapon, a storage container with grenades and drugs, or Electronic Counter Measures (ECM) that helps everyone's attempts at hacking.

Hacking

Would it be cyberpunk if it did not have hacking?

Any Agent can attempt to hack, with Slicers getting the bonus die. What exactly can be hacked seems to be a part of the scenario. For example, are the doors closed and simply need an Interact action to open them or do they need to be hacked to get them open? Can you hack the network and open them all at once? Are the H-SEC forces organic or cyborg?

All H-SEC cyber-systems have a Security Rating of 1-3, with the higher numbers harder to hack. (Civilian systems are rated 0.) The rating is used as a negative modifier to your hacking roll (again, needing a 4+ to succeed).

It should be noted that everything is networked to some degree and wireless to boot so an Agent can hack without range or line of sight restrictions as long as they are in the mission area.

H-SEC A.I.

Hardwired is meant to be played cooperatively (all players are playing Agents) or solo, so the H-SEC forces naturally need an A.I. or program to operate. The rules they follow are pretty simple.

  1. Engage the nearest visible enemy.
  2. Use cover whenever possible.
  3. Keep attacking until either they or you are dead.
  4. Prevent Agents from achieving their objective.

Pretty simple and straightforward. Play them to the best of your ability while following those rules. Where two options are equal, you can easily roll a die to see which they choose.

H-SEC forces actually all start off the board. Each turn they randomly spawn on two of the four access points defined in the scenario. Each spawn is either 2 or 3 models, of a Tier indicated by the turn. On the turn they spawn they only thing they can do is a free Move towards cover, no activation roll needed. (There is an exception for the final game turn, otherwise the last turn's reinforcements would be useless.)

Scenarios

There is 1 scenario and 5 mission starters (scenario ideas) included with the rules, in order to give you an idea of how to approach this genre as a miniatures game. The scenario, the Seraph Protocol, is a straightforward retrieval mission. "Move in, secure a VIP, eliminate any hostile forces, and exit the area with the asset unharmed." It gives the backstory, forces involved, a description of the mission area, objectives, and special scenario rules (like bring a Slicer to deactivate the cortex bomb in the VIP before you exit out of the mission area with him).

Expansions

The only expansion to date is The Tsim Sha Tsui Expansion although there was mention of a military-oriented (big skirmish?) expansion in a videocast.


This supplement introduces new weapons, gear, and threats, as well as provides clarifications and variants for the original game.

New Weapons

As every agent is considered to be armed with a generic close combat and ranged weapon that have generic combat values, I am glad to see that this did not turn into an exhaustive list of weapons that basically have no real value in game terms. Instead, the author focused on creating new weapon categories that come with their own rules to cover all specific weapons of that category generically.

The first weapon category is heavy weapons. Any and all Agents can carry one, but doing so has both benefits and penalties. Agent Drones cannot carry heavy weapons, although H-SEC Drones can. Rather than firing 18", heavy weapons fire 24". Because these weapons are heavier and bulkier, the model's Move action grants 3" of movement rather than 4" and they can no longer climb sheer surfaces without a ladder. Finally, heavy weapons use a 3" Blast template. If the hit roll is successful, all models touching or in the template must make a Defense/Dodge roll or take two wounds.

The second weapon category is SAD or Short-ranged, Area effect, Direct fire weapons, i.e. shotguns, flechette rounds, flamers, and such. The weapon uses a 3" wide by 8" teardrop template. Everyone touching or within the template must make a Defense/Dodge roll or take one wound.

New Equipment

The new equipment includes Carbon Fiber Armor Plating, Active Mimetic Camouflage, Electronically Activated Adhesive Grips, a Miniature Holo-Generator, Variable Condition Optics System, Full Armored Tactical Suit, a Breaching Charge, a Resuscitation and Rapid-Healing Module, and a Nanite Fabricator. I'll let you imagine what these are, but you can see that now the author has considered armor and stealth a little more.

New Threats

In addition to the reinforcements that spawn every turn you can now face new threats in the form of sentry guns and turrets, surveillance masts, cyber-security nodes (ICE), and improved H-SEC troops using the new weapons indicated above.

Campaign and Missions

Included in the expansion is a mini-campaign of five linked missions. Wounds and Agents carry over from mission to mission, but as always, you can swap out your equipment load-out between each mission. At the start of mission 5 the action escalates, so you get a fifth Agent on your roster. If you lose an Agent there will be a replacement, but it will take one full mission to recruit them, so you will be down one man (for each lost Agent) for one game.

As in the main rules the missions define the forces, constraints, objectives, and any special rules. No maps are provided only descriptions of the environment and terrain.

Final Thoughts

I found it interesting that for an "espionage" game, stealth plays no real role in this game system. Rule systems like Black Ops and Chrome Hammer have stealth as a core game mechanic, but not Hardwired. I can see grafting stealth mechanics from either of those two systems onto Hardwired for a better espionage experience. But that is for another blog post.

Another aspect not touched upon are civilian forces, i.e. scientists, workers, bystanders (if the scenario takes place in public), and such. You can easily devise your own A.I. rules for them (run!), but I was surprised nonetheless.

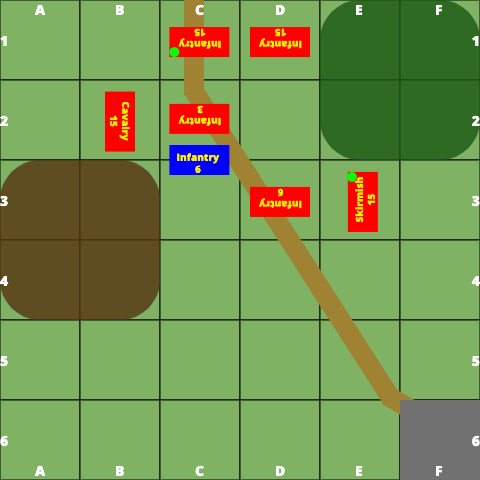
I like simple game mechanics and Hardwired definitely falls into that category. But just because the rules are simple it doesn't mean that there aren't difficult decisions to make. Given that you have six turns and four actions (one being a free Move) for each Agent every turn, this game is like Warhammer Underworlds in that this is all about managing a limited resource (Actions) as efficiently as possible. Given that the standard board size is 36" across and a standard Move is 4" that is a minimum of 9 Move actions if the scenario is to cross the board and exit off of the other side. As you have six free Move actions that means you must spend a minimum of three of your other actions, where success is governed by a die roll. Want to use your D6 to move those three times? Well, that is a 50% chance of success for each of those actions, so you better plan on burning six actions instead of three. That is now one action every turn, in addition to the free Move, assuming you move straight across.

So, Hardwired has no shortage of meaningful decisions for the player to make that will greatly affect gameplay. Also, like deck-building games, the player has to consider their load-out of equipment and Agent SPs. (If playing a campaign, you decide the Agent SPs once, unless you have a deep roster.) Unlike deck-building games, however, the amount of time needed to decide on that load-out is far shorter and can easily be done in a few minutes prior to the game, rather than setting up a card deck the night before the game.

Another aspect of a good game design that I like is not needing to constantly refer to the rulebook. Dice rolls are very easy in that the target number is 4+ and there are very few modifiers. The odds are determined by which die type you decide to throw rather than a long list of modifiers and model characteristics. The one areas where I can see getting stuck on is CAPs, because everyone can use any CAP at any time and there are just too many choices (12, unless using psionics then it is 16) to remember all of the details. Add in combat drugs, ICE, and gear variants on top of that and you probably have more than a few things to refer to. That said, the core of the game is activation efficiency and all of these other things use activations to get bonuses, so after you play a few games you realize that you cannot use these things except when you really need it.

All in all, I like the rule system. If I have any skepticism it is whether I can think up a sufficient number of scenarios that have the right cyberpunk feel.

Sunday, December 20, 2020

Battle Systems Terrain

Like everyone I have been home a little more than usual (but not too much more, given I am this side of a shut-in) and I have been wondering why I have not been gaming as much as I think I would like. The more I thought about it the more I realized that when it comes to gaming, I have been a little too neglectful with the other hobby[1]: terrain making.

For example, I have a lot of Warhammer 40,000 miniatures and have almost zero terrain for it, other than a few generic trees and hills. But that is about it. Most of my terrain is for 15mm figures, and more oriented towards WW II. (The roads, for example, have tank tread marks, so are generally unsuitable for earlier periods unless you just overlook it.) Second is cartoony wooden terrain for my homemade 42mm wooden soldiers. 

Sometimes I feel like I should either get out of a lot of scales and periods, or get busy with making terrain. (I actually should do both, but let's not go there...)

The FLGS (Isle of Games in Tucson, Arizona) was having a 25% off Christmas sale (30% for "Big Kahunas" like me[2]) so I decided to head the 75 miles there and see what I could get in the way of terrain.

I saw the Battle Systems tabletop terrain sets on the shelf before, but I rarely gave it more than a glance. There was an open box once and it was printed cardboard, not plastic or MDF. It looked to be pretty flimsy cardboard at that. So I always passed it by.

Well yesterday I did not pass it by. One thing I noticed that I had not before was that the box included a neoprene mat that acted as the board. I recently wrote to Alpha Terrain about their MDF products and they showed a setup on a mat and with bases that looked like floors and sidewalks that the buildings and walls were on. It turned out that all of that was for show and was not included in their set, nor could you apparently buy it. The Battle System kit appeared to be showing exactly what was in the box. I decided to give it a try. In fact I bought not only the Cyberpunk Core Set shown above, I bought the City Block Core Set and the Frontier Core Set.

As the Cyberpunk Core Set was the smallest, and I was looking to play a scenario of Hardwired and maybe one of Chrome Hammer (the author of the latter is local), I decided to put that together first. Although this set makes a 2' by 2' table – a little small for 28mm figures – it is actually pretty adequate because the walls and such break up lines of sight really well, so this promises to be setup good for a close quarters battle scenario.

The first thing I want to point out is that this is my setup, not promotional pictures from the website. Second, this is most, but not all, of what is included. There were some additional signage and gizmos that I was not really able to figure out how to incorporate (yet). More on that later.

As you can see in the image above it has a nice number of walls and furniture. You are provided with extra straight, corner, t- and four-way intersection clips to connect the walls, so you are not limited to the setup shown on the back of the box. Further, Battle Systems sells additional walls and gubbins from this set so you can definitely expand beyond what you see. They even sell the mat.

The detail of the printing is pretty good. Note the one thing I did was go around all of the edges and blacken them with a permanent marker. When I looked closer at the images on the box and the website I noticed that they painted them, using appropriate colors (red, for the neon sign, for example, and steel for the wall tops and edges). I may go back and do that.

Here is a scene where my Tau have a Dark Eldar cornered. All in all it looks pretty good.

As I was assembling everything I started to wonder if these were a little too ... small.  As you can see with my GW figures below they are actually scaled pretty well with them. The crate is about 1/2 body height, even with the thick bases. They would probably look a bit small for Space Marines, but hey ... Space Marines.

They would look really well with the Star Wars figures from Imperial Assault. (I am not so sure about with the figures from Star Wars: Legion, which I also bought into.)

In case you didn't notice, there is a square grid printed on the mat. They are 1" squares, so if you play games where not knowing the range is a thing... Me, I don't play those sorts of games. I love the grid and before I noticed it, I was considering putting dots on the mat to demark the grid. So one less thing to do.

So, is it all pie in the sky? There are some minor issues, like a little bit of warping and wondering whether there will be wear and tear as I keep setting it up and tearing it down. But let me tell you, the ability to quickly get a board together like this was certainly worth the cost (about $75 for this set and $110 each for the other two sets). Again, Battle Systems has additional sets and individual parts so assuming that this holds up to my gaming, I can see getting more and gaming this genre more. So far I am impressed.

Footnotes

[1] One of the other things I have come to realize is that "gaming" is generally not a single hobby for most people. There is the miniature collecting hobby, the miniature painting hobby, the terrain making hobby, and the gaming hobby. I think the only people that get away with "just" gaming are those that show up for games at the hobby shop or your home, use your miniatures, and generally never know the rules.

[2] I get that "Kahuna" and "Big Kahuna" are rankings that speak to the "Isle" theme, but I think the real definition is "a wise man", which isn't really accurate, given they add the label for big spenders. I think they use it instead of another island-themed term: whale.

Wednesday, April 22, 2020

Painted my Ratmen (Skaven)

I was able to get another Warhammer Underworlds warband completed. Lest anyone think I am out of work, I am not. (I am very lucky in that regard. My wife, however, is a nurse at a hospital, as is my daughter. Everything still good on those fronts too.) I have just been focusing more on painting over tabletop, computer, or virtual gaming. (Shaun Travers burned me out for a week or so on the latter. I may have possibly burned him out too as I have not heard from him. Shaun, are you still out there?!)

So, why all the painting? As I have probably said more than once, I have a tendency to rotate through my hobbies, of which gaming is only one (well, two, because I consider tabletop gaming and computer gaming separate and distinct, while virtual gaming is a variant of tabletop gaming). Painting miniatures and making them are two other hobbies. Clearly I am in "painting mode", which I have not been for quite some time.

These figures had been partially painted twice before, along with being stripped twice. This time I primed them white and went to town with contrast paints.

The first color is the bluish-gray used for the metals. This is the Space Wolves Gray color. As you can see it is a bit blotchy in color. The first time I used it I tried to even out the blotchiness by painting another coat. Then another. Several coats turns this paint into a very dark shade of bluish-gray. Because it has some medium in it that makes it thicken relatively quickly it is hard to soak up the pools of paint before it thickens. If it gets too thick then trying to soak up the excess paint breaks the surface of the paint, which looks even worse. I need to find a mix of paint and flow aid/gloss medium/gloss gel that will smooth out the pools on the flat areas while maintaining its ability to collect in the crevices, creating the contrast. As it stands, I like it as a bluish "non-metallic metal".


You can see the chainmail and stonework were painted the same color, despite the former representing a different shade of non-metallic metal and the latter representing stone. That is the Basilicanum Gray contrast paint. This too is a very blotchy paint on flat surfaces. I think it works better for chainmail than it does for stone, but neither are really bad for tabletop standard. I think if you undercoated the chainmail with a true metallic, then used this gray, it would look better.

The gild work on this next figure's helmet is one of the yellows in the contrast paint range. It is clearly too yellow for a gold, but I later found out that if you use the flesh color as a wash over it, it takes on a deeper golden tone. So I may go back and do that. That is one of the things I like about singly-based figures. In theory, you can always go back and add a little more detail later. In theory...


I used the standard human flesh color for the flesh of the ratmen. I wanted the color of the tails to be a bit more distinct from the rest of the flesh, so I mixed the flesh color with the pink in a 1:1 ratio. That toned down the near-magenta look of the pink contrast paint.


I wanted to make sure that my browns were distinctly different colors, so the flesh was a light red-brown, the fur a deeper red-brown, and the wood was a mid-brown to which I added a coat of yellow-brown on top. Again, another nice quality of some of the contrast paints is that they are weaker and make great glazes so you can apply colored filters and subtly change the final color value.


A good example is the base of the figure above. The sewer grate is the same bluish-gray color of the armor and the flagstones are the previously mentioned gray, but I have used two shades of weak green as filters to spots in order to give the appearance of algae-covered stone.

The final two colors used were the Gryphon Orange, for the cloth, and Snakebite Leather, which appears on the hood of this character.

The orange is simply too blotchy to be used as what most people would use it for, representing cloth. If you use it for hair, well, it will be some pretty bright hair. Like dyed orange hair. As a cloth color, however, it just does not go on smooth enough, like the bluish-gray. Maybe more coats of the orange would not be a bad thing. I think it is one of those colors that simply need tweaking with either contrast medium, flow aid, or acrylic gel.


Snakebite Leather used to be a classic yellowish-brown in the Citadel paint lineup that was great for leather (hence its name). Alas, they are no longer sold and the "replacement", Balor Brown, is not the same. (Or rather, no longer sold by Citadel. I hear that the same color is a part of the Coat D'Arms paint line.) It seems like if you slather the Snakebite Leather contrast paint on, in several coats, it has a quality much like the old paint of the same name, but I hate painting the same spot over and over to build up a color, so I need to find a formulation that fixes this contrast paint.

All in all, I like them. I used to be able to do much better, using a much cleaner style. (Maybe someday I will post picture of my old miniatures, from 25+ years ago, but it might depress me.) But for what I am aiming for – tabletop ready troops – this is fine.

Next Up

This will probably be the last fantasy subject for a while. I have quite a collection of unpainted 15mm Classical Greeks – as in hundreds of them – and I am now very curious about painting them with contrast paints.

Will they look okay? It is possible that they need deep creases in order to look better, but I won't know until I try.

Will they be significantly faster to paint with contrast paints? Given that they have been sitting in a giant plastic tub for damn near a decade the significant factor is actually attempting to apply the paint.

Can I make the right colors? I consider ancients sort of cheating in this regard because we have very few examples of the exact Pantone shade used in ancient times! 😁So I think pretty much any dull color I use will be good. You can further vary the shades by changing the primer color from white to light gray to beige to light blue and these will change the color values of the contrast paints as many of them tint the undershade.

So, hopefully I do not burn out before I get that project started.

Tuesday, April 07, 2020

Contrast Paints for Painting Ork Skin

As I am painting a warband of Orks (or I guess they are now called Orruks) for Warhammer Underworlds the first area to address is their skin color. Citadel has a number of greens in their Contrast Paint line and, interestingly, it has changed shade from the "old days" when I painted Orks, i.e. Warhammer 40,000 Second Edition.

The basic way that contrast paint works is that the medium tints all of the figure but is a much darker shade where it pools. As it pools in the cracks and crevices to a greater degree than it does on flat surfaces, it naturally shades the model, much as their earlier washes were designed to do.

So what is the difference between a wash/shade and a contrast paint? Well the tinting of the underlying base color is supposed to be stronger with a contrast paint. But in both cases the color underneath can change the final shade once you put a wash/shade or contrast paint on top.

To show this effect – and to help me decide on how to paint my Orks' skin – I decided to take some old Gretchin models (space goblins) that I collected from Warhammer 40,000 Second Edition boxed sets. (No one wanted Orks or Gretchin back then except me, so I picked them up for practically nothing. They were still laying around unpainted some 20+ years later.)

I started by using Citadel Corax White spray paint, which is a cool off-white tending towards gray, to prime them. This is a recommended, and hence expensive, primer for those using contrast paints. I can tell you that it is a better primer than, say, acrylic inks when it comes to contrast paints. Acrylic inks can cause the contrast paints to bead, so if you are going to prime with that, you need to shoot it with matte varnish afterwards.

I basically had three greens on hand to try out: Plaguebearer Flesh, Militarum Green, and Ork Flesh. There are at least three others, Dark Angels Green, Creed Camo, and Warp Lightning but my FLGS did not have them. If anything, Creed Camo is the one closest to my idea of what Ork skin color should look like, but I did not have access to it. (I could complain about COVID-19 closing down the shops, but honestly, if it were not for the closing of the shops I would probably not be painting.)

I started with Plaguebearer Flesh alone, as an undershade to the other greens, and as an overshade to a brown (Aggaros Dunes).

Paint combinations with Plaguebearer Flesh
Next I tried Aggaros Dunes as an undershade to the three greens.

Paint combinations with Aggaros Dunes
Next I tried Militarum Green by itself.

Paint Combinations with Militarum Green
And finally I tried Ork Flesh by itself.

Paint Combinations with Ork Flesh
One of the things that I noticed is that certain paint combinations did really well when it came to smoothing out the colors, ending up much less blotchy than colors by themselves. Other combinations remained blotchy. I don't know if it was how I laid down the colors or, as I suspect, that the contrast paints with stronger pigments and covering power do not react well with other contrast paints.

For Orks tending towards a yellowish skin color I preferred Plaguebearer Flesh over Aggaros Dunes. Neither of these contrast paints are particularly strong in their covering power.

Best Yellow – Plaguebearer Flesh over Aggaros Dunes
The best combination for Ork skin color tending towards green has to be Ork Flesh over Plaguebearer Flesh.

Best Green – Ork Flesh over Plaguebearer Flesh
Something about the Plaguebearer Flesh formulation smooths out Ork Flesh so that the latter is not so blotchy. Either that or I had a really good touch for once and got it just the way I like it. Given that my armor color is going to tend towards the lighter green color I am probably going to use the latter color combination for my Orks' skin color. If I were going to go with a single paint as the color, right now it would be Militarum Green. However, I suspect that once I see Creed Camo it will likely turn out to be a favorite.


Let me know if you are not interested in seeing painting discussion. I know I am usually a gaming blog with an emphasis on rules reviews, but there are really four aspects of my hobby (making, painting, gaming, and gaming with computers) and I have been focusing on the latter two for a while now. I have shied away from painting for some time mostly because I feel like between my back and my eyesight I cannot accomplish very much volume and what I can accomplish is always pleasing to my own eye. (I am very critical of my painting because I used to paint very well for an amateur.)

Sunday, April 05, 2020

Comic Style Painting and Contrast Paints

This post will be a departure from my norm as I rarely talk about painting, although sometimes I show painted figures.

More than 30 years ago I discovered waterproof inks and how they could be used in miniatures painting. Largely I confined myself to using them for painting horses, but on occasion I used them to paint cloth and leathers. I was also very much into blacklining when painting Napoleonic Austrians, which are practically all white.

As time wore on and the inks dried, I switched back to painting block style with washes to increase contrast by enhancing the colors in the folds, but I was never too keen on it. I felt too many washes tinted the main color too much despite generally giving good results for the folds.

Contrast Paints

Then came contrast paints. Initial results that I had seen from YouTubers were ... ugly, to say the least. Painters I watch (or now watch) slowly started experimenting with the paints and the results started getting better. One good (but very long) video is Vince Venturella's "Ultimate Guide to Contrast Paints". He explores just about every way you can use Contrast Paints. If you only want to get an idea of some really cool effects, watch the beginning of  Juan Hildago's "'Eavy Contrast Marine - Death Guard" where he lays down the base color of the armor, then uses two other Contrast Paints as glazes to achieve the really stunning effect of Nurgle plague-affected armor. Long tory short, real artists started understanding that Citadel's initial instructions of "one thick coat" was a bad idea and that the qualities of the formula could be used for same really good paint jobs.

I tried them and almost immediately did not like them. I could not seem to come even close to replicating the success of these guys, largely not getting the smooth colors without massive pooling, coffee staining, tide marks, and too heavy of a contrast. But, just like with painting, you have to keep practicing. So I would dunk my figures in Simple Green, take a soft bristle toothbrush to them, pull out the airbrush[1] to prime them, and start all over again.

I haven't given up completely on Contrast Paints though. Here is my latest effort, Rippa's Snarlfangs warband for Warhammer Underworlds. This is what Games Workshop would call "battle ready", meaning I have used Contrast Paints to paint the miniature, but not used normal acrylic paints to come back and provide highlights.

The Leader
The Lancer
The Bowman
The wolves are actually painted with a homemade wash with ink to boost the contrast and drybrushing to accentuate the hairs with another color. That and there red eyes was the only instances where I did not simply use Contrast Paints; everything else is pure Contrast Paint. Mind you there is quite a bit of use of primer (black, grey, bone, and white) to provide additional contrast and an undertone, but basically the colors on the goblins and their equipment are Contrast Paints.

Comic Style Painting

Someone posted a picture of a gundam painted "comic book style" in a local gaming Facebook group and I really liked it. So I started looking up "comic style painting" on YouTube and FaceBook and came across Mike Cousins of Epic Duck Studios (FaceBook, YouTube, and Instagram) and the Comic Style Mini Painters FaceBook group (FaceBook).

Mike Cousins is the one to inspire me to try comic style painting. If you are still wondering what comic style is, here is one of Mike's earlier models.

Imperial Fists Space Marines
As you can see, it uses solid black as shading, especially in areas not generally visible, uses blacklining to separate details and uses small "scratches" here and there to add interest and break up large areas of a single color.

I have to say, I have not been successful at it quite yet. What I found hard is painting contrasts and then blacklining after the fact. Here is a better picture of some of Mike's work with his more common comic style (he has two).


Here you can see that the colors, say the green in the tunic and the red in the hair, are not single shades, but generally three different shades, dark, medium, and light. These shades are not blended, but painted solidly, in order to intentionally increase the contrast. After that, he adds significant detail with black ink, giving it that comic style look. (Interestingly, this three shade style of painting, sans blacklining, is very much the style Matt uses on the Wooden Warriors blog that I co-author with him.)


That said, Mike recently showed his second method of comic book style, which is to paint the figure white, add the black ink shading and lining, then color the figure, in this case with Contrast Paints. Here was his result.


That is all Contrast Paint with no highlighting. As you look at the red you can see it is a bit blotchy, but for the most part it works really well. As I have that same figure (the whole warband, in fact), I decided I was going to try my hand at painting in this style, but use a different armor color. I like how the Ork flesh turned out, but I am hoping to get a smoother color on the armor. I am pondering, but not quite sure if I want to attempt, the Death Guard armor color scheme that Juan Hildago showed.

Death Guard Space Marine in Contrast Paint
That is all Contrast Paint. (He made it look so easy.)

Step 1 – Black Shading and Lining

After priming white I took out a Faber Castell XS black waterproof ink pen, which is a 1.5mm nib. I also have some 005 pens, which are 0.2mm. You can do much finer detail with the latter, but the problem is that the nibs are extremely short, and thus it is hard to get into some little crevices.


As I get used to doing this more – it is slow, painstaking work – I have made some improvements. So it is a process of do a little with the larger pen, then with the smaller. Also, I find it easier to start with the brush in order to shade large areas first. This is what I like about this style; it forces you to focus on the areas people can see, and paint the rest black. Here are shots of the underside, with the black shading.


Notice that under the chin, belly, legs, and arms it is solid black. Same with the bottom side of the weapon. Looking dead on from the front, back, or side you can barely see these black areas; you definitely cannot when the figure is on the table and viewed from above.

This shading effect makes sure that you do not do something stupid like make sure you detail the bottom of the shoe or make sure that the underside of the weapon shaft is appropriately shaded and colored compared to the rest of the shaft. You immediately black it out and never have to worry about it again.

Note that I did not ink the chainmail or fur pieces. These recesses will be handled by Contrast Paints. Same with the details of the face. As you can see with the Goblins at the beginning of this post, Contrast Paints work very well on their own when a figure has a lot of detail. Right now the faces look stark white, but they will come out with appropriate shades once it is all done.

If the Goblins taught me anything it is that you cannot judge Contrast Paints by how they look initially. You really have to wait until it is all done and judge the effect.

Well, I know I won't have the four Orks done any time soon. Although Contrast Paints can be a time-saving method of painting, the way I do it is not. I am too finicky a painter to let paints slop over the lines and two colors mix at the edges. (Painting in one color and then a second darker Contrast Paint color is however a legitimate technique.)

But so far Contrast Paints produce the best results that my old eyes can handle. I either need to stop buying miniatures (selling a lot of my lead pile that I have accumulated), accept the battle ready style in order to get more troops on the table, or pay more people to paint my troops.

Footnotes

[1] Yes, I bought an airbrush, a Iwata Neo Air, which is their cheaper "starter" airbrush. Using it produces very nice, smooth coverage for primer. I have also used it for varnishing, but not much more than that. I think it is almost a must for painting with Contrast Paints, inks, or glazes because the paint is so delicate that brushing on varnish can sometimes chip the paint below.

Thursday, March 26, 2020

One-Hour Wargames Scenarios – Filling in the Blanks

In the last blog post Shaun Travers and I played scenario 10 in One-Hour Wargames and it turned out pretty disastrous for the attacker (Red). Although I like to flip the scenario and play it the same way, the way we played it just felt wrong. I do believe that some of the scenarios don't "work" with all periods, but in this case the math just makes it so hard to get the Red Infantry engaged against the defenders who will inevitably will Blue Infantry units. (There is a risky gambit involving defending initially with one Infantry and one Skirmisher, but that is beyond the scope of this discussion.) Basically, it takes turn three to four before Red can engage the Blue defenders. A big problem is that entry via the road is a huge bottleneck. How much of a bottleneck did Neil Thomas really intend this to be?

When Shaun and I played the first time we assumed that "entry via the north road" meant that the first square the unit had to move through was C1. This meant that, at best, you were going to occupy four squares on turn 1. (B2 and D2, only if you had Cavalry; C2 if you had Cavalry or Skirmishers; and C1. Basically all of the squares indicated by Red arrows in the image below.) Note that it means that by the end of turn 1, Red would only have one Infantry unit on board, two by the end of Turn 2, etc. Given that the Blue defenders could start in C3 and D4, and could theoretically push into C2 and D2 on their turn (although would be unlikely to do so), they could really jam up Red forces until this first line of defenders was eliminated. As was shown in the last blog post, if they do not accomplish that quickly enough, Blue can reinforce the line such that Red will never reach the town, having to break through two lines of defenders.


So, what's the alternative? Shaun and I talked about the concept of using an off-board square, in this case square C0. The idea is that all of the Red units start in the square north of the northernmost road square, just off board, i.e. square C0. If you did that, the number of squares that you could move to on the first turn are not only the ones with red arrows, but the blue ones too. More importantly, units with a 6" movement can move on and occupy squares B1, C1, and D1. This is three times the number than if you consider square C1 is the first square of movement (red arrows only).

How will this affect the game? Quite a bit.

The Game


Red's first turn looks a lot better than the last game. There are four units on rather than three, two of those being Infantry. (If I had rolled two Cavalry, I would have had another unit on the board too.)


My basic plan is to use the Skirmisher unit to flank Blue defensive line and break it faster. (Interestingly, Ross MacFarlane played the same scenario and had the same force that Shaun had when playing Red, used his Skirmisher to also make a flank run, but to secure the town instead.)

By turn 3 everything was engaged.


By turn 5, Red breaks through the portion of the line closest to the town.


Just in time for Blue to bring on their first reinforcements. Mind you, by this time in the first game it was obvious that these reinforcements could make it close to the original battle line, but Shaun, seeing that I had already broken through, decided not to advance but rather to occupy the town.

Infantry in the Ancient period take 1/2 hits as it is, with defending a town yielding another 1/2 hits. It is going to take some time digging them out. In fact, the only way to win is probably by attacking it from two directions.
As a side note, in square grid combat you have to attack from F5 and E6. If the attack comes from E5 (which is legal) it essentially makes an implied pivot that 'hides' its left and right flanks (squares E7 and G5).
Turn 8 saw the Blue Cavalry charge out and attack the Red Infantry that was attempting to move on its flank. This was a strong move by Shaun because with the Cavalry in E6 and its front facing D5, that puts its right flank in square F5.
Again, that is a quirk of the square grid rules we use, but the best way to look at it is that OHW only allows one unit to attack per face and to get on the flank each unit must have a square in between each attacker. So a unit could be in square E5, but it would not be able to attack the Blue Cavalry.


By Red turn 10, Red had the attack on the town secured. (I am not sure why Red Infantry in C5 is facing South and not West.) The Blue forces coming on can only enter from A6 or B6 and with the hill impassable, they have to go through me to disrupt the attack on the town.


By the end of Red turn 13, the town was secured.


This was a far-cry from the result in the first game (turn 10).


Summary


To me this was a huge difference in the result. The pendulum swung dramatically from "no way for the attacker to take the town" to "no way for the defender to retake the town". All because of the change of a single rule. (Shaun may disagree, but I remember that neither side had better rolls in either game, but this second game did result in both sides having bloodier results.)

I am curious. How do you interpret the rule that "all Red units must enter the board via the road"? When playing the scenario without a grid, you probably use the same method as we used here, which is that all Red units are artificially stacked up on the point where the road intersects the board edge. This is equivalent to the "square C0" concept Shaun and I used.

More importantly, does anyone map out the road march order and penalize the rearward units movement based on how far back in the march order they are?

Friday, March 13, 2020

One-Hour Wargames – Scenario 10 – Late Arrivals

If you were wondering why Shaun Travers (of Shaun's Wargaming with Miniatures blog) hasn't been blogging much lately it is probably because I have been taking up all his time with One-Hour Wargames (OHW) scenarios. We played Flank Attack 2 (Scenario 7) using Medievals and we just finished the first of two games of Late Arrivals (Scenario 10) using Ancients. A much different feel to the game with Ancients – Infantry hits with D6+2 but only take 1/2 hits due to armor – than with Medievals, Dark Ages, or Rifle and Saber.

More importantly, the scenario is really interesting because Blue is the defender and they have some hard choices to make.


Shaun and I again used a 6x6 square grid for the game – essential for virtual gaming if you are not using a computer program to indicate your precise position and make accurate measurements – shown in the image above.

Blue is defending the town (F6) and Red only has to occupy it at the end of turn 15 to win. Blue gets two units at the start and can setup in rows 3, 4, 5, or 6, or in the woods (E-F/1-2). Note that the mountain (A-B/3-4) is impassable.

This means that a core Blue strategy is to defend in squares C3 and C4 with Infantry and hold the enemy off. However, Blue only gets two more units on turn 5, and the final two units on turn 10. Ancient Infantry, being D6+2, has an Average Turns to Eliminate (ATE) of 3, meaning that it can eliminate an enemy unit on average in three turns. However, if the enemy unit is also Infantry, because it has has armor (1/2 hits) the ATE is 5 turns. So, this really turns into a race because it takes two turns to move the infantry to row 2, then turns 3 through 7 will be spent chewing through that front line of enemy infantry. With Blue having 3-4 infantry in their force they could easily have the second wave up to the battle line by turn 8, which would cause another 5 turns of combat, at least, to chew through that line. So simply pushing the infantry forward will not win the objective.
Please note that I have the advantage of hindsight and playing once as Blue to give this analysis. My first attempt looked something like the image below.


Trust me, the "Skirmishers in the Woods Gambit" is not a winning strategy. At D6-2 my Skirmishers were still cooking their breakfast in the woods when the Red Cavalry flew by, unscathed.

In my opinion, if Red does not have Skirmishers or does not have two Archers, I am not sure Red can win in the Ancients period unless Blue makes a mistake. If Red and Blue have Skirmishers, Blue might have to commit it to the fight at the start if the game, which would make for an interesting fight. As I said this is an interesting scenario, but there are some matchups that seem like they would always result in a Blue win because the clock runs out.

The Real Game 1


As you can see above, my first game 1 was a disaster. I did think about potentially pushing forward with the Blue Skirmishers to block enemy units from coming on at C1, but it seemed like such a low probability of success that we bagged the game early on. I threatened to play that setup solo, but have yet to.

I rolled and received three Infantry (of course!), one Archer, and two Skirmishers. To me, this was probably the worst combination I could think of. Two extremely brittle units and I would not have two full waves of dead hard Infantry.

Shaun rolled and received three Infantry, two Cavalry, and one Skirmishers. All I knew was that having Cavalry might allow him to make a breakthrough to get to the town and having a Skirmisher meant the woods were not impassable too. So my first decision was whether to use a solid line of Infantry and risk him flanking me with Skirmishers to break through faster or using one Infantry and one Skirmisher and seeing how I could contain him. I chose the former.


One of the other issues with this scenario is that Red enters from the northern road not the northern edge. This makes maneuvering out extremely hard and the introduction of the square grid does cause an issue with that, at least the way we play it.

I imagined the units stacked up in "C0", off the board. I felt like from there they should be able to move one square on, so B1, C1, and D1 would be eligible squares. But Shaun pointed out that the scenario says "via the road on the northern edge", so given that we play "in the square" the first movement point is in square C1. This caused a jam up of Red units, as you will see.

By the end of turn 2 you can see that the Blue Infantry have beaten up the leading Red Cavalry while doing almost no damage. However, I have this nasty habit of hitting units hard early on, then running out of steam while trying to finish them off. The main thing to notice as that only four of the six Red units have made it onto the board, with one Infantry and one Skirmisher still being off of the board.


By the end of turn 5 one of the Red Cavalry units had been eliminated and a Red Infantry unit was getting dangerously weakened.  The last Red Infantry unit was on the board, but the Red Skirmisher was still off! The second wave of Blue troops were on the march.


Turn 7 saw the elimination of the weakened Red Infantry in C2, but turn 8 saw the both units in the Blue front line eliminated. By then, however, the second Blue line was already in position. (Shaun forgot to bring on his Skirmishers, not that they could have gone anywhere.)


Turn 9 and 10 saw Red unable to break through the second Blue line, so with the final Blue reinforcements entering the board, Red quietly withdrew their forces.


Battle Summary


There are so many interesting combinations to think about here and how it would play out in different periods.

Medievals have mainly fast-moving Knights (D6+2, 12" movement), so unless Blue draws a force of two Men-at-Arms units (armored, thus take 1/2 hits like Ancient Infantry) the battle is not going to take place in rows 2 and 3, but rows 5 and 6.

Dark Ages have mainly Shieldwall Infantry, which take half hits like Ancient Infantry, but only hit with a D6, so it is an even slower slog through rows 2 and 3. I think it would be even harder to win as Red in this scenario during the Dark Ages.

Horse and Musket really changes things as Infantry now fire 12" with D6, so the name of the game is for Red to bring his superior numbers to bear, which is interesting given the confined space which they have to deploy to.

How do you think your favorite period (using the standard rules) would play?

What Else Have I Been Up To?


As it so happens, the writer of the blog Red Player One lives in the same area as me. He and I played a game of Starport Scum by Nordic Weasel Games and it was really fun. It has been a long time since I played a narrative (RPG-lite) scenario. The rules are very simple, but effective. My hero, Flavio, cut the anti-hero Ahnuld in half with a single stroke of his monofilament blade. That gruesome kill caused the rest of the security guards at the compound where my brother Squigi was being held. (Yes, the Flavio Brothers – Flavio and Squigi – were reunited so they could continue their criminal "plumbing" careers together.)

You can see some of Jason's cool terrain and figures over on his blog. The vidscreen of a pixelated geisha-like figure is hand-painted. Very cool.

Jason is a dangerous guy to hang around though as he is a rules junkie like me. I ended up getting copies of Starport Scum and 5 Parsecs after reading his blog. Then again, he ended up getting Battlesworn. (We were going to play that this weekend, but we ended up having to cancel.)

Although I did not give it a very strong try, I did try Star Wars: Legion and I just could not get into it. It has too many elements that I am not fond of. It is a very competitive 1v1 game where – unless you have basically bought one of everything or scoured the internet thoroughly – someone will eventually pull out something you have not seen and play gotcha! with a new special rule. Been there, done that with Warhammer 40,000, Warmachine, and Flames of War (multiple editions for each).

I finally broke down and purchased the next version of Warhammer Underworlds, Beastgrave. I continue to like that game despite not being able to get that many games in and it being hard to play solo given the amount of hidden information. But I am working on that. More later on the Solo Battles blog.

I have been doing some more painting. I am trying "comic style" which is a couple of steps beyond what I used to do as a kid, which is a heavy blacklining style.

Finally, about a third of my team at work were let go. Our company decided that they did not want to keep them and decided to let the remainder – largely a bunch of techno-geeks – take over their duties, which was managing accounts, in addition to our normal duties. I am not going to say much more than that other than to say that my blood pressure spiked, badly, and I needed to find another job because that was not what I signed up for. So I did. Rather than working for the company that makes software for the US home mortgage market, I will soon be working for a company that uses that same software, i.e. I will be a customer. My work with the product and insight into how it works under the covers really helped me leverage a new opportunity. So let's hope the grass really is greener on the other side...

Saturday, February 22, 2020

A First Look at Undaunted Normandy

Undaunted: Normandy (UN) is a card, tile, and counter game of small-unit infantry combat in Normandy 1944. It is called a "deck building game" by the publisher Osprey Games. When most people hear that term they think of something different than what it really is. You do not pick and choose your cards from a large pool of options. Rather, the scenario defines what cards are available because the cards are the soldiers in the fight. If you have ten "Rifleman" cards you have ten soldiers with rifleman qualities.


The box contains all that you need for a game. It is smaller than a standard Letter size page and about 3-4" thick, so the game is very compact. Inside is a nice plastic tray to hold the game tiles, four 10-sided dice, and the two decks of cards (German and U.S.).


Underneath the plastic tray there is more than enough room to hold all of the counters in the game.


The game includes a rule book, which contain more than enough examples of play, and the scenario book. The rule book is very thin as this is really a fairly simple game. Don't let that fool you, however. The gameplay is very thought-provoking.


This is what the first scenario setup looks like. Each tile has a number and a side A and B. The map shows you which tiles to use, how to place them, what units are in play, and what additional markers to use (such as objectives, control, scouted, and spawn markers).


This is why I say it is not really a deck building game. Half of the fun of the game is building a deck and tuning it over time. In UN the scenario specifies which cards are in your starting deck (black circle with white D), which cards are in your reserves (white circle with black S), and which are not in play at all.


In the beginning scenario both sides start with two squads of five riflemen and two teams of three scouts – represented by four unit counters on the board – one platoon sergeant, and two squad leaders – represented only by cards.

Here is the board, set up and ready to go.


First thing to notice is that each area of the map is a square tile. Note that the squares are offset so each square is surrounded by six adjacent squares, much as a hex grid would be, rather than four adjacent orthogonally and four adjacent diagonally as in a square grid.

Each square has a white number inside a black shield at the bottom center. This represents a defense value given to any unit in the square being shot at. Values in this set of tiles range from 0 to 3.

In the upper-right I have placed the light brown objective markers, which look like guidons. Each has a value from 1 to 3, indicting the number of objective points allotted to the player that controls the square. In this scenario the German player starts with control of 3 objective points (last column, middle row square). In this scenario, the first player to reach 5 objective points immediately wins the game.

In the upper-left corner of the square I place the control markers. A control marker for your side can either show binoculars, indicating you have scouted the area, or an insignia, indicating you control the area. If you control the area then you claim the objective points in the square. A square can have scouted control markers from both sides, but only one side can claim control of the square (have the insignia side up).

In the early scenarios there are two basic unit types: riflemen and scouts. Scout units move through areas, placing scouted control markers in each square they pass through. Riflemen units can only move into areas that have scouted markers for your side. Once in a square they can attempt to control it, earning the objective points if successful.

That is pretty much the game. Use scouts to scout out areas then move riflemen in to control them and score objective points. Whichever side scores enough objective points first wins.

Turn Sequence

Your cards exist in one of six places: the deck; supply area; your hand; the play area; the discard pile; and the dead pile. Here are what the cards look like.
The number is the upper-left corner represents an initiative value. Each turn both players draw four cards from the deck to the hand. They will pick one of those cards in the hand to use to bid for initiative. The card with the higher value wins the bid, gaining initiative. (In the case of a tie, the player with initiative retains it.) That bidding card is then placed into the discard pile.

The player with the initiative plays one card from the hand at a time into the play area, taking one of the actions indicated on the card. For example, looking at the card for the Rifleman in Squad A (second row, middle column), you can see the actions below the green stripe: Move 1; Attack 1; and Control. This allows the unit to move one square, attack once, or control the current square.

The player plays all of the cards in their hand, one at a time, until all of the cards are played and none remain in the hand. All of the cards in the play area are placed in the discard pile. The player that lost initiative now does the same, playing each of the cards from their hand one at a time until done, then moving the cards in the play area to the discard pile. The turn is now done and a new turn is started.

  • Draw Cards
  • Bid for Initiative
  • Initiative Winner Plays Cards
  • Initiative Winner Discards Played Cards
  • Initiative Loser Plays Cards
  • Initiative Loser Discards Played Cards

Note that there is no "check for victory" phase. As soon as one player fulfills the victory conditions, play immediately stops; it does not continue until the end of the turn. Thus holding initiative has an inherent value.

Once a player's deck is exhausted, their discard pile is shuffled and then becomes their new deck.

Command and Control

The cards represent your command and control ability. You can only act with the units that were drawn into your hand that turn. Because you only have three cards to play, your ability to act more than once with a unit relies on the luck of the draw. But, there is a way to change the odds.

You have several cards which represents soldiers on the battlefield, but not on the board as a separate unit: the Platoon command staff (Platoon Sergeant and Platoon Guide) and the Squad command (Squad Leader). These cards have special abilities like Bolster, Command, and Inspire.

Bolster

The Bolster action, available to the Platoon and Squad commands, allows the player to move cards from the supply area (think of them as reinforcements) to the discard pile. This is how you increase the number of cards in your deck of a certain type, increasing the odds of drawing that card and of drawing more than one of that card.

Command

The Command action allows the player to draw additional cards from the deck to the hand, thus changing the number of possible actions a player can play in one turn.

Inspire

The Inspire action allows the player to take a card from the play area, i.e. a card already played this turn, and place it back into the hand, effectively allowing a player to play a card more than once a turn.

Hunker Down

One final action a player can take – although it is not listed on any card – that impacts your card composition is Hunker Down, which is done with a unit card. This means that the card is played from the hand back to the supply area.

The Fog of War

There are a specific number of Fog of War cards that are placed in your deck and supply, dictated by the scenario, that represent the loss of command and control. These cards effectively clog your hand, allowing you to take no action. Scouting an area will transfer a Fog of War card from your supply to your discard pile, a Conceal action will transfer a Fog of War card from your enemy's supply to their discard pile, and a Recon action will transfer a Fog of War card from your hand to the dead pile. Note that all of these actions are only available to Scout units. Also note that you cannot Hunker Down with a Fog of War card as it is not a unit card.

Combat

As discussed previously, the square tile that a unit is in indicates it defense value. Each unit also has a defense value, indicated on the unit counter in the lower-left corner inside the shield. Finally, the farther a unit is from the target it is shooting at increases the total defense value.


To resolve combat, a unit takes an Attack action and adds the square's and unit's defense value to the number of squares from the firing square to the target square. In the example figure above, the German Rifleman Squad A fires one square at the U.S. Scouts Team B. The range is 1 + 5 defense value for the unit and 0 for the square's defense value for a total of 6. The attacker then must roll a '6' or higher on a D10 to score a hit.

If a hit is scored one card of the type in the squad indicated by the unit counter must be removed. The card is removed from the hand, discard pile, or deck (in that order) to the dead pile, and if no card is found, the unit counter itself is removed (even if there are still cards of that type in that squad remain in the supply area). Continuing with the example above, if the German scores a hit, a Scouts Squad B card must be removed as indicated above, otherwise the unit counter will be removed.

Each scenario indicates a spawn point for each side. A unit counter can be returned to the board at the spawn point if a card for that unit type and squad is brought into play, such as with a Bolster command.

Note that there are other types of combat such as suppression (requires discarding a card in lieu of taking an action) and HE attacks (called blast attacks). This covers the attacks by two other types of units not represented in the first scenario, machine guns and mortars. The final unit type is the sniper.

Final Note

There is no variance between the cards of a single unit type, other than the name of the person and a squad designation. So one Rifleman card always has the same initiative value and actions available as every other Rifleman card in the game. The variance is between the card types, i.e. Rifleman cards are different from Scout cards which are different from Mortar cards, and so on.

Sample Game

Here is the first scenario at the start. The Germans start with 3 objective points under their control, but only one objective point between the German and U.S. starting positions. In order for the Germans to win they must either take the objective in front of the U.S. starting position or one beyond the U.S. starting position.


By turn 2 the U.S. forces were able to push their rifle squads into the farm, capturing the first objective (worth two points), making the score 3-2 Germans. The U.S. Scouts are contesting the objective to the north. Given that the defense value of that square is 2, it will be hard for each side to dig the other side's Scouts out.


By turn 5 the U.S. have controlled another square, making the objective point score 3-3. In the upper-left corner you can see the face down U.S. cards. That represents the dead pile, meaning that the Germans have been scoring casualties while the U.S. have been scoring objectives.

In the north the Germans have doubled up to try and dig out the U.S. Scouts, which is largely where those casualties came from.


By turn 7 the Germans have eliminated four U.S. cards and removed the U.S. Scouts Team A unit counter (which spawned back on the board by the end of the turn). This allowed the Germans to take back the lead in objective points, 4-3.

Meanwhile the U.S. has been causing German casualties of its own (two) while U.S. Riflemen Squad A is poised to control the final objective for the win. Despite the Germans blazing away at the unit, it has not been able to take it down. As you can see on the left side of the image, all of the supply cards for units have been added to the U.S. deck, save for a few Fog of War cards.


By turn 8 – despite not having the initiative – the U.S. secured the last objective, putting them at 5-4 for the win. Overall the U.S. lost five men to the German two, but the U.S. kept their eye on the objective and prevailed.


This was an interesting scenario to start with as the Germans have to either attack close to the U.S. reinforcement (spawn) point or attack across an open field (square 3B in the second column, bottom row) to control the farthest objective (square 6A, first column, bottom row). The objective to the north (square 7A) is a distraction to the Germans, and should the U.S. challenge it, it will be slow for the Germans to control it due to the good defense value of the square.

Overall Impressions

One of the hardest decisions to make when gaming solo and using rules where you do not have full control, i.e. not every unit can act in a single turn, is decided which unit should act. UN solves that problem for a solo gamer as this decision is taken away as a core mechanic.

That said, having hidden information in a game is generally the bane of the solo game and it has two: card hand management and hidden bidding. I talk about how to deal with that in a post over on my Solo Battles blog. Some say that any randomization of the bidding is detrimental to the game as initiative is core to the game, but I did not find it so. There were turns in which I intentionally gave up the initiative in order to get rid of a dead card in the U.S. hand. But then again, I need to play it a lot more to really get a feel for the true importance of initiative.

The rules are very simple and there was nothing I had a question on. I can see that might be a problem with a future scenario in that there are no explicit canal rules that I can find.

The concept of dividing cards into a deck, representing forces actively engaged, and a supply, representing temporarily ineffective members of a squad, or even off-board reinforcements that enter at the reinforcement (spawn) point, is a really slick concept. If playing a campaign game, say with something like Platoon Forward, you can easily assume cards in the dead pile as simply rendered ineffective for the remainder of the battle. After the battle is over you can roll to see if you find them cowering in the rear, at the first aid station, wounded and out of action for awhile, recipient of a million-dollar wound, or in fact dead.

I can easily see myself playing Undaunted: Normandy again, and I have already pre-ordered Undaunted: North Africa, which is the sequel pitting Britain's raiders from the Long Range Desert Group against the Italians in North Africa. (I can foresee playing the Italians as the non-player side.) My hope is that this game will introduce light vehicles.

Recommended.

Miniatures

I can easily see using 15mm miniatures with, say, 6" square tiles. For each unit card in the deck initially you would have a miniature by the corresponding unit counter. As more cards are added through the Bolster command, you would add more miniatures to the units. As cards are sent to the dead pile, so would the corresponding miniature.

Would this be necessary? Of course not. But nor are miniatures necessary for practically any miniatures rules out there. (Well, maybe the skirmish ones that take true line-of-sight and figure silhouettes into account. But you know what I mean.) I could see using this sort of ruleset to play out miniatures games the same way people use Command and Colors (Ancients or Napoleonics) for the rules, but use miniatures instead of blocks for the units. It looks much more glorious, but plays with the rock-solid rules that board games tend to have.

Blog Archive

Blog and Forum Pages

Popular Posts

Followers

About Me

My photo
Huachuca City, Arizona, United States
I am 58 yrs old now. I bought a house in Huachuca City, AZ working for a software company for the last three years. To while away the hours I like to wargame -- with wooden, lead, and sometimes paper miniatures -- usually solo. Although I am a 'rules junkie', I almost always use rules of my own (I like to build upon others' ideas, but it seems like there is always something "missing" or "wrong").