My blog about my wargaming activities. I collect a lot of 15mm miniatures for the American War of Independence and so collect a lot of rules for this period. I started miniatures with Napoleonics, so I have a number of armies in 6mm and 15mm figures for skirmishing. I have15mm WW II figures that I use for Flames of War, Memoir '44, and someday, Poor Bloody Infantry. Finally there is my on-again, off-again relationship with paper soldiers that I sometimes write about.

Showing posts with label virtual gaming. Show all posts

Sunday, October 22, 2023

Remote Game of Age of Penda

Revisiting My Age of Penda Review

I used to review rules with giving a playtest, simply analyzing the rules on paper. That was a big mistake when I rated the rules The World Turned Upside Down. The analysis was so off, that I am not even going to link to the old blog post. The ideas on paper looked so compelling, but the game was unplayable, in my opinion, unless you had the author (or maybe a veteran player from the author's group) present and guiding you through the murky bits.

I knew I wanted to review Age of Penda (AoP) because the rules were exactly what I was looking for: grid-based; Dark Ages; any basing scheme; simple to learn; and a game that required some planning, even if it was short-term. But, given the TWTUD disaster I knew I had to play it first, to make sure that what I thought about it on a read-through matched how it felt in a game. But, I played it solo.

Why is solo gaming an issue? Normally it isn't, but sometimes, when a ruleset is written simply and plainly, you have an interpretation of the rules that might not be shared. I have one rating category that is affected by this idea of shared understanding, i.e. is a rule written so clearly that two different people generally interpret it the same, and that is the Tournament Tight™️ rating. I gave AoP a rating of 4 and, after playing a game of it remotely with remote gaming buddy Shaun Travers, I think I have to lower it to a 3.

So, what are the issues?

Suggestions, Not Directives

There are a number of minor quibbles about how to do some things, like building an army, setting up a board, who goes first, and so on. The rules are written with several alternatives to handling the topics with one particular method that seems to be what the author prefers. But it is not always crystal clear.

Terrain

What terrain types there are and how it affect movement and combat is all pretty clear. What terrain is to be used follows along the lines of "place the terrain as indicated in the scenario, but if you don't have a scenario, use this random generation method instead." Again, it is not hard to figure out what to do, it just seems like and afterthought rather than the method to use unless you have set up a scenario. (Have you tried searching for a map of the battlefield, or an order of battle, for a battle in 7th Century Britain?) Minor quibble, I know.

Deployment

This one is a little more unusual. When I think of deployment, especially the typical game mechanic of alternating deployment, I envision "I place one unit, you place one unit" and so on until all units are deployed (or designated as an off-board reinforcement. But the phrasing in the rules are "… take it in turns to deploy your units into one area at a time". To me, this sounds like you designate an area on your baseline and then place all of the units that will deploy there. Once you have deployed to an area, no subsequent units can be added to it.

Now some might read it as "one unit at a time", but to me the subject is the "area". But then again, I know I have issues with Phil Barker's wording in De Bellis Antiquitatus and he is very precise with his wording, so my my English comprehensive is simply not good enough. Then again, when I pointed this out Shaun agreed that it does seem to be saying one area at a time, so I felt better about what I see as a non-standard game mechanic.

In a way, I like it because it makes you think in terms of groupings of units, and you have to do that before the first unit, I mean area, is deployed. Who is under which leader's command?

Rally

In AoP all battling is done by area. When you shoot you add up the Battle Ratings (BR, not Battle Strength or BS, like I indicated in the original post) of everyone shooting into the designated area, with close combat you add up the BR of all units on your side in the area, and when you take damage it is inflicted on the enemy in that area; the owning player allocates the damage to the units.

If you rally the rules say to "select one area with units in it that belong to you and where at least one of these units has lost Battle Rating at any previous time during the game". It then instructs you to "roll a dice for each such [wounded] unit". Based upon the die roll you will regain 0-2 BR. The issue is that it says "regain n Battle Rating", not "regain n Battle Rating on that unit". So, does the player apply the BR to the unit or to the area, the latter allowing the player to choose how to apply the BR? If this is not clear, here is an example.

King Penda decides to rally. He has three units (with remaining BR): Armored Warriors with Leader (5); Armored Warriors (3), and Skirmishers (1). All three have lost BR. The player rolls 3D6 and scores for each, respectively, 0 regained, 1 regained, and 2 regained. (Note that the Skirmishers started with 2, had lost only 1, but rolled to regain 2.) If you apply the rolls to the unit then the Armored Warriors with Leader regain 0, the Armored Warriors regain 1, and Skirmishers regain 1 (as the BR can never go above the original value), for a total of 2 regained. If you apply the rolls to the area (like you do with damage), then you regain 3, and you can allocate it any way you choose as long as no unit ends with more BR than they started with initially. These are two significantly different results.

Shaun and I chose to apply it to the unit, i.e. point to a unit in the area, roll the die, and then apply the result to that unit. I am beginning to suspect that it should be the area. Yes, you have to manage the number of BR each unit has, but the rules intent is to abstract away as many specifics about a unit as possible, like facing, formation, position in the battle line, etc. Applying it to the area is more in the spirit of the rules and doesn't have this 'gambling' aspect to it, i.e. losing good rolls to lightly damaged units or not getting the unit you want rallied. If you can protect a unit from damage, why can't you favor a unit for rally?

Moving From an Enemy-Occupied Area

This rule was not ambiguously written, the rules were very clear: you must keep track of each unit's area that they moved from, when moving into a new area. Why?

Because the rule for moving out of an area containing enemies require your unit to move back into the area from which it entered, it’s a good idea to place units angled to represent their entry point, or remaining alongside the edge through which they entered the area.

This rule creates so many issues and does not logically follow the design the author put forth in the first place. Here are some examples.

A unit’s precise location within an area is unimportant for all other aspects of the rules.

Why are there no outflanking rules?

Outflanking is factored in when you roll dice for all of your units in an area. My vision, streamlined here like so many aspects of these rules, is that enemy units will not allow themselves to be outflanked unless they are outnumbered and therefore cannot face all of their enemies at once. Rolling dice for all of your units doesn’t just represent them fighting, but also the effect of pinning their enemy’s front while other units approach the weaker sides. Strength in numbers and all that!”

“Unit facing does not affect shooting.

Note that units do not need to be in base-to-base contact to fight one another, just in the same area. It is assumed that your on-the-spot commander will place their unit in the correct position; as you are your army’s warlord, you don’t need to worry about this. That said, feel free to move units within the area to suit your taste – putting opposing units in contact makes no difference in play but we all know it looks correct and your dice roll better if you do so.

So facing, positioning, and flanks don’t matter because it is all abstracted away, but the army general is supposed to track which area each unit comes from in order to specify a retreat path?!? And note that it does require it even if the area was not occupied by the enemy when you entered the area; if they are there now, your previous line of march is what matters. In a ruleset that doesn't pin units exact position and formation.

Shaun initially viewed this movement restriction as something akin to DBA's rule on blocking retreats. That never occurred to me, especially as there was no language in the rules about blocking movement (other than area capacity for three units from each side). There are certainly no 'automatic destruction' rules like DBA has for blocking retreats. But it was an interesting idea.

Well, Shaun and I thought it fiddly when we tried our test games, but we decided to play it straight for our remote game and we have now decided to discard the rule and replace it with this one:

If beginning a Move action in an area with enemy units present, you may only move to an adjacent area that does not contain enemy units, i.e. you can't move directly from an enemy-occupied area to an adjacent enemy-occupied area.

This takes away the hassle of tracking this information for each unit while keeping to the spirit of allowing flexible movement. We considered a rule that says you must move towards your baseline, but then would have had to add another rule that indicates what you do if the area is enemy-occupied. This is simpler. Needs to be tested though.

Who Holds Initiative

Who holds the initiative is a very important aspect of these rules. The player with initiative makes the first pick on the tactic chart in the Tactics Phase and makes the first action in the Action Phase. Given that close combat allows you to strike first, with your opponent striking back with whomever survived, being first is a strong advantage.

Now the rules are clear on who holds initiative at the start of the game. (The player with the most mounted and skirmishers has initiative for the first turn. If tied, roll a die.) It is also clear that you seize (or retain) the initiative if you choose the tactic Seize the Initiative. What is not clear is who holds the initiative if no one chooses to use one of their four precious tactics tokens to play Seize the Initiative.

There are really four possibilities: 1) whomever currently holds the initiative retains the initiative (I've got it so I keep it); 2) initiative passes to the other player (I did not maintain the momentum); 3) initiative is determined by the rule that determined initiative for turn 1 (count remaining mounted and skirmishers, highest gets it); and 4) randomly determine who gets it. Honestly, I have seen all four mechanics in various rules.

There is nothing in the rules that would suggest #4 was correct, however. The rule for first turn initiative states "for the first turn", so unless there was a rule that states "use the rule for determining initiative on turn one", that seems a less likely choice. So the only logical choice are retain and pass. Therein lies the issue. The rule for the Seize the Initiative action states:

"If you have selected this tactic, follow these rules when you activate it:

  • Taking this action allows you to take (or retain) the Initiative from the start of the next turn. You may wish to use a marker to keep track of who holds the Initiative.
  • In some scenarios, this tactic can also be used to trigger a "special event" such as dicing for reinforcements, inspiration from praying by monks, and so on. (Chapter 4 suggests some ideas.)"

The confusing part is the phrase "… allows you to take (or retain) …". It implies that if you don't take the action you are not guaranteed to retain the initiative. But if you do not automatically retain it, then how do you determine who has it? There is another irritatingly worded rule in the Phases of Play:

"3. End Phase. Check victory conditions and end the game now if these have been fulfilled. Otherwise, check which player holds the initiative for the next turn and begin it."

If initiative is automatically retained, if no one chooses the Seize the Initiative action, why would it tell you to "check". Again, how do you check? (It has a rule for turn 1, hence why I felt it was option 3.)

The phrase "… if you have selected this tactic …" is also key here in that the only mention in a rule of taking the initiative is in this rule. So taking the initiative, other than the initial determination for turn 1, requires you selecting that tactic.

In the end Shaun convinced me to go with initiative is retained if it is not explicitly seized by your opponent.

Uncertainty

While I now think the rules are a little less clear than before (when no one was disagreeing with me), I also realize that there is more uncertainty built into the system.

As a solo player it is hard to surprise yourself. (I even wrote about the subject on my Solo Battles blog, which Shaun and I batted back and forth in the comments.) But this game (below) opened my eyes about the uncertainty that I forget about because I am playing both sides and it is hard to divorce your mind from considering the impact to one side while making a decision for the other side.

One element of uncertainty that has a large impact on the game is random terrain generation and placement by the players. I had two woods in my test game (plus a hill) and I let the dice essentially place the woods out of play. Players won't do that.

Another element is deployment. (Both Shaun and I admitted that when we played our solo test games we simply laid out one side completely, then laid out the other. We didn't follow the process.)

Finally, the process of selecting tactics actually produces less uncertainty than I thought initially, but it does produce some, surrounding who will spend their precious tactics point to seize (or retain) the initiative. But for the most part, tactics selection is pretty formulaic.

For these reasons I am changing the Uncertainty rating of Age of Penda from 3 to 4.

Summary

So, what does all this mean? I think I have to change my Tournament Tight™️ rating for AoP from a rating of 4 to a 3 and the Uncertainty rating from 3 to a 4. With a few changes to the wording – which may or may not reflect the intent of the author – I think you can get the former to a 5.

The rules are still very much recommended.

Remote Gaming

In a comment on the last blog post Martin Rapier mentioned remote gaming which, given that Shaun is in Australia and I am in the USA, is what we had to do. Our setup was to use a private Discord server for voice, chat, and image sharing (from our cameras) and an online die roller for rolling dice and logging actions sequentially. The die roller is nice because AoP uses a 'bucket of dice against a target number' combat mechanic so you can type something like #14D6E4, for example, and it will roll 14 D6 and count the number of dice that were 4+. There are all kinds of dice codes to simplify die rolling.

We continued to use Rolz because it is the tool we used when we played One-Hour Wargames by email. We could roll the dice when it was our turn, tell the other person it was their turn, then they could confirm the transcribe the results on the copy of the map they were keeping. Plus it keep a log of the action, so you can write comments like "Attacking with the Knights from A4 to B3" and then follow it immediately with a die roll.

I considered using my iPhone for video – gaming buddy Justo and I did that once – but it was a pain to get pointed in the correct direction so it covered the map yet wasn't in the way of me gaming. So instead I just took picture of my copy of the board after each action and uploaded it to the Discord channel.

As you can see in the image above, I decided to use painted Jenga wooden blocks to represent the unit. I did this not because I don't have any well-painted or appropriate figures. I do. But I think it is very hard to figure out what is going on when you are trying to first figure out what exactly you are looking at.

In the picture above it is clear that once side is blue and the other side is red and white. The white blocks are red's mounted troops, the medium red are their unarmored warriors, and the dark red their armored warriors. Blue's mounted troops are brown and blue (dark brown being the leader), light blue are skirmishers, and medium blue are unarmored warriors. This makes it easy to discern who is what.

Not to knock Shaun's setup, but to illustrate the point, this is his version of the same starting deployment.

I think the unarmored warriors at the top are three figures to a base versus four being armored warriors. If only one of us were keeping track of the movements and the other player was playing remotely, with no setup on their side, I know which version I would rather use. Are my blocks as aesthetically pleasing as miniatures? No. My they are more easily identifiable through a remote camera. Nonetheless, I would like to hear from you that do remote gaming, how do you do it (exactly) and what challenges have you faced (besides people actually following through and doing it)? Put them in the comments or hit me up on Twitter/X where I am @DalesWargames.

The Game

I decided to try a little experiment. My first game was a pretty standard Normans versus Anglo-Saxons, except that I was at a 60 point game (rather than the standard 80). The second game was a little different. I tried a Viking raiding force against Anglo-Saxons, but the Vikings chose a superior Warlord for 20 points, leaving them with 60 points of troops. The Anglo-Saxons had the standard Warlord and applied the full 80 points to troops.

The basic formula for AoP is that every two points grants you one Battle Rating (BR). So a standard army is always 41 BR (the extra 1 point is your free Warlord). If you take a superior Warlord you are essentially giving up 10 BR, or ¼ of your combat power in exchange for one tactics token each turn. Is it worth it? Well, the Vikings lost, but AoP is a very dice-heavy game so it could have been bad luck. On the other hand  dice are generated by BR so the more BR the army has, the more dice it gets to throw and more hits it gets to absorb.

That said, I decided to give a superior Warlord a try again. Also, I wanted to try and maximize the advantage of mounted warriors and skirmishers as both of those troop types share two special tactics: Rush, or the ability to move two squares; and Skirmish, or the ability to shoot then retreat one square. So my army was as follows:

  • King of Strathclyde (brilliant leader) at the head of a Mounted Warrior unit
  • Three additional Mounted Warrior units
  • Two Skirmisher units
  • Two Unarmored Warrior units

As a note, I misread the unit selection rules. I did not read that Skirmishers can only make up ⅓ of your army, at most. My original plan was four Mounted Warriors and five Skirmishers. But when Shaun pointed out the rule (in a QRS he wrote up) I quickly changed three Skirmishers for two Unarmored Warriors about 5 minutes before the game.

Shaun went with a Frankish force (I believe he said), with the following:

  • Dux Travers leading an Armored Warrior unit
  • One additional Armored Warrior unit
  • Three Mounted Warrior units
  • Five Unarmored Warrior units

Here was the board, terrain placement, and troop deployment.
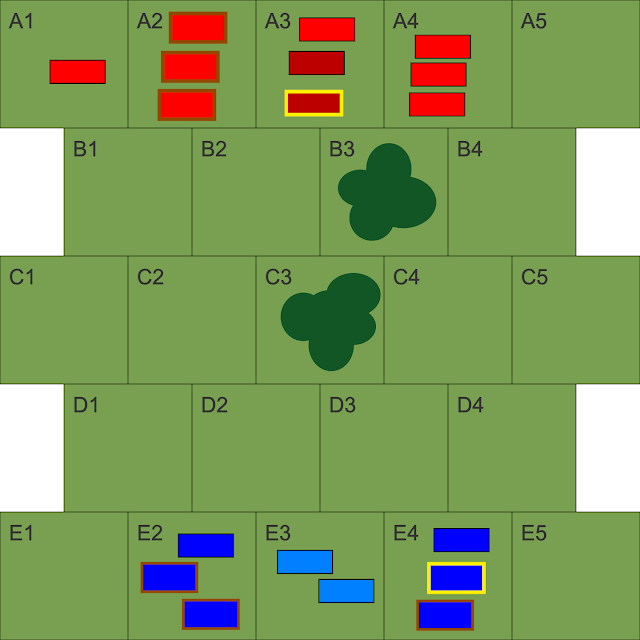
The dark green blobs are woods. There is no other terrain on the board.

The blue forces are the Strathclyde troops and the Franks are in red. Blocks with thick, brown outlines indicating the Mounted Warrior units, those with a yellow outline indicate the unit with the commanders. The medium color blocks are Unarmored Warrior units, the dark color blocks are Armored Warriors, and the light colored blocks are Skirmishers.

I should start by saying that the last minute change to my army list wrecked my initial plan and rattled me. I deployed poorly (as you will understand in a moment).

My plan was to move my Skirmishers into the woods using a Rush. As it happens, this also allows Mounted Warriors to move at the same time. So with four Mounted Warriors and five Skirmishers I would have captured the woods in C3 and had all of my Mounted Warriors anchoring their flanks on both sides of the woods in row C. Instead, because I deployed my Unarmored Warriors with my Mounted Warriors, one unit per area, I ended up leaving the two Unarmored Warriors on the baseline, in two areas no less, requiring two Move actions later to try and recover from the situation. Instead, I should deployed with each area having only two units, keeping the two Unarmored Warriors together. Details, details…

The other lesson for why I should play a game with another player before doing a formal review is because sometimes I don't take certain actions because they don't make sense to me, even if they are allowed in the rules. For example, the idea of a line of Warriors on foot charging into a woods is just something I would not have done, leaving the woods as an anchor or moving troops in slowly. I definitely would not have thought about using Charge or Rush to allow Mounted Warriors to do so. But both of those actions are allowed. When Shaun did it I was surprised. I didn't say anything because I knew it was allowed and that I had simply put blinders on because of rules I have played in the past. It is things like that, your own personal biases due to rules you have played previously, that can distort your thinking about a new set of rules. My problem is that I just get so excited about a ruleset that I want to share it.

Continuing on – you've probably guessed at what happened – because the Skirmisher firepower had been lowered from 10 dice (five units firing from two areas) to 4 dice, my shooting was much more ineffective. Further, when he charged his Armored Warriors into my woods, the odds were fairly good that he was going to wipe out the Skirmishers and they would not even get a return attack. Even if they did, it would be very weak unless Shaun got very unlucky.

With the Skirmishers gone and my forces scattered across the board (six units in four separate areas), it felt like what happens to me in DBA. My lack of discipline at keeping my groups together means it takes more actions (PIPs in DBA) to control the force. At least I had the extra tactics token.

What was interesting was that – save for the first turn – our pattern of tactics selection was nearly always the same.

  • Dale: Special Tactics
  • Shaun: Special Tactics
  • Dale: Rally
  • Shaun: Battle
  • Dale: Battle
  • Shaun: Move
  • Dale: Move
  • Shaun: Move
  • Dale: Move

Here is a reminder of what the Tactics Chart looks like. Recall that each player alternates placing tokens and only one player may place one token in any given box, i.e. the action in that box can only be used once, by one player.

Why this pattern? Once I selected Special Tactics if Shaun chose anything other than Special Tactics then he would have been denied a Charge that turn. That is why he did not get to Rally until he Seized the Initiative. The third play is always Rally, if only to deny the enemy a chance to rally or as a safety move if a battle goes poorly.

Same with Battle. Once someone chooses Battle the next player's play must be to grab the second Battle otherwise they could be hit up to three times where their opponent strikes first.

Every so often I would hear Shaun pause on his fourth selection, and I would always say "thinking about whether you should take Seize the Initiative?" He was. It comes at a painful price, especially when it effectively lowered him to three actions while I would have played five. With two Move Actions I could have moved two areas away, denying him the ability to Charge me as the first action next turn.

At least in theory. Because of the broken rule where you have to move out of an enemy-occupied area to the area you came from previously it made for some strange moves.

Long story short, my Mounted Warriors wiped out his Mounted Warriors, but were blown from the combat. His Armored Warriors followed up behind his mounted and wiped out half of my mounted in turn. That left me with an even combat, which I did not want to risk. So I went after his troops that were isolated while he went after mine. Eventually he ended up with two foot blobs hiding in the woods and my mounted circling, looking for an opening to charge him out in the open. Eventually it came and I rolled poorly on my dice, and ended up so wounded I could not sufficiently rally, even with having that action all but one turn.

I was down to where I had three BR left, one for each of the remaining units, so my King decided to retreat with the mounted troops, leaving the Fyrd behind to cover the retreat. They were quickly eliminated and my army routed from the board. It had been a very bloody battle.

Honestly, it felt right. Cavalry pretty much being blown after a single charge in which they don't overrun the enemy. The woods dominating the battlefield.

What didn't feel right were the movement rules previously discussed. That is why Shaun and I have decided to change them for the next game. What also did not feel right to me was mounted being able to charge or rush through woods, and non-skirmisher foot being able to charge into woods. Maybe that is just the influence from other rules, but I still see these as formations, even if the details of handling those formations is abstracted away. Even though it adds complexity, I would like to see those additions.

Finally, AoP has a very restricted troop selection process. Skirmishers must always be 2 BR/four points and Mounted Warriors must always be 5B/10 points. Given that every troop type is two points per BR, why not allow a range of values of each troop type? Mounted Warriors at 5 BR means they are always heavy cavalry. For Age of Penda, that just isn't right. There were plenty of cultures that had lighter cavalry.

Had I been allowed my army selection would have been: two Armored Mounted Warriors (5 BR each); six Unarmored Mounted Warriors (3 BR each); and four Skirmishers (3 BR each). This would have given me my 31 BR (counting the 1 for the Leader) and my ratio of 1 Skirmisher for every 2 Warriors. I think that would have better represented my concept of Strathclyde (which is heavily based on what the Saga rules say they should be).

Game Summary

Gaming with Shaun opened my eyes to some of the rules and concepts that I took for granted, some of which were incorrectly interpreted. The longest discussion Shaun and I had regarding the game was whether taking the extra tactics token for 20 points was worth it. Well, because we were using the online die roller that logged all of the rolls we can look at some statistics.

DaleShaun
To HitHitsDice% HitHitsDice% Hit
4+327244%326847%
5+2540%144035%

The first thing of note is that the deficit of having 10 BR fewer troops than Shaun meant I rolled far less dice; 77 versus 108. That basically tracks in that I had an army 75% the size that he had. But that also shows the damage. I took 46 hits on an army with 31 hit points (overkills were still counted) while he took 34 hits on an army with 41 hit points (again, counting overkill hits). Any claim I might have on 'bad luck' is simply not born out. The telling effect was that the weight of numbers seem to far outweigh any value of having an extra tactical token. That token does not allow you to generate any more hits.

Funny, Shaun and I were discussing whether the extra token was worth 20 points or less. It has to be worth something, but it definitely doesn't seem worth 20 points to me. Then again, my deployment and play was flawed, so another test is in order.

I definitely see a lot of possibilities with these rules, including carrying it out to the Horse & Musket era and a WWII infantry game where players command about a company, plus additional assets (a tank, ATG, or off-board artillery).

Sunday, September 11, 2022

Another Scenario for One-Hour Skirmish Wargames

This post includes another scenario and some special rules for a skirmish game.

Playing OHSW Virtually

I wanted gaming buddy Justo to try out my version of the Sword & Sandal (S&S) variant of One-Hour Skirmish Wargames (OHSW) that I used in the last post, and get some feedback on the rules. Because we had to play virtually we first needed to figure out how to play a skirmish game using online tools.

The first option is something like Tabletop Simulator (TTS) on the computer, as there are a number of skirmish and mass-combat games to use miniatures rules with, such as this one for One-Hour Wargames.

If it does not have miniatures to your liking, you can always search TTS's Workshop for the keyword "miniatures" and find some others, like these medieval miniatures I found.

But, I wasn't sure Justo had TTS and, although we have both played games using Vassal, I did not want to tackle making or modifying a module for a scenario. So I fell back to my default: creating a grid for the map and using grid movement rather than freeform movement. The first problem to solve: how to convert OHSW to a square grid.

Converting OHSW to a Grid

As always, the first thing you need to do is figure out what the cell of the grid (square or hex) represents in terms of ground scale. Because most movement values are closely divisible by 3, I decided each cell was about 3" of ground, so a 3' square board would be 12 rows and 12 columns. Within a single cell you could have two friendly fighters (so four figures total, two for each side).

All distances were converted by taking the distance and dividing by 3, rounded to the nearest. So weapons with a 1/2" or 1" zone of control (ZOC) would be 0 cells (same cell only) and 2" reach would have a 1 cell ZOC and attack range.

In the original playtest we allowed long weapons to attack diagonal, adjacent squares, but I am leaning towards not allowing that. Diagonal squares represent a distance of roughly 1.5 times ground scale, or 4 1/2", which is a stretch for a weapon that originally had a reach of 2".

For movement it was the same, so light foot was 3 squares, medium and heavy were 2 squares.

When 'measuring', you count each cell in between the starting cell to the ending cell, plus the ending cell (but not the starting one). That is the distance. For squares (but not hexes) where you trace a line (of sight, march, or fire) diagonally the first such square will count as 1 square, the second as 2, the third as 1, the fourth as 2, and so on alternating the cost between 1 and 2 points each. Example: the player trace a line through four diagonal squares. The distance is 6 squares (1 + 2 + 1 +2).

The one exception that I made for fudging the distances was for the combat results. Combat results that force a figure to retreat always results in the figure retreating one cell away from the enemy.

Protecting Downed Friends

Another area that I wanted to address was the effect of a figure's ZOC has on enemy trying to dispatch downed friends. Although this should be added to the ZOC section of the S&S variant rules, they were playtested in this game.

Basically the rule is that if a figure is in the ZOC of an enemy, or you have an enemy in your ZOC that is in the same cell (within 1", in freeform movement games) it cannot dispatch a downed opponent unless that enemy is also engaged by another figure in close combat.

In the example above X2 cannot dispatch the downed A1 because it is in the ZOC of Y1. B1, however, can dispatch the downed A2 with a long weapon as B2 has attacked A4 with his own long weapon, engaging him.

Originally, I had the rule simply as you had to have 1 more figure than the number of non-Downed enemy figures. Both accomplish the same thing, but the current rule is a bit more complex when long weapons come into play on both sides. An example is the figure below.

Y1, with a long weapon, holds off both X2 and B1 from dispatching A1 until either X2 or B1 engage it first. Further, if Y1 wins that combat, either by killing, downing, or forcing the retreat of the enemy, it continues to block the other blue attacker.

Again, I want to stress this is not a 'grid' rule, but an adaptation of the S&S variant rules that I add to as I come upon new situations. The ability to easily dispatch downed foes has been the one area that has always bothered me about OHSW and this is an attempt to address that.

Town Raid Scenario

If you think you might have seen this scenario before it is because it is converted from the scenario "Town Raid" in the old Warhammer Skirmish scenario book.

The world of the Kingdom is a dangerous place and even in these civilized lands there is still more countryside than city. It is in these places where brave freeholders must struggle daily to make a living. Ever searching out fertile land for crops and grazing settlers have followed a small river out of the dark forest to the richer plains beyond. Out beyond the coast – and who know what danger lie off there? Can the small local militia protect the farmers?

Overview

A smaller attacking force – as part of a larger attack on a town – has been tasked with making a feint attack in one section of the town with the target of killing or absconding with the town's livestock, burning buildings, and causing general mayhem. The local militia are tasked with driving off the cattle to safety, preventing the burning of buildings, and slowing the attackers until a larger defending force can arrive to drive off the attackers.

Forces

Modified point costs are used, i.e. each figure costs 1 point + 1 point for each point of Army Motivation.

Defenders

  • 40 points
  • May include up to one leader, i.e. someone with the Leader (X) special ability.
  • 10 Livestock critters
  • One 6" (2 square) barricade in the top 3/4 of the map (rows 1-9)
  • If no leader is present then the maximum Army Motivation is 1, otherwise it is 2

Attackers

  • 80 points (no more than half of the figures may have bows; no mounted troops allowed)
  • Must include one leader, but may have a second
  • Minimum Army Motivation is 1 with a maximum of 3

Battlefield

The buildings are not built for defense in mind, rather they are simple dwellings of farmers. The local militia had some time to set up a single 6" barricade. Red-brown rectangles are buildings. Gray rectangles are waist-high stone walls. Green circles are single trees offering no cover.

There is no difference between grass green and light brown squares; they are both open terrain.

Objectives

The Attackers realize that there is little to no value in this area of the settlement, other than the cattle, but they want to draw the locals into this area to fight fires while the main attack heads to richer targets. The game ends when the defending leader (if any) or attacking leader is killed, either side fails morale, or at the end of six turns. Calculates each side's points to determine a winner.

Note that the game ending – regardless of the reason – represents the larger defending force's arrival, and the end of the attacker's marauding.

Attacker

Each defending figure removed from the board - 1 point

Each livestock animal killed - 1 point

Each building totally destroyed - 5 point

Each building partially destroyed - 1 point

Defender

Each attacking figure removed from the board - 1 point

Each livestock animal alive or escaped - 1 point

Each building still standing and not on fire - 5 point

Each building still standing but on fire - 1 point

It is important for the players to realize that the victory conditions represent not who wins this little skirmish, but about the larger action occurring elsewhere. The defenders have 1/2 of the points of the attacker; they are expected to get crushed. So just because the attacker wins the fight, it does not mean that they will win the scenario.

Players are advised to understand and keep an eye on the objectives. The defender can lose every single figure and still win the scenario. It this is not the type of scenario that you like to play – where your forces will almost certainly lose militarily – I suggest that you not play the defenders.

Deployment

The defenders deploy first, then the attackers, then the livestock is deployed.

All defenders must start in the northern half (rows 1-6) of the map, save for a maximum of 2 figures, which may man the barricades. No two defending figures may start in the same square.

The attackers must enter from the south (bottom of the map). However, they must be deployed adjacent to the column where they will enter.

Livestock are then placed alternately (defenders choose first) anywhere on the board at least two squares from any table edge or any other livestock model. (If a livestock model cannot be placed because all eligible squares are filled, then it may be placed within 1 square of another livestock model.)

Scenario Special Rules

Attacker's Initiative

The attacker always has the initiative on the first turn. Initiative is determined as normal on subsequent turns.

Livestock

Livestock are +0 in defense, draw 1 card, and do not attack back in close combat if they are attacked. They are killed when the attacker exceeds the defense value by 4 or more. If the animal is not killed it immediately retreats away from the attacker 2 squares.

Either side may spend 1 AP to drive a livestock model. The figure must be in the same square as the livestock. The figure may choose which direction the livestock model retreats two squares.

Any retreating livestock that comes within 1 square of another livestock, or killed within 1 square of another livestock, will cause that livestock model to retreat 1 square directly away from the retreating or killed livestock. This can cause a chain reaction.

Livestock that run off of the board in any direction save south will be considered saved for the defenders. Those that run off towards the south will be considered killed for the attackers.

Livestock cannot enter buildings or cross stone walls, so adjust their movement accordingly.

Livestock in the square reduce the number of models both sides can have in the square by 1 for each livestock model. Livestock moving into a square already at capacity forces another model out of the square (player's choice). For example, two defenders and one attacker are in a square. A cow retreats into the square making the capacity one model for each side. One defending figure must retreat from the square (away from the cow).

Setting Buildings on Fire

The attackers using one-handed weapons are assumed to have torches to light the buildings on fire. Any model with a torch that is touching a building and not in close combat may try to set it on fire for 1 AP. Draw a card and if it is red, the building is on fire and the figure loses their torch. (If black is drawn another AP may be spent and another attempt may be made.)

A defender not in combat may attempt to put out the fire. Draw a card and if it is black, the fire has been extinguished.

At the end of every turn (not round!), after morale and figure recovery is determined, but before the next turn's initiative is drawn, one structural point is removed from each building per fire.

A building is considered destroyed when five structural points are removed.

Playtest

My main concern with the playtest was getting Justo's opinion on the modified combat system and secondarily how the scenario played. Although I recorded the action through drawings, there were a number of mistakes made that sort of invalidated the game. But he got a feel for the combat system and I added a few refinements here and there to both the variant and the scenario. Our mistakes were:

  • Somebody forgot to put their two Jokers into their deck, making for an extremely long turn 2 with 8 rounds. (My second Joker was the third to the last card in my deck.)
  • I messed up on the movement speed of foot troops, so everyone was moving in slow motion.
  • I did not specify that the attacker's had to specify where there troops were deployed, which led to some painful flank charges that absolutely crushed my defenders.

Nonetheless, my defenders won a narrow victory. I am proud to say that I saved 7 of the 10 cows, defended 2, and only lost 1 to the roasting spit of the attackers. This was largely because Justo did not read the scenario victory scoring system and brought no one with torches (figures with only one handed weapons). But he did kill all but 1 of my defenders!

Overall the combat played very well. Again, I liked the movement stemming from the combat results, the interplay between forces around protecting downed friends, and their being sufficient variety between weapons and armor. The scenario also played out very well, with the Livestock rules in particular producing some interesting results as I was trying to drive cows into other cows to cause a chain reaction of retreats to safety.

Definitely something Justo and I will try again.

Thursday, April 07, 2022

First Attempt at a Map Campaign

One of the hardest goals I have ever tried to achieve is to add context my games. There are plenty of ways to try and achieve that, but I think the one most gamers go for is to play scenarios in the context of a larger campaign game. Hopefully, the larger campaign provides you the forces for each side, a location to be fought over, and both previous and subsequent battles will be affected by the results of the battle you are about to fight.

So what is a "campaign"? Essentially it is a larger game intended to consist of a series of smaller games, linked together over a span of time and distance. Sounds simple on face value, but it requires the gamer to consider many factors that they normally abstract away from normal, tactical play, such as supply and logistics, marching rates (outside of the battlefield), and thinking about multiple objectives spread across distances. With campaigns you have to figure out if you want to continue to abstract many of those factors away.

Rather than talk about the different types of campaigns, this post is going to focus on a map campaign that I started with gaming buddy Justo (in Texas). It started with watching YouTuber The Joy of Wargaming's series Five Villages (which starts here), which was a map campaign he played using the rules The Chosen Men (so it was a skirmish campaign). I decided to play that same campaign after watching the first four episodes. (I should have watched the fifth episode before starting the campaign, by the way.) I drew up my own version of the map (putting it on hexes), created the opposing forces, and developed some rules (largely taken from the original campaign). The next problem to solve was: what strategic orders do I give each side?

Because my intent was to play the battles out solo – the objective of the campaign was simply to produce scenarios for battles to be played out on the tabletop, especially unbalanced and unlikely scenarios you would not play face-to-face with an opponent – I decided to enlist my gaming buddies to provide me the basic strategies for the two sides and then I, as umpire, would execute the orders for both sides and resolve the resulting conflicts.

I enlisted gaming buddies Justo and Chris (from Ohio) for the two sides, but it turned out that I did not convey the requirements adequately and it fell through in about a week. That said, Justo had a map campaign in his tool box – also based on a The Joy of Wargaming (TJoW) video series, in this case an Imagi-Nation map campaign (which starts here) – and he suggested that I give the orders to one side, he does it for the other, and we each play out our own campaign separately. Rather than use this plan for my original campaign, I decided to go ahead and try this one.

Initially Justo provided two map drawings, but eventually I ended up converting these to hexes.

WestoniaEastonia

As with the video series, Justo and I decided to use the system provided in The Solo Wargaming Guide (TSWG) by William Silvester for conducting map movement, dealing with supply and logistics, weather, mobilization, and determining the number of initial forces. (Because the campaign is measured in days and not weeks or months, recruitment is not an issue.) Now, my opinion of this book has been pretty low since purchase. When it comes to solo wargaming, I really don't want to lean on random tables and this book does that heavily (as does Featherstone's). But as I looked through all the variables you have to contend with, it seems like this is a good way to start until you sort out your own rules with fewer fully random tables.

Justo had created the maps, set the city sizes, drew in the terrain and roads, and stopped sort of determining the force composition and location. That is where our campaign started.

I saw that the map favored Westonia, as it had more lesser villages (class C, D, and E urban areas), and thus would have a smaller army, so I chose Eastonia as my side figuring it would likely be the defender. Here is the full process that we used for our campaign:

  1. Select campaign map
  2. Select which side you represent 
  3. Roll your side’s forces
    1. Roll total forces for each city
    2. Divide Regiments into Line Infantry and Line Cavalry
    3. Subtract the number of Line Cavalry from individual Companies; that is the number of Artillery Batteries
    4. Divide remaining individual Companies into Light Infantry and Light Cavalry
    5. Assign Regiments and individual Companies to cities
    6. Name Regiments and Companies
  4. Divide forces into Brigades
    1. Define Brigades (which Regiments and Companies, from where)
    2. Roll Brigadier Generals’ Commander Competency Rating (CCR)
      1. No more than three Brigadier Generals per side
      2. Any additional Commanders will automatically have a CCR of ‘3’.
    3. Assign Brigadier Generals to each Brigades
    4. Name Brigadier Generals
  5. Make a Muster Plan
    1. Define the Muster Rating of each city.
    2. Identify Muster Point for each Brigade.
    3. Define travel from origin Cities to Muster Point.
  6. Define an Action Plan
    1. Identify starting time for each Brigade
    2. Identify general orders (attack, defense, delay, etc.)
    3. Identify route of march
    4. Identify goal of campaign

Step 3, roll your side's forces, comes straight from TSWG, which is as follows: Class A gets 2-5 Regiments (each of 5 Companies); B gets 1-5 Regiments; C gets 4 Companies; D gets 3 Companies; and E gets 2 Companies. Given that both sides started with one A and three B class cities, both sides would start with relatively the same number of Regiments. Note that 3.2 and 3.4 above defines what class of troops come from these sources, Line Infantry and Line Cavalry only come from Regiments, and thus only class A and B cities produce those troops. The class C, D, and E towns only produce Artillery (in limited amounts), Light Infantry, and Light Cavalry. So my feeling was that the extra towns of Westonia would not produce a significant advantage in troops, but enough to justify me being the defender.

As with TJoW, we decided to have one Line Cavalry Regiment for every five Line Infantry Regiments raised, rounding fractions up. I rolled up fifteen Regiments, so that gave me three Line Cavalry Regiments and twelve Line Infantry Regiments.

With three Line Cavalry Regiments, you are allowed three Artillery Batteries, subtracted from your total number of Companies (28) raised from your C, D, and E towns. In hindsight I think that may be a little too few batteries, but we press onward.

Of the remaining Companies (25) we decided to have one Light Cavalry Squadron for every three Light Infantry Company, rounding fractions up. That gives me seven Light Cavalry Squadrons and eighteen Light Infantry Companies. Along with our three Brigadier Generals, this is my total force disposition.

I am not going to bore you with the nitty gritty details of where the units ended up, but my basic plan was to pool my Light Cavalry in certain towns so those forces could muster and move faster to engage the enemy while the rest of the units muster for defense. My sole goal was to attack on the south road, taking the first C class town on that road, and attempt to hold on to that until the cessation of hostilities, hoping I could win that in subsequent peace negotiations or at least use it as a bargaining chip in the event I lose any towns or cities.

By the way, given that we are not using any siege artillery and the class A and B cities are fortified, there is essentially no way to capture the enemy's cities; only the towns are vulnerable.

The first wrench in the campaign was that Justo did not want to determine, at the start, which side was the attacker and which was the defender. Rather he wanted to have each side write attack orders without knowing who was attacking. I thought that was a little strange, but agreed to it. After all, we would each be playing our own campaign so whoever ended up attacker in one campaign might well be the defender in the other's, so I guess it made sense and was easier than writing one set of orders if you are the attacker and another if you are the defender.

My Version of the First Elope-an War Campaign

I will be reporting on my campaign here and on my Solo Battles blog, given that the tactical play will likely be solo (though not necessarily, if I enlist the aid of local or virtual players).

The Westonian Duke, after sending his daughter ahead to Eastonia to eventually be married to the Prince of Eastonia, and subsequently finding out that the Prince had absconded (eloped) with his daughter to another country, decided this was the final straw. After decades of attempts to make peace with the Eastonians, by tying their families through marriage, this was too much! With the loss of his daughter there was no treaty between the two, especially as the Count of Eastonia was claiming it was their strumpet of a daughter that lured his son and heir away! This means war!

Westonian ended up as the attacker so I have to determine how long it takes Eastonia to react to the news and send out their mobilization orders. Looking at the Mobilization table in TSWG, the Eastonian's mobilize five days after the Westonian's do. Clearly the Count did not figure the Duke would react so poorly to the news.

Diary

April 3, 1750

Light Rain (6) greets the Westonians as they start to muster. Each city has a Muster Rating to determine how long it takes the news to get to that city, and how long it takes the local garrison commanders to get their troops mustered locally.

April 4, 1750

A light rain continues. Troops in Tresvoces, Siayfin, Avrafin, and Vacaque have completed their muster.

April 5, 1750

The rain has stopped (7). The troops above are moving to their Brigade Muster Point while the remaining troops complete their muster in their respective cities and towns. (I did not roll a single Westonian city with a Muster Rating of '1', which is the slowest Muster Rating. They have clearly been contemplating this action and have been drilling.)

April 6-8, 1750

The Vanguard of the Brigade SLT completes its muster in Astaelfin and prepares to move on towards Firnskuppe.

April 8, 1750

Mobilization orders are sent out to all Eastonian units. Units will muster in their cities and towns on the 9th through 11th, depending upon their Muster Rating.

April 10, 1750

The Vanguard of the 1st Westonian Brigade arrives in Firnskuppe, just as the Firnskuppian Husaren (two independent light cavalry squadrons) complete their muster. One Light Infantry Regiment and one Light Cavalry Regiment versus these two Husaren squadrons… Not quite your normal matchup to play on game night!

Fighting Tactical Battles

The next question is how to fight tactical battles, going from the campaign map to the tabletop and back. In this regard Justo and I have again decided to take our own routes. We can use whatever rules we like to fight out the battles, but they need to be able to map to our unit structures.

One-Hour Wargames

I am considering using Neil Thomas' One-Hour Wargames (OHW), especially for the simpler battles. I like the basic mechanics of either moving or firing, which feels right for this period. The issue is how to represent the units?

The basic unit in the campaign is the company. Towns and cities provide a certain number of companies to the army. Cities provide the line units, and thus are organized in units (regiments) of five companies each. Towns can either combine their companies into consolidated regiments (again, of five companies each) or use them as independent companies. Given that an OHW unit is 15 hits, that can easily be translated as 3 hits per company in a five company regiment. That would make independent companies and squadrons as 3 hit units. Any permanent losses in hits from the unit can likewise be reflected back to the campaign by removing a company for each 3 hit loss.

The problem with this, however, is that a unit maintains its firepower/melee power regardless of the number of hits remaining, so five 3-hit units are far stronger offensively, than one 15-hit unit. The former would be throwing 5D6 in combat while the latter would only be throwing one. How to resolve that?

Another method would be for one OHW unit to equal a company, but force the companies in regiments to operate together (in formation). That might be interesting. Basically it would be scaling OHW up (tremendously), as this first battle would be 10 units versus 2.

Finally, I can just see forcing all independent companies to consolidate into units of five companies, with the fractional unit having three hits per company.

2x2 Napoleonics

Justo will be using 2x2 Napoleonics by Rod Humble, which was also used in the original TJOW campaign. Although I enjoyed those rules immensely back in the day – it was one of the first rule sets that Justo and I played almost 20 years ago when we first met – I have to say that I have outgrown them a bit. Roll a D6, add modifiers from a table, and compare the result to a chart (which is fairly easy to remember). Very 1970s-80s.

One-Hour Skirmish Wargames

Interestingly, Justo and I discussed these rules on our last call. The idea was to convert the rule mechanics – using a standard deck of cards as the sole chance element – to mass combat. As I pondered the idea more I liked what I was coming up with, but I don't want to hold up the battles as I try and sort it all out. So maybe later in the campaign or another one.

Well, that's the start. I have a butt stomp to play out. I'll let you know how it goes in the next post.

Wednesday, March 09, 2022

Abstracting the Battlefield

Abstracting the Battlefield

Recently I noticed an increase in the number of blog and Facebook posts about '3x3' gaming. Wondering what it was I did some more research and found that it is basically abstracting the battlefield away into a square gridded battlefield of 3 squares by 3 squares (hence '3x3'). Actually, it is slightly more complex.

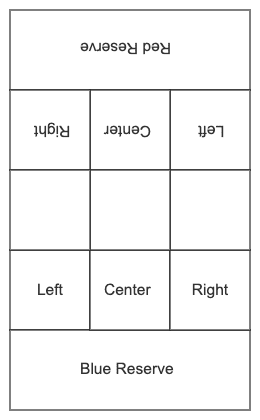
As you can see in the diagram above, the board is comprised, by row, of you side's Reserve area, your baseline, the center 'no-man's land', your opponent's baseline, and your opponent's Reserve area.

The board is further sub-divided into a left flank, center, and right flank. This effectively makes nine separate positions where units can maneuver and fight one another. All area terrain would be contained within a grid, thus defining the terrain for all of that particular grid location; there would be no areas within a grid where units would be 'in' the terrain while others were 'out'. Linear terrain would generally take the form of being 'on the lines' between areas.

The reserve areas are considered off-board and touching the left flank, center, and right flank of that side's baseline row.

Generally movement is simplified to foot troops moving one grid orthogonally (never diagonally) and mounted, fast, or vehicular units moving two grids. Close combat occurs by moving into the enemy's grid, small arms ranged combat is one grid away (again orthogonally), and longer-ranged weapons two or more grids away.

Although these boards are represented as a grid of squares, I consider this more of an area movement game than a square gridded game, but that is me.

The more I thought about this 'new' style of game, the more I realized that I had played it before, more than two decades ago. The game was called Dixie and it was a card-based wargame put out by Columbia Games. As a game Dixie was simple, but fun, but what hurt it was that Columbia Games was trying to capitalize on the collectible card craze that Magic the Gathering had started and had produced randomized decks, making it more expensive to collect the whole series. (They later realized the error of their ways and produced full sets people could buy, but I think it was too late by then.)

Dixie came out with three versions, each representing a different battle in the American Civil War, but all followed the same basic rules. The image above shows the abstract battlefield that it used. You will note the similarities to the 3x3 format. The primary difference is that there is no 'no man's land', or middle row. Each side goes straight from its baseline to the enemy baseline.

Dixie did add an advanced rule that allowed a player to make a flanking attack, moving straight from the reserve (the player's card hand) to the enemy's left and right baseline area, but these flank positions were not proper areas where units were held; it was more of a visualization to help you understand how a unit could go straight from the reserve to the enemy's baseline.

Another game that drew upon this concept — and gave credit to Dixie as inspiration — was GMT Games' Sun of York, also a card-based wargame, only this representing the battles of the War of the Roses.

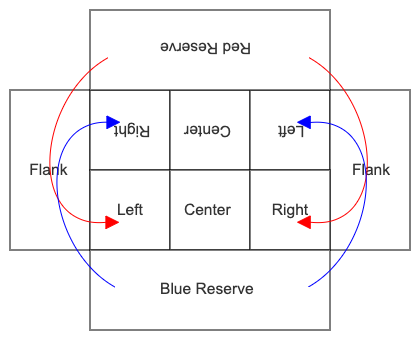
As shown in the image above, this has been the most 'complex' of the designs to date (that I am aware of). It is similar to the 3x3 model, having three rows and three columns, along with a red and blue reserve, but also having separate red and blue flanking positions. Further, the flanks contain units and those units can push into the enemy flank positions. (No combat occurs on the flanks, however.) As with all other formats, you can never push units into the enemy's reserve area.

Conceptually, I think I actually like a mixture of the Sun of York and Dixie models. I like the single flank areas of Dixie, but I prefer them to be actual positions where units are posted. The archers in the woods at Agincourt come to mind. I do prefer the 3x3 grid for the main battle area that both 3x3 and Sun of York share. I am not sure why 3x3 does not account for flanking attacks. Perhaps because it envisions itself as being a portion of the total battlefield while both Dixie and Sun of York are reflecting the entire battle?

Another element that might define the scope of the action is the stacking limit applied to each cell of the grid. I think most players allow only two units in the 3x3 model while both Dixie and Sun of York allow four (plus Leaders).

Representing Campaigns and Battles

Recently I started playing Marvel United (MU) — a superhero versus supervillains game — with my wife (she has taken pity on me while I am still recovering from foot surgery and cannot go out and game with others) and it also abstracts the battlefield. If you think about the storylines in comics it is generally a series of battle vignettes in various locations between the superheroes and the supervillain's henchmen, with an occasional short fight between the superheroes and the supervillain before a final big fight between them that generally (hopefully) ends in the supervillain's defeat. MU models that by making each area of the map a different location where battles can occur, with each location not being broken down any further as these are not mass actions but rather skirmishes between a few people on each side.


Characters move around the map (shown in the image above) from location (six large squares arranged in a circle) to adjacent location, clockwise or counter-clockwise, with some characters able to move to any location due to their powers (typically flying) or equipment, fighting the opponents found there. Once enough missions have been completed (defeating thugs and henchmen, rescuing civilians, performing heroic tasks, etc.) the final battle can commence and the superheroes can start dealing damage to the supervillain. It is a very interesting game model that I will be reviewing on my Solo Battles blog at some point, but I think it shows an innovative way to reflect the cinematic battles that occur over time, but not the same location.

Summary

Games like these allow players to quickly fight battles and get to a decisive result very quickly, minimizing the fuss and muss generally required with rules that have players carefully measuring movement and ranges, changing formation, and jockeying for position to optimize tactical effectiveness. In these games simple rules determine how units within an area face off and combat one another. The most optimal formation is considered to be automatically used by the unit commanders (which you are not; you are the overall commander), so all such details are abstracted away.

If you like these sort of games, they not only allow you to get into and resolve them very quickly, they are often designed to be gamed in a smaller space, such as a folding table. I personally like them because they also allow you to stay seated for most of the game, much like a board game does. But that is because I am an old man who will have back pain by the end of a multi-hour gaming session.

If you have seen other format of these area-type game boards, let me know. I know that the AWI miniatures rules that I reviewed, The World Turned Upside Down, promised to be an area map battle game, and that was what definitely drew me to it initially. Ganesha Games' Of Armies and Hordes is similar to MU in that the areas are more for the campaign and the battle is fought out in that single area location. You could easily combine those campaign rules with something like the 3x3 model to 'zoom in' and fight out the battle once you determine which area on the map the conflict occurs. (Hmmmm...)

Wargames are Puzzles

Recently I watched a video on how to play MU and the narrator said "Marvel United games are basically giant puzzles. You pick the supervillain that you are going to fight and they have specific characteristics — henchmen, attacks, hit points, ways they can be defeated, victory conditions, etc. — that you look at the determine which team of heroes and tactics you should select to defeat them. That is the puzzle solving part of the game experience." I thought about that and recognized that wargames are effectively the same. They are complex puzzles to be solved.

I know that when I wrote about Tactical Exercises and Micro-Games back in 2011 I was alluding to this idea. When you have the task of taking a house (skirmish) or a town (mass battle game) within a larger battle, the taking of that structure is a puzzle. There is a certain way to approach the task, you need a certain amount of troops compared to the defending force. You run these micro-games performing these singular tasks in order to understand the 'formula' for success.

For example, when I was 13 or so and playing Column, Line, and Square (CLS, a figure-heavy set of Napoleonics rules) I would generally bash my troops against a town trying to take it and always losing. One day an older gamer said "let's just play you attacking a town" rather than playing a larger game that had all kinds of elements, like roads, woods here and there, some walls and hedges, and so on. He said all that other stuff are distractions. "Right now, you need to focus on how to take that one building." So, that is all we had on the board, one building and nothing else. He took some points and bought Russians and I had more points (because I was attacking) and I bought some French. Got slaughtered. Rand it again and still got slaughtered. He said "Why were you slaughtered?" I realized the math of the situation — the minuses I had to contend with for firing at troops in cover — and came to the conclusion that if I truly needed to take the house, I did not have enough troops to overcome the penalties. So we started playing the same game with me getting increasingly more points. Eventually I won and I came to realize that there are some puzzles you cannot solve, i.e. attacking a town in CLS with only a 4:3 point advantage will always result in a loss, so the winning move is to figure out how to not attack the town. After that weekend of playing the same simple battle a dozen times and reaching my Eureka moment, I became a much better player. That was also when I realized that I liked wargames not because I like playing games, but because I like solving puzzles.

The problem with many rules though is that they throw so many variables into the mix, then beat the puzzle right out of the game. Most players cannot work through the probabilities of a dozen turns worth of dice rolls to determine the odds of winning. (I certainly cannot.) Adding other factors like troops defending terrain (-1 to firing for cover), and whether they will even be able to reach that cover before you have a chance to fire (because of variable movement rates) and many rules get reduced to games of chance. Don't get me wrong, I am not saying to remove all elements of chance (although I do play and did review various deterministic rules), but some rules just go to far.

I have talked with a number of gamers, however, that feel the opposite. Whereas I like to analyze games, in fact that is a particularly strong element of my enjoyment of gaming, others tell me that they enjoy more the rolling of the dice and seeing how the battle unfolds. Sure, they like to win too, but if the 'story' was a loss but fun that is far more preferable to a boring win. I have been accused many a time of being too over-analytical and taking all of the fun out of gaming, but that has only made me realize the two general types of players: puzzle solvers and gamers.

What about you? Are you looking for rules that are puzzles or games?

Saturday, January 22, 2022

Sword and Sandals (One-Hour Skirmish Wargames)

Sword and Sandals is a variant for One-Hour Skirmish Wargames, published by the author John Lambshead. (You can download this for free in the Files section of the Facebook group One Hour Skirmish Wargames fan page. Basically it extends OHSW backwards in time, allowing you to play pre-gunpowder eras, adding additional rules for melee weapons and armor.

My gaming buddy Justo wanted to play OHSW virtually, so first I had to figure out how to do that. Normally when I do virtual games I play on a square grid and we call out grid references, like the childhood game Battleship. "I move my Infantry from A4 to B4 and then fire on your Skirmishers at C4." Believe it or not, I did not want to use a grid this time, but a good, old-fashioned ruler. (I know, I know, very strange of me. I will pay for it in back pain tonight, I am sure.)

Secondly, I wanted to get good shots of the game in progress because I was going to be pointing my phone camera to the board using Discord, so Justo could see the game. I decided to try using an overhead shot so that action farther away from the camera would not be distorted and I would not have to move the camera around. (Let me know if you think this works compared to my earlier efforts.) Whenever I did overhead shots before, I would basically stand up on a chair and shoot downwards. It was very hard to tell when I had the camera centered and aimed properly. This time I decided to use a microphone boom to hold the camera directly over the table. We will see how it works, but here is what the setup looks like.

For the figures I wanted to use my large 42mm wooden figures as I thought they would be more visible for the game, plus I have not used them in a while. My choices were Napoleonics or Dark Ages, so I chose the latter.

For the terrain I was considering using my wooden terrain and a grass colored felt cloth, but decided to go with some printed cardboard terrain hexes that I purchased on Kickstarter some time ago. Ironically I see these still on sale in a local hobby shop, but the company that manufactures them is out of business. I think given the overhead view, using flat terrain will be sufficient. Besides, the hexes are very colorful. The figures are just a little large for 42mm.

This is a bit of experiment as I am not really sure if the action will be easily seen. (You can always click on an image to look at the larger version, of course.) Here is how a game in progress might look from overhead.

Whereas this would be the shot I would normally take.

As I say, feedback is always nice.

The Forces

Viking Raiders

Motivation 2 (2 points)

NameWeaponRHSMADPointsNumberSpecial
WarlordAxe2"145"13131Leader 2,
Tough 2,
Bruiser 2
Inspiring
HearthguardAxe2"145"135 (20)4Bruiser 1
BerserkerH Spear1"236"2261Bruiser 1
Tough 1
BondiH Spear1"236"224 (8)2

Total: 49 points, 8 figures, and 8 pieces of loot.

Saxon Defenders

Motivation 1 (1 point)

NameWeaponRHSMADPointsNumberSpecial
WarlordSword1"325"13141Leader 1,
Tough 2,
Bruiser 2
H Javelin12"23

HuscarlAxe2"145"1351Bruiser 1
FyrdH Spear1"236"224 (16)4
FyrdKnife½"318"213 (12)5
Self Bow24"11

Total: 51 points, 11 figures, and no pieces of loot.

The Scenario

The Viking Raiders are fresh from raiding the local church and laden down with loot (not being able to find beasts of burden). They are heading back to their longship unaware that the local fyrd is waiting for them at Stony Creek.

Objective

For the Viking Raiders, exit the board using the road to the northeast with the majority of their loot. If the Saxon force fails morale any loot they have picked up will not drop; it will be carried off with the retreating Saxons.

For the Saxon Defenders, recover the majority of the loot from the Viking Raiders. If the Viking force fails morale any loot they still carry is dropped. (Yes, I know it is not fair.)

I leave it to the players to determine how extensive the victory is by comparing loot possession.

Special Rules

Loot

In the beginning, each Viking figure carries one Loot counter. A figure can only carry two Loot counters, at most. For each Loot counter carried, a Move action costs +1 Action Point (AP). A figure not in hand-to-hand combat range of an enemy figure can drop or pickup one Loot counter for 1 AP.

Example: The Vikings have 9 AP. Viking A has one Loot counter. He drops the Loot (1 AP), and moves away (1 AP). Viking B has one Loot counter. He moves to the dropped Loot (1 AP), picks it up (1 AP), and moves (5 AP, 3 for second Move action plus two for carrying two Loot counters).

The Vikings must keep at least one figure within one Move action of any dropped Loot counters on the south side of Stony Creek. (A figure can guard more than one dropped Loot counter with one Move.) There is no requirement to guard Loot counters dropped north of Stony Creek.

Note that there is no penalty to carrying Loot counters to hand-to-hand combat or shooting, only increasing the AP cost to each Move action.

Stony Creek

There are three ways to cross Stony Creek: via the ford on the left; via the foot bridge in the center; and anywhere else in the water.

Figures crossing via the foot bridge have no penalty to movement. The bridge is only one figure wide, however.

Figures crossing via the ford have a minor movement penalty. Draw a card: if it is red, the penalty is 2" off of your figure's movement allowance; if it is black, there is no penalty. You will have to pay this penalty for each Move action in which you enter or are within the ford.

Figures crossing through the water have a major movement penalty. Draw a card: if it is red, the penalty is 4" off of your figure's movement allowance; if it is black, the penalty is 2" off of your figure's movement allowance. You will have to pay this penalty for each Move action in which you enter or are within the water.

Test Game

Gaming buddy Justo and I decided to try gaming this virtually, over Discord (as discussed above). I don't really have good shots of the game as I was using an overhead camera. Besides, I write terribly unentertaining battle reports. Instead, I want to discuss issues that came up in the game, which highlights some of the (very dramatic) differences between One-Hour Skirmish Wargames (OHSW) and Sword and Sandals (SaS).

Card Draw Rate

One thing that is immediately obvious is that SaS draws cards at a much faster rate. In OSHW a typical hand-to-hand combat has the attacker drawing two cards and the defender drawing one, so three cards for a single combat (spread across the two decks). In addition, that combat will be decisive; either the attacker or the defender will become a casualty.

Because the mechanics of SaS are draw to hit then draw to wound, and the card draw is based on the weapon and armor, true melee figures will pull multiple cards for each draw. Let's take two spear-armed figures with no metal armor and a shield fighting one another. The attacker pulls two cards to hit (for the spear) and the defender pulls two cards to avoid the hit (for their armor). If the attacker succeeds they then draw three cards to wound (for the spear's strength) and the defender draws two (for their armor's protectiveness). That results in up to 9 cards drawn, rather than 3. If the figures have Bruiser, as the Elite warriors will, add another card for each figure and each level of the Bruiser skill.

What is the net result of that? Actions do not resolve as the Joker appears much more frequently. Further, any scenarios with turn limits will have to be adjusted as you will burn through the decks faster, hitting the Jokers faster, and thus ending the turns with fewer actions resolved per turn. There were many a turn in which one side would draw a high number of AP, only to have a Joker come up after two or three actions, killing both player's turns. There were even turns in which the first action hit a Joker on resolving the wound of the first attack, effectively meaning no action whatsoever was completed that turn.

Indecisive Hand-to-Hand Combat

The kicker is that only if the attacker's best card for wounding beats the defender's by 7 is the defender killed. So hand-to-hand combat is very indecisive, comparatively, and requires many more attacks in order to get a decisive result. (If the attacker wins by 1 to 3 the defender is pushed back and the attacker can follow up. If the attacker wins by 4 to 6 the defender is pushed back and knocked off of his feet, making him very vulnerable.)

This may not be a bad thing, in terms of realism. Hand-to-hand combat becomes and attritional grind, looking for the opportunities where opponents are outnumbered, where there are breaks in the line, and where opponents have fallen and are vulnerable. The net result, however, is that a game that was once one hour long could now be very much longer.

I do like the effect on the melee with pushing and shoving around, but that can be achieved by driving your opponent back (always) on a hit, and when I try this again I will likely adjust the numbers to beat by 1, 2, or 3 to knock down, and beat by 4 or more to take out of action.

Final Analysis

I like SaS and would play it again, but I would definitely end up using fewer figures and trying the changes above or using the armor rules that I am trying, which is that light armor adds one card to the defender's draw while heavy armor adds two, using normal OHSW hand-to-hand combat rules. I can see that adding attack modifiers for heavy weapons is also a good idea, so a heavy weapon would add one or two cards for the attacker. I get the author's desire to rate weapons for both agility and damage, as he did with armor, but the numbers generally come out the same.

Also, the author did not define whether abilities like Bruiser apply to the hit draw, the wound draw, or both. Using my method, with only one draw, there is no question as to how it is applied.

I definitely liked the movement in the melee. My experience with hand-to-hand combat is martial arts and fighting with pugil sticks while in the US Marine Corps and I know that hand-to-hand combat is anything but standing there taking swings at one another. So any rules that reflect that movement is right in my book. OHSW does not need that distinction because there are no draws; either the attacker or the defender goes down. So if I were to continue with the hit then wound method in SaS, the charm of these rules would be this fluid combat.

If I continued with less decisive combat, however, I would definitely want to add a rule for fatigue, which I think is an important element in hand-to-hand combat.

Overall, I really enjoyed this game with SaS.

Blog Archive

Blog and Forum Pages

Popular Posts

Followers

About Me

My photo
Huachuca City, Arizona, United States
I am 58 yrs old now. I bought a house in Huachuca City, AZ working for a software company for the last three years. To while away the hours I like to wargame -- with wooden, lead, and sometimes paper miniatures -- usually solo. Although I am a 'rules junkie', I almost always use rules of my own (I like to build upon others' ideas, but it seems like there is always something "missing" or "wrong").