My blog about my wargaming activities. I collect a lot of 15mm miniatures for the American War of Independence and so collect a lot of rules for this period. I started miniatures with Napoleonics, so I have a number of armies in 6mm and 15mm figures for skirmishing. I have15mm WW II figures that I use for Flames of War, Memoir '44, and someday, Poor Bloody Infantry. Finally there is my on-again, off-again relationship with paper soldiers that I sometimes write about.

Showing posts with label scenario. Show all posts

Monday, August 14, 2023

Skirmish Scenario Design (Part One)

The game of Song of Drums and Shakos that I played at the last convention not only convinced me to play more skirmish games (where I can), but to possibly try my hand at running a game at the next convention I have lined up, SouthwestCon 2023 in Tolleson, AZ. To that end I decided to start designing a scenario to play and then do a few dry runs to refine it.

The first decision to make is what rules to use. Because the Song of engine re-kindled my interest, I am going to go with that. It is a relatively simple game that you can add as little or as much 'crunch' as you like, by adding in the special abilities. Also, every turn the player has numerous little decisions to make such as how many activation dice to use, so player engagement is relatively high.

The next decision is what period to play. My initial inclination was to use my wooden 43mm Dark Ages figures, to get them out on the table again. (The more I think about it, the more I realize I probably use them the most, of all the 43mm wooden figures I have.) Another alternative is Napoleonics. If I want to drop down to 28mm (and blow off some serious dust) I could make it WW II, but I would have to seriously tweak the Flying Lead rules (which I ranted about more than 10 years ago).


Several Playtests

So far I have played two Dark Ages and one Napoleonics version of a 'King of the Hill' scenario (where possession of the hill determines the victor) and the results brought up some interesting points, all of which make the scenario rather stale.

The Only Objective is to Eliminate the Enemy

The official scenario objective was "at the end of the game to have more figures on the hill than the enemy". However, there was always one overriding victory: elimination of the enemy, typically accomplished by them hitting a breakpoint and failing morale. If you did that, then it was assumed that you would take the hill unopposed after the enemy's rout.

In one scenario I remember losing enough figures early that I determined the only way to win was to break the enemy and thus capturing the hill was totally irrelevant. I ended up pursuing his leader attempting to run him down. If I had been able to accomplish that, half of the enemy forces would likely have routed and those that had not would either have vacated the hill, or if they had stood, been isolated and picked off.

Combat Becomes Static

Although this might sound like an inevitability with Dark Ages troops, as everyone gets into melee and maneuver essentially ceases, but it happens in Napoleonics too as troops settle into cover and start sniping at one another. This is either because the primary objective (the hill) is a static location or because everyone is 'stuck in' and movement only occurs when some figure is eliminated.

The Rest of the Board is Fairly Useless

Unless you both decide to ignore the primary objective and simply go for breaking the enemy force everyone is likely to be heading for the hill. Potentially terrain close to the hill might be of value as you snipe away at people on the hill, but in the end you have to be on the hill to win. But any terrain out of line of sight of the hill is essentially just window dressing.

A recent scenario is a good example of this. In the scenario depicted below, when I first reported about it, I left out all terrain detail, other than the town (in the lower right-hand corner). That is because everything other than the town was irrelevant. As it happened there were forests on the left, a ridge line on the French right flank, and roads. In this battle the town was worth 5 VP, a road on the enemy's baseline was worth 1 VP, all other terrain worth nothing, and destroying enemy troops worth variable VPs. (By way of comparison, I was able to score 3 VP for troop elimination against the enemy while they were able to score 2 VP against me.) I did not bother to draw other details because the town was the sole piece of terrain that mattered.

The 'King of the Hill' scenario feels the same way. Any terrain off of the hill just seems like window dressing.

Skirmish Scenario Design Objectives

So, what are the objectives of a good scenario design, especially for skirmish games? Let's start by taking a look at some rules and scenario books to see how they present victory conditions and scenarios.

Star Wars Shatterpoint Scenarios

One of my recent regrettable purchases was the game Star Wars Shatterpoint (SWS).

The game design looks good, but is just way too crunchy for my old brain. Like Star Wars Legion, but at a skirmish scale. The figures and terrain are really nice looking though, although some figures are a nightmare to assemble. I could have learned all of this had I watched more videos as content creators put them out, but I am generally a latecomer to rules and I wanted to be an early adopter this time. That will teach me!

SWS does have any interesting objective-based victory condition system. You start by picking a mission card, which defines where the objective markers are placed. All objectives are initially inactive (circles marked in gray).

SWS currently only has one mission card – the one shown above – and it evenly spaces out nine objective markers range 4 from the board edges and range 5 between each. If a marker appears where multi-level terrain is, it is placed on the upper level.

SWS has three different phases of the game, called Struggles. At the beginning of each Struggle a card is drawn which identifies which objective markers are active. In the example below, on the left, there are five objectives active, with the remaining four inactive throughout Struggle I. After the victory conditions of Struggle I are met, Struggle II is revealed, showing which objective markers are inactive and active. In the example below, on the right, a die is rolled on each player's turn to see which single objective marker is made active.

The net effect of this system is that it generally keeps players moving as they try and capture active objectives, keeping the enemy away from them. Between each struggle a winning position – in terms of who is successfully holding active objective positions – may turn into a losing one as the objectives have moved and you hold few or none of them. Players camp on positions, but generally not for the entire game.

Although an interesting concept and one that gives these rules the reputation for cinematic movement and action, one wonders how long before the shine comes off because players don't actually do anything at these locations, they just simply control them by outnumbering the enemy within a certain distance from the marker. In the example above, on the left, the objectives are supposed to be representing "stealing the secret plans", but there is no guarantee that there will be a computer terminal or a safe at each of these points; just an orange marker. Players are not required to have a figure perform an action, only that they are standing within a certain distance from it. They might have been full engaged moving or fighting. Still, it gets players to move into locations that might be out in the open rather than in cover, or have them move rather than make another attach in order to get 1" closer to the marker to contest. Put another way, it gets players to make sub-optimal moves rather than having them sit in heavy cover safely sniping away. At that it succeeds.

SWS has one of the best cures for people settling into cover and turtling there: you lose the game because you don't receive victory points for that. You get points for moving to and capturing points on the tabletop.

Intermission

You may not believe this, but it has taken me more than a week to write just this. My writing style is … chaotic. I sort of write in a stream of consciousness and edit it a bit afterwards. It is not so much that it is a lot of 'work', just that I want to get ideas out there and flowing and I sometimes wonder whether this is the best platform.

If I want to just send it out to you, with feedback limited to plain text comments, then I suppose this is the best method. But I am not sure that is what I want. I have been watching how Twitter/X has been changing as a platform and wonder whether that might be more suitable. I tried podcasting, but that is just as intensive as blogging – if not more so – and sort of limiting for the consumer. Twitter, on the other hand, is rather easy to consume. I can limit each thought to 280 characters (unless I get verified, then it is 4,000 characters I think). More importantly I have learned how to use the thread feature, so you can keep adding bits to a topic thread as ideas come to you.

I am thinking of trying that – maybe as a way of sorting out my thoughts and getting feedback – and then posting a completed thread here. There are lots of wargamers on there. If you are (or are not) interested, let me know. The account I use for this will not contain any personal posts, like vacation photos or political topics. Just straight up wargaming ideas. When I get the Twitter/X account sorted, I will post it here.

I'll pick up more on scenario design in the next post.

Thursday, September 08, 2022

Dark Age One-Hour Skirmish Wargames

Today I bring you a variant to a set of skirmish rules that I hope you have, a scenario, and a battle report on testing those variant rules. Plus I will update you with what is going on with me.

If you have been reading my blog awhile you know that I like to review games and post battle reports of those tests. I used to tweak rules every time I got a new set, but I have eased up on that over the years. (Except for converting them to a grid. I don't consider that 'tweaking' as much as saving my back from bending over and measuring freeform movement.) That said, if I like a rule set that I think can be carried over into another period, I will write a 'variant' for that. The subject of today's variant is One-Hour Skirmish Wargames (OHSW), which I reviewed in these four posts.

All that said, John Lambshead did write a pre-gunpowder variant for his rules OHSW called Sword and Sandal (SS) that he posted on the Facebook group. I tried them out back in January and another (undocumented) game. I had cooled on them a little more than the review might indicate because the indecisive combat, although possibly realistic, is sort of 'death by a thousand cuts' for gaming. So, I wrote a variant while convalescing that addresses the issue.

So, what was the issue? Specifically, it was:

It is at this point that I diverge from John's original design. The problem I have with the original design is that it is too card intensive. The more cards turned in a single action, the more likely a Joker will be drawn, negating the action and the remainder of the turn.

For example, it was possible for a single melee to draw ten cards (five per player), plus those added for Bruiser (X). This dramatically increases the chance the Joker will be drawn and the melee will not resolve. The odds of actually meleeing with three or more figures a turn is even worse. Put simply, the game was boring as few melees actually resolved.

The goal here is to go back to minimal card draws and represent better weapons and armor in another fashion.

My Sword & Sandal Variant


One-Hour Sword & Sandal Skirmish

Original version PJD Lambshead
Variant version Dale Hurtt

Assume the rules work the same as in the OHSW book unless altered below.

Game Turn

  1. Each player turns over a card to check for initiative.
  2. The player with the highest card has the first player phase. The opponent has the second player phase.
  3. Once these player phases are played, and if no joker has been drawn, go back to step 2.
  4. Both players simultaneously check their army morale.
  5. Both players simultaneously check to see if their downed figures stand up or are removed from play (red is dead).
  6. Go back to step 1 unless the scenario dictates otherwise.

Player Phase

  1. Draw Action Points card.
  2. Move a model, resolve any combat.
  3. Continue until all models have moved OR action points are exhausted OR a player passes. Note: play stops immediately if a joker is turned over; the turn ends.

Zone of Control

Each model has a zone of control (ZOC) arround it corresponding to the reach of its melee weapon. There are three steps:

ZoneRangeWeapon Types
Zone 11/2"small hand weapons
Zone 21"normal hand weapons
Zone 32"long one-handed thrusting spears and two-handed weapons

Movement

As OHSW except:

  • A model must not enter a ZOC of an enemy model when moving unless it moves directly toward that enemy model.
  • A model may leave an enemy ZOC at the start of its movement but must move directly out of the ZOC and may not enter another enemy ZOC in the same player phase. Infantry cannot leave the ZOC of cavalry.

Combat

At the end of a model's movement it may shoot or strike with a melee weapon at a cost of one action point. The target must be in range of the weapon (equal to its ZOC distance). A ranged weapon cannot be fired if the shooter is within the ZOC of an enemy figure.

Close Combat Procedure:

Attacker draws two cards, discarding the lower, while the defender draws one card, per normal OHSW rules. If either figure has Bruiser (X), X additional cards would be drawn for that figure with all extra cards being discarded save the one with the highest value. Further, the attacker gets one additional card if the defender is in the ZOC of one at least one additional friendly model, while the defender gets one additional card if the attacker is in the ZOC of at least one additional friendly model. (Note this differs from the original S&S rule which states that the additional attacker must be within the defender's ZOC.)

  1. Determine the attacker's card value. Add the attacker's attack modifier and subtract the defender's defense modifier to the value of the attacker's card.
  2. Determine the defender's card value. Add the defender's attack modifier and subtract the attacker's defense modifier to the value of the defender's card.
  3. Determine who wins. The highest card value wins. That player is designated the winner; the other player the loser.
  4. Subtract the lower card value from the higher and resolve the combat.
DifferenceMovementOther Effect
0 (tied)Attacker retreats out of range of the defender's weapon, but a minimum of 1".Note that this may still put the attacker within range of the defender.
1-3Loser retreats out of range of the winner's weapon, but a minimum of 1".Note that this may still put the winner within range of the loser.
4-5Loser stumbles back out of range of the winner's weapon, but a minimum of 1".Loser falls (is considered Down)
6+Loser is removed from board.Loser is killed.

Note that a Downed figure has zero defense, as per the original rules, and can simply be dispatched automatically in close combat.

The Attack Modifier is determined by the weapon the figure is using. It directly correlates to the additional point cost spent for the weapon.

PointsWeapon TypeAttack Modifier
0Unarmed, improvised+0
1Light, short, primitive+1
2Heavy, long+2
3Heavy and long+3

The Defense Modifier is determined by the armor the figure is using, and whether they are cavalry.

PointsArmorDefense ModifierMovement
0None+08"
1Light or shield+18"
2Light and shield+26"
2Mail+26"
3Mail and shield+35"
3Light Cavalry+212"
4Heavy Cavalry+310"

Ranged Weapons

Ranged weapons use a slightly modified combat system.

The attacker and defender each draws one card, per normal OHSW rules. If the attacker has Dead Shot (X), X additional cards would be drawn for that figure with all extra cards being discarded save the one with the highest value. If the defender has Tough (X), X additional cards would be drawn for that figure with all extra cards being discarded save the one with the highest value. Being in cover further allows the defender to draw additional cards, per the normal OHSW rules.

  1. Determine the attacker's card value. Add the attacker's attack modifier and subtract the defender's defense modifier to the value of the attacker's card.
  2. Determine if the attacker hits. If the attacker's card value is higher than the defender's, he has hit, otherwise he has missed and nothing further occurs.
  3. Subtract the defender's card value from the attacker's and resolve the combat.
DifferenceMovementOther Effect
0NoneMiss
1-3Defender may move up to 2" to cover terrain, if not already in cover. The move may not take it closer to the attacker that fired at it.None
4+NoneDefender is Downed.

The Attack Modifiers and Range for projectile weapons are:

PointsWeaponShotsRangeAttack Modifier
0RockUnl. *8"+0
1Throwing Axe18"+1 **
2Javelin324"+1 **
2Heavy Javelin, Pilum112"+2 **
2SlingUnl.Unl.+1
1Self BowUnl.24"+1
3Composite BowUnl.Unl.+2
4LongbowUnl.Unl.+3

* It takes 1 AP to find and pick up a rock. Some terrain may not contain rocks to throw.

** These may be used as melee weapons, with the same Attack Modifier in close combat, at no additional cost.

Thrown weapons cannot be retrieved until after the battle, and only if your side won the skirmish.

Test Scenario

Similar to the last scenario I am using my Terra Tiles™ hexes as the board and opted for a road which the attacking Vikings will march down, which has a small bridge that crosses a deep stream and with woods on the opposite side. The Saxons are waiting in the woods in ambush.

Ranges are intentionally very short as I want to get stuck in and test the combat system, so I don't want a whole lot of maneuvering. Besides, I was playing in limited space beside my bed. (More on that later.)

Also, two things to note about the points in this scenario. The attacker intentionally has more points as the scenario is designed with the defender hidden, in cover, while the attacker marches on the board, in the open. The attacker has about a 4:3 advantage in points.

Secondly, if you are familiar with the points system in OHSW then you will note that figures cost more in my list than if you use the method in the book. That is because I think Army Motivation (AM) is improperly costed. In the list it shows that for each point of AM it costs 1 point. Ironically, this is listed under the model cost section, but that cost is only applied once, to the force as a whole. (You can deduce that from the point cost values listed in John's scenarios in the book.) That makes AM incredibly cheap. I have applied the cost to each model. Thus the Saxons, with a AM of 1, have a basic point cost of 1 point plus 1 point for the AM, or 2 points each. Vikings cost a basic 3 points per model as they have an AM of 2. To this basic cost you then add the cost of the close combat weapon, the ranged weapon (if any), and the armor.

Defend the Ford

Saxon Defender (Army Motivation 1)

Warlord: Sword, Heavy Javelin, Mail and Shield, Leader (1), Bruiser (2) = 12 points
M: 5; A: +1/+2; D: +3
+2 cards in melee

Huscarl: Two-Handed Axe, Mail and Shield, Bruiser (1) = 9 points
M: 5"; A: +3; D: +2 vs Melee, +3 vs Ranged
+1 card in melee

Blacksmith: Long Spear, Shield, Bruiser (1), Tough (1) = 7 points
M: 8"; A: +2; D: +1
+1 card in melee; +1 card when shot at

Fyrd: Long Spear, Leather and Shield = 6 points
M: 6"; A +2; D: +2

Fyrd: Long Spear, Leather and Shield = 6 points
M: 6"; A +2; D: +2

Archer: Self Bow, Leather = 4 points
M: 8"; A: +0 in melee, +1 ranged; D: +1
Range: 24"

Archer: Self Bow, Leather = 4 points
M: 8"; A: +0 in melee, +1 ranged; D: +1
Range: 24"

Archer: Self Bow, Leather = 4 points
M: 8"; A: +0 in melee, +1 ranged; D: +1
Range: 24"

Archer: Self Bow, Leather = 4 points
M: 8"; A: +0 in melee, +1 ranged; D: +1
Range: 24"

Total Army = 56 points

The Saxons start on the board, west of the creek, with all troops starting in cover and out of sight. (As I am playing solo, I have placed the figures on the board despite them being hidden. Each figure is marked with a grass green counter to show their hidden status. As soon as a figure is spotted (see below), the marker is removed. A figure may not hide after it has been revealed.)

The Saxons win if the Vikings fail morale without the Saxons also failing morale or the Viking Warlord is killed.

Viking Attacker (Army Motivation 2)

Warlord: Two-Handed Axe, Mail and Shield, Leader (1), Bruiser (2) = 13 points
M: 5"; A: +3; D: +2 vs Melee, +3 vs Ranged
+2 cards in melee

Hearthguard: Two-Handed Axe, Mail and Shield, Bruiser (1) = 10 points
M: 5"; A: +3; D: +2 vs Melee, +3 vs Ranged
+1 card in melee

Hearthguard: Two-Handed Axe, Mail and Shield, Bruiser (1) = 10 points
M: 5"; A: +3; D: +2 vs Melee, +3 vs Ranged
+1 card in melee

Hearthguard: Two-Handed Axe, Mail and Shield, Bruiser (1) = 10 points
M: 5"; A: +3; D: +2 vs Melee, +3 vs Ranged
+1 card in melee

Bondi: Long Spear, Leather and Shield = 7 points
M: 6"; A +2; D: +2

Bondi: Long Spear, Leather and Shield = 7 points
M: 6"; A +2; D: +2

Bondi: Long Spear, Leather and Shield = 7 points
M: 6"; A +2; D: +2

Thrall: Self Bow, Leather = 5 points
M: 8"; A: +0 in melee, +1 ranged; D: +1
Range: 24"

Thrall: Self Bow, Leather = 5 points
M: 8"; A: +0 in melee, +1 ranged; D: +1
Range: 24"

Total Army = 70 points

Note that figures with two-handed battle-axes with mail and shield pay the cost of the enhanced armor, but do not get the benefit of the shield in close combat, only against ranged combat.

The Vikings start off the board. They must specify their order of march prior to the start of the game, which dictates the order that figures may enter the board.

Viking figures may not hide.

The Vikings win if the Saxons fail morale without the Vikings also failing morale or the Saxon Warlord is killed. Moving off of the west end of the board via the road is not a victory as enemy in the rear can potentially move to your longship and burn it.

Scenario Special Rules

Crossing the Creek

A figure crossing the creek must draw a card. If the card is red then they must stop in the middle of the creek as they have started to fall. (If the card is black they continue their movement, as normal.) If the figure has slipped they draw another card. If it is also red then they have fallen and may drown. The figure is considered Downed.

Attacker's Initiative

As the attacker has initiative (the defenders are waiting in ambush), there is no draw for initiative on turn one; the Vikings automatically have it and move first.

Hidden Units and Spotting

After each Movement action a Viking figure takes, it draws a single card. The value of the card indicates the number of inches away it can spot all hidden enemy figures within line of sight. Remove the hidden markers for all figures spotted.

Within line of sight means that there is no intervening terrain that cannot be seen through between the spotting figure and the hidden figure, save for the cover the hidden figure is occupying.

If, for example, a figure is hiding in a woods and there is another woods intervening, the figure cannot be spotted. However, if no woods other than the one the figure is in, is between the spotter and the hidden figure, it can be potentially spotted.

As none of my woods are particularly deep, I don't worry about whether the figure is on the edge of the woods or not. However, as a general rule, you should determine before the game how far figures can spot into terrain. For woods with heavy undergrowth I would suggest 3", while light undergrowth could be seen through as far as 6". You must decide what other terrain items obscure spotting, by how much, and whether it counts as cover.

Battle Report of Test Game

Similar to the last test game of SS I am using my Terra Tiles™ hexes as the board and my 42mm wooden Dark Ages figures. I was hoping to try another virtual game with gaming buddy Justo, but it wasn't to be. (Next time.)

The Board
Blue positions are Saxon ambush positions.
Red are the Vikings, but they enter at the red arrow.
Viking March Order
Thrall, 2 Bondi, 2 Hearthguard, Warlord, Hearthguard, Bondi, Thrall

We are all set to go.

Turn 1

Viking

The Thrall leads down the trail because, well, he is expendable. I spend 4 AP to move twice, finally spotting the Saxon Huscarl under his nose. He takes a quick shot, but the Saxon just grins. The Thrall screams.

That sends the Bondi running (4 AP for two moves) and he spots a few more Saxon ambushers. With not enough AP to charge in, he also calls for support. Finally, another Bondi and a Hearthguard enter the board. The last is clearly a veteran as he spots all remaining Saxons, save the Saxon Warlord who is out of sight, and alerts everyone to the full extent of the ambush.


These are the remaining figures off-board.

Viking March Order
Hearthguard, Warlord, Hearthguard, Bondi, Thrall.

Saxon

The Saxons had a very busy and successful turn. The Saxon ended up drawing a lot of their face cards during combat, thus giving them great results, but possibly starving them of good cards later as it is a long way to the bottom of the deck.

The Huscarl popped up within close combat range of the Viking Thrall, so he simply chopped him down. The Huscarl was +3 on his attack and the Thrall was +1 on defense, so a net +2 value to the attacker's card. The attacker's adjusted value was six or more than the defender's resulting in a kill. (I kept the figure on the board for the picture.)

The archers to the south then opened up on the Bondi standing on the bridge, forcing him to retreat. The first archer's card beat the target's card, but did not exceed it by four, so the target was allowed to retreat 2" towards cover, but no closer to the shooter.. The second archer, however, was able to hit his target.  The shooter's card exceeded the target's by at least four, despite the archer's attack modifier of being +1 and the target's defense modifier of being +2.

The final archer on the southern flank also got a lucky shot and hit the second Bondi. The single archer on the northern flank got a shot in at the Hearthguard, but only forced him to retreat towards the brush. Note that this shot was at +1 for the archer and +3 for the target, so a net -2, yet the archer still drew better.. This was truly a spectacular ambush for the Saxons.

The final action points were spent shifting a Fyrd spearman to cover the archers to the south and the Warlord closer to the action, but still out of sight.

It is at this point that I, and others, forget that the 'turn' is not over and thus initiative is not drawn again. We continue alternating between Viking and Saxon until the Joker is drawn, thus signaling the end of the turn.

Viking

Drawing a low number of action points show just how surprised the Vikings were to the ambush. With only 5 AP, one Hearthguard makes a double move to secure north of the bridge and to punish anyone who attacks to kill the downed Bondi at the foot bridge. The second comes onto the board and moves into cover to the south.


Viking March Order
Warlord, Hearthguard, Bondi, Thrall

Saxon

A short round because the Joker appeared. All three of the archers on the southern flank take shots at the Hearthguard to the north, with no effect (+1 versus +3).

With an Army Motivation of 2 for the Vikings, and only one casualty, there is no chance for a morale failure. Of the two downed Bondi, the forward most one is deemed a casualty and the other comes back into the battle, albeit in the open.

Losses: Vikings 2, Saxons 0.

Another common error I make at this point is to shuffle the deck. It is important that you do not do this as, if as happened with the Saxons, you use a lot of high cards in the beginning reshuffling will reset the odds. You only shuffle the deck when the deck is exhausted.

Turn 2

The Saxons win initiative, but its first card draw is a Joker, so the turn immediately ends. Although the Vikings have two casualties, the minimum draw is an Ace (1), which means morale is automatically passed.

Turn 3

The Saxons again win initiative, but the third shot pulls another Joker, so the turn ends.


With three Jokers gone and a lot of cards in both decks, we should have a long turn here soon.

Turn 4

Again, a Joker came right up. That's all four down, so it is time for the long turn.

Turn 5

Viking

The Vikings steal initiative, and with a low card at that, and proceed to create mayhem. The Bondi, realizing he is out in the open, charges across the bridge and into close combat with all three archers. Put another way, he made sure all three archers were within his 2" ZOC. Because the ZOC of the archers is 1/2", the defenders do not get an additional card in melee, as he is standing outside of their ZOC. This is a small detail that allows for 'micro tactics' the player can use, i.e. one side being within its own weapon range, but staying out of weapon range of their opponent. Also, by using his ZOC to cover all three archers, they are limited in what they can do when it is their turn.

With only 3 AP remaining, I brought the Warlord, a Hearthguard, and a Bondi onto the board. Only one Thrall remains off-board.


Saxon

With only 4 AP, the Saxons do not have many options. First the Fyrdman charges into the Bondi, but the Viking was waiting and he easily skewers the Saxon. Meanwhile, the Huscarl charged out of the brush to deliver a death blow to the unlucky Viking.


The death toll is racking up as the Vikings have lost three figures and the Saxons two, but a morale check is a long way off, given that each have only gone through half of their decks.

Viking

Tragedy as the Vikings draw an Ace for their action points. With only 1 AP, the Vikings have the Thrall enter the board ending to the right of the bridge.

Saxon

A lot of action, so the diagram is a little confusing. Essentially the Saxons need to stop the Vikings from crossing the bridge, or at least make it very risky.

The first to fight was the burly Blacksmith. He popped out of the brush and swung at the Hearthguard. I realized that the two were within each other's ZOC all along.) Unfortunately the Viking got the better of the exchange and the Saxon was forced to retreat back. Note that the Saxon was +0 to his card value (+2 for his weapon and +2 for his opponent's armor) while the Viking was +2 (+3 for his weapon and +1 for the Saxon's armor). Not a good exchange, but now the two are out of range.

The three archers fire (although it shows that only two did) resulting in a miss, a forced retreat, and finally hitting the Thrall.

I moved up the Saxon Warlord and he threw his heavy javelin at the Bondi, but that too was a miss. (I should have kept it as a short spear.)

Finally, I moved up the Huscarl and Frydman to stand guard at the end of the bridge. Any Viking crossing would face two defenders and a result of being knocked back or down would likely put them in the creek.


Viking

Another complex turn as the Vikings draw 8 AP. The Vikings need to force the creek so it is time to see who slips and falls.

First the Hearthguard on the north side circles the Saxon blacksmith and charges across the creek. He succeeds without slipping, but in the ensuing combat he is driven back and falls when he slips on a slimy stone.

The Hearthguard to the south attempts to cross the creek and attack the Saxon Warlord, but he slips and falls when he hits the water. Two downed Heathguard in a very short order!

The Viking Warlord, using his Hearthguard as a stepping stone makes it safely across the creek, attacks the Saxon Warlord, and forces him back (downed).

The center Hearthguard moves to block his end of the bridge as there are not enough remaining action points for him to charge the Warlord and dispatch him, leaving that to the Bondi. The Bondi easily leaps across the creek and the Saxon Warlord is no more. The Saxons are demoralized and quit the field.


Summary

Overall I liked the rules changes very much. The movement as a result of combat added to the scene and the varying combat results fit nicely with what John Lambshead put in his original, experimental version. (John, if you read this, feel free to use any part of it in your upcoming rules.) I would definitely play these again.

In Other News

So, I am finally retired. Officially my last day was August 19th, but my last day of work was actually August 16th. On August 17th I went into surgery to have my right big toe amputated. While the surgery was successful, and I am recovering nicely, complications arose, as life is wont to do when you are my age.

When I was in my thirties I had gotten a strange result on a physical and was sent to a cardiologist. I wore a heart monitor for several days – it looked like a Sony Walkman in those days – and they told me that I had a benign heart condition. All I remember was they called it an 'irregular heartbeat' and that it would cause anomalous blood pressure readings if done by a machine (as opposed to the traditional manual cuff). Since then I have had two other cardiac 'scares', but in both cases the report from the cardiologist was that I had a strong heart, despite all of my other issues.

When they were closing me up, however, my heart went into atrial fibrillation – in my case the heart from irregular to erratic and it was beating at almost twice the normal rate – and so they kept me in the hospital longer than expected. The cardiologist on duty said that this often happens, and they would shock it with paddles and see if it went back into normal rhythm. They did and it did. For a day. Then it went back into a fib and now I am on heart medication, quite possibly for life.

The good news is that I have really changed my diet, for the better. I am eating greens before eating other foods (no more meals without a salad or vegetables) and I wear a continuous glucose monitor to see what is going on. Here is an example of what it looks like.


Basically the device is a small chip attached to a needle, which stays stuck in your arm for two weeks, and it sends the data to your smartphone via Bluetooth. (Yes, I am already trying to get the data to my computer and hack the format so I can do other things with it.)

Using this data I can look at the effect on my glucose when I eat various things. There is also a book out there that contends that if you eat foods in a different order, you can reduce glucose spikes. I am still experimenting with that too.

One the other thing the monitor provides is alarms when I get too high or too low in blood sugar. I haven't gone over and tripped an alarm, but I have, quite a number of times, tripped the low blood sugar alarm; always while I am sleeping. The good news to this is it allowed me to back off of two medications I was taking for diabetes. One was causing me nausea anyway, and thus I would not eat enough, while the other was dropping me too low (while counteracting the effect of another drug). Now that I am off those two I feel a lot better.

Although my mobility is still a bit restricted, hence gaming on a small bedside end table for this battle report, I am up and walking about. I just haven't started driving again (yet). Next week they should be pulling at least half of the staples from my wound, so we see if the doctor clears me then.

I still haven't got back to painting yet, but that is not really a function of mobility issues, just lack of drive. I hope to get back to face-to-face gaming with the group next Monday.

Thursday, March 26, 2020

One-Hour Wargames Scenarios – Filling in the Blanks

In the last blog post Shaun Travers and I played scenario 10 in One-Hour Wargames and it turned out pretty disastrous for the attacker (Red). Although I like to flip the scenario and play it the same way, the way we played it just felt wrong. I do believe that some of the scenarios don't "work" with all periods, but in this case the math just makes it so hard to get the Red Infantry engaged against the defenders who will inevitably will Blue Infantry units. (There is a risky gambit involving defending initially with one Infantry and one Skirmisher, but that is beyond the scope of this discussion.) Basically, it takes turn three to four before Red can engage the Blue defenders. A big problem is that entry via the road is a huge bottleneck. How much of a bottleneck did Neil Thomas really intend this to be?

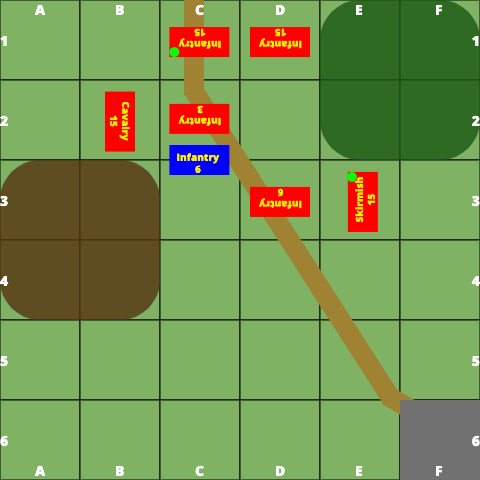
When Shaun and I played the first time we assumed that "entry via the north road" meant that the first square the unit had to move through was C1. This meant that, at best, you were going to occupy four squares on turn 1. (B2 and D2, only if you had Cavalry; C2 if you had Cavalry or Skirmishers; and C1. Basically all of the squares indicated by Red arrows in the image below.) Note that it means that by the end of turn 1, Red would only have one Infantry unit on board, two by the end of Turn 2, etc. Given that the Blue defenders could start in C3 and D4, and could theoretically push into C2 and D2 on their turn (although would be unlikely to do so), they could really jam up Red forces until this first line of defenders was eliminated. As was shown in the last blog post, if they do not accomplish that quickly enough, Blue can reinforce the line such that Red will never reach the town, having to break through two lines of defenders.


So, what's the alternative? Shaun and I talked about the concept of using an off-board square, in this case square C0. The idea is that all of the Red units start in the square north of the northernmost road square, just off board, i.e. square C0. If you did that, the number of squares that you could move to on the first turn are not only the ones with red arrows, but the blue ones too. More importantly, units with a 6" movement can move on and occupy squares B1, C1, and D1. This is three times the number than if you consider square C1 is the first square of movement (red arrows only).

How will this affect the game? Quite a bit.

The Game


Red's first turn looks a lot better than the last game. There are four units on rather than three, two of those being Infantry. (If I had rolled two Cavalry, I would have had another unit on the board too.)


My basic plan is to use the Skirmisher unit to flank Blue defensive line and break it faster. (Interestingly, Ross MacFarlane played the same scenario and had the same force that Shaun had when playing Red, used his Skirmisher to also make a flank run, but to secure the town instead.)

By turn 3 everything was engaged.


By turn 5, Red breaks through the portion of the line closest to the town.


Just in time for Blue to bring on their first reinforcements. Mind you, by this time in the first game it was obvious that these reinforcements could make it close to the original battle line, but Shaun, seeing that I had already broken through, decided not to advance but rather to occupy the town.

Infantry in the Ancient period take 1/2 hits as it is, with defending a town yielding another 1/2 hits. It is going to take some time digging them out. In fact, the only way to win is probably by attacking it from two directions.
As a side note, in square grid combat you have to attack from F5 and E6. If the attack comes from E5 (which is legal) it essentially makes an implied pivot that 'hides' its left and right flanks (squares E7 and G5).
Turn 8 saw the Blue Cavalry charge out and attack the Red Infantry that was attempting to move on its flank. This was a strong move by Shaun because with the Cavalry in E6 and its front facing D5, that puts its right flank in square F5.
Again, that is a quirk of the square grid rules we use, but the best way to look at it is that OHW only allows one unit to attack per face and to get on the flank each unit must have a square in between each attacker. So a unit could be in square E5, but it would not be able to attack the Blue Cavalry.


By Red turn 10, Red had the attack on the town secured. (I am not sure why Red Infantry in C5 is facing South and not West.) The Blue forces coming on can only enter from A6 or B6 and with the hill impassable, they have to go through me to disrupt the attack on the town.


By the end of Red turn 13, the town was secured.


This was a far-cry from the result in the first game (turn 10).


Summary


To me this was a huge difference in the result. The pendulum swung dramatically from "no way for the attacker to take the town" to "no way for the defender to retake the town". All because of the change of a single rule. (Shaun may disagree, but I remember that neither side had better rolls in either game, but this second game did result in both sides having bloodier results.)

I am curious. How do you interpret the rule that "all Red units must enter the board via the road"? When playing the scenario without a grid, you probably use the same method as we used here, which is that all Red units are artificially stacked up on the point where the road intersects the board edge. This is equivalent to the "square C0" concept Shaun and I used.

More importantly, does anyone map out the road march order and penalize the rearward units movement based on how far back in the march order they are?

Saturday, January 11, 2020

Botched Relief Scenario in OHW and Other News

My gaming buddy Shawn and I were able to get two games of One-Hour Wargames (OHW) in today (in two hours, no less) using some of my old medieval DBA troops. We decided to play Scenario 28: Botched Relief and, let me tell you, this is a very interesting scenario. Lots of choices to make and very quirky, although a simple design. Both games were very much until the end. (Okay, on game two you could do the math and figure out that Red was not going to inflict enough damage, but it was still a very exciting game.)

Botched Relief


The scenario notes indicate that this scenario draws inspiration from the Battle of El Molino del Rey (1847) from the Mexican-American War of 1846-1848. A smaller force defeats a larger force largely because the larger force commits itself piecemeal.

The Blue Army (attacker) is assaulting the town held by Red units. The majority of the Red Army, however, is on a hill on the flank, unengaged in the battle. Although the units appearing there are on the table, they cannot attack nor be attacked until they "activate". Additionally, only one unit can activate at one time. The second cannot activate until the first unit is eliminated, the third until the second is eliminated, etc. So although Red has 6 units to Blue's 4, Blue will never have more than 3 active at any one time.

I brought my medieval troops so we were playing that variant, which is good because occupying the town is part of the victory conditions and all troops can enter towns in this period.

I am not going to go for a blow-by-blow narrative in this battle report because I think, for the most part, people don't really like that. (Maybe it is just me.) What I like in battle reports are highlighting where key mechanics in rules come into play (especially when reviewing rules) and the key decisions made by the players. I am especially interested in the latter as I am trying to develop a series of programmed opponents specifically for OHW and its scenarios.

Game 1

I played Red and rolled up three Knights, one Archers, and two Levy. Darn! No Men-at-Arms to defend the town with. Blue Army was rolled up as three Knights and one Archers unit.


  1. The column of Blue Knights attacking up the road (not visible on the map, but trust me, it is there).
  2. The Blue Archers guarding the flank.
  3. The single Red Archers defending the town.
  4. The Red Knights defending the flank.
  5. The Red Knights coming in from the relief forces on the flank.
The key decision the Red commander has, after finding out their force composition, is which unit types to put where. With Knights having 12" movement and hitting with D6+2, they could afford to be in the relief column; they have the mobility to get engaged with the enemy the quickest. The Archers have a 6" move and a 12" range, so it is possible that they too can have an impact in defending the town (or re-taking it). The issue with Archers is that they are D6-2 in melee and Blue Army, using the road, would be on them in turn 2. So I now question my choice of selecting them for my initial forces. Putting a Levy unit in there would have lasted as long, but inflicted more damage over the long run. The main point was that there was no Men-at-Arms unit (i.e. dismounted Knights) to put in. As they only take 1/2 damage, they have staying power.

The first key rules moment came when I charge the Red Knights into the middle of the Blue Knights column.


As you can (barely) see, I intentionally charged my Knights past the lead Blue Knights at the head of the road column and clipped the flank of the second unit. My intent was not to claim "flank attack" (and in fact I did not), but rather to tie up the road column from moving any further. This action, as you will see, brought up a lot of questions on how to interpret the OHW rules. I would like to hear some of your ideas on how you would interpret them.

Despite my constant advocation of playing the Rules As Written, I find myself with OHW often "injecting" rules into the game that are not there, but are simply common conventions in other rules that I have played over the years. In this case I did not claim a flank attack because of the convention that you can only claim a flank attack if you are coming in more than 45ยบ off of the front corner of the enemy unit, otherwise it is a frontal attack. It seemed cheesy to claim a flank attack when the charge clearly did not originate from the flank.

There are three interesting things about this attack though. First, that you could charge past the first unit. This felt right because I was coming in from the side. Second, because the Knights were all jammed up together, there really was no way to engage the front face of the second Knights unit. Charging a unit in column would have hit its flank. Third, the charging unit only has corner contact. Nowhere does Neil Thomas espouse "squaring up" units in hand-to-hand combat in these rules.

At this point, we had ruled it a frontal attack. Later we would both agree it should have been a flank attack, and thus caused double casualties.

One other point of note is that the Blue Archers unit failed to pivot at the end of the last turn. You can just barely see the second Red Knights unit coming up on its flank. If it had pivoted, it would have been able to fire at those Knights, but as it was, they were either going to fire at my engaged Knights and eventually be taken in flank, or they would pivot – losing their opportunity to fire – but able to face off against the flanking Knights.

That leads to another couple of questions: firing at units partially obscured and firing at units engaged in hand-to-hand combat.

When it comes to line of sight, Neil Thomas is silent. Generally speaking I use a simple rule. If the right-front edge of my unit can draw a line to the closest center-point of the edge of the target unit and it does not pass through a unit or terrain, then do the same from the left-front edge, I allow the unit to fire. This means that units can fire into a melee if they meet the above rules. Here are some examples of what I mean.
Allowed – Not Blocked by Unit or Terrain
Not Allowed – Blocked by Terrain
Is this how you play it?

The next significant event was the relief Red Knights hitting the Blue Archers on its flank. It rolled a '6', adding '2' and then getting doubled (see the rules for the order of operations; adding and subtracting come before halving or doubling), resulting in the Blue Archers being run down in a single turn.


Generally you think of OHW as an attritional game, given that it has 15 hits per unit, but you have to remember that hard-hitting units coming in on the flank can take out a fresh enemy unit 16% of the time!

One of the rules in OHW is the inability of most units to interpenetrate other units. Generally only skirmishers can interpenetrate, or be interpenetrated by, other units. In the medieval variant there are no Skirmisher units, so there is no interpenetration allowed. By the way, I like this rule because, as Neil Thomas wrote in a Slingshot article of his rules (paraphrasing): I don't believe in command and control rules because I think players do a good enough job of getting in their own way. This next turn showed that concept neatly. The Knights on the road are all bunched up and now a threat on the flank has appeared much more quickly than anticipated.


Although it is hard to see, the block of Knights on the left are actually two units, one behind the other. Due to the interpenetration rule the Knight unit in the rear cannot pivot. Interpenetration. Units may never pass through each other. So, it is not merely a matter of clearing the footprint of the friendly unit, one unit's footprint may not pass through another at all.

This leads to a second issue. Although the rules never state it explicitly, movement is always straight. The following passage makes no sense otherwise. "Movement is depicted according to a simple model, whereby rapidity is reflected by faster movement rates rather than, for example, allowing some units to turn more rapidly than others. Turning is instead depicted in a simple manner, by pivoting units on their central point. This avoids the complexity of wheeling manoeuvres, where wargamers have to precisely measure the movement distance of a unit’s outer corner. The difficulties of turning are instead provided for by only allowing evolutions at the start and/or the end of a unit’s move, but not during it. This reproduces the historical effects, but makes the tabletop process much easier."

That said, no word is mentioned of a unit backing up, reversing its movement. In the above situation the last Blue Knights unit would be stuck in place, unable to pivot, until the Knights unit in front of it moved forward or was eliminated. We decided to allow a unit to move straight forward or backward with no left or right drift. We felt the intent of the passage above was that there is no turning or oblique/drift in movement as the rules allow a free pivot both before and after the movement.


Is that how you play it? Or would you have disallowed it because the commander inadvertently bunched his troops up? As it happened, this command and control issue still had a penalty. It allowed the Red Knights to get the jump on the Blue Knights, inflicting the first hit.

The game ended with a Red loss. The Blue Knights eventually ground down the Red Archers while only taking 10 hits. The flanking Red Knights cut through all of the Blue Knights caught on the road, but in the end exposed its flank to the Blue Knights in the town. With the clock run out the Blue Knights turned around and re-entered the town long before the next relief unit could arrive and challenge ownership. Four determined units beat six cautious ones. It was a very close game.


In hindsight I do think having a Levy unit in the town rather than the Archers unit would have resulted in a Red victory. That -2 in combat resulted in the loss of 6 hits on the leading Blue Knights, which would have destroyed them first.

Let see how I fare as the attacker.

Game 2

Blue force rolled and got three Knights and one Men-at-Arms. Men-at-Arms (i.e. dismounted Knights) are notable in that they take 1/2 casualties due to their armor. Although they are slower, I wanted to have them attack the town. I wanted to make sure they survived the assault, leaving my Knights to clear the field. My strategy was going to be much different. (By the way, even though I did not plan it this way, I think the person that goes second as the attacker has the advantage as he can see what does and does not work.)

Unfortunately, Red force rolled and also got one Men-at-Arms! In addition they received four Knights and one Archers unit. Here is how we deployed our troops.


As you can see, Red went with the Men-at-Arms defending the town and the Knights protecting its flank. Red also chose the Archers unit as the unit from the relief force.

I decided to attack on a broader front. Now that I knew I would be attacking Men-at-Arms in a town – they take 1/4 casualties – I knew that I would have to keep the flanking Knights and all of the relief forces off of my back to allow me as much time as possible to whittle down the defenders. Also, I knew that mathematically with him taking 1/4 casualties (armor and town defense) and me taking 1/2 casualties, I would have to get a second unit in there hitting him on the flank as soon as possible. So my plan was to use one Knights unit to engage his Knights unit, another to engage the Archers unit, and the final Knights unit to take the Men-at-Arms in flank.


As you can see by the image above, I pushed my Knights all the way to the hill to take out the Archers. It did not matter much because the one shot they took was to the (white) Knights. But the problem was that I was now inflicting 1/2 casualties for attacking uphill. At the time I was not too concerned about that. In my game I only got one unit from the relief force activated until Turn 15 hit. If I could keep the relief forces pinned down as long as possible the second unit might not have enough time to take back the town, as happened to me. That said, my math was a little off. The Archers would inflict an average of 0.7 hits per turn (D6-2) while my Knights would still inflict an average of 3 hits a turn (D6+2 / 2). So as soon as I wiped out the Archers, he would have a Knights unit on my Knights' flank, which would likely wipe them out instantly.

That said, all was playing out well. My Knights in the center had his engaged frontally and on flank. I missed blowing out his unit by one hit, however. Once that unit was eliminated, I had another interesting decision.


The Archers had been inflicting a few good hits, so with the Red Knights in the center gone, my (white) Knights were free to slam into the Red Men-at-Arms defending the town. But what to do with the other Blue Knights unit? I knew that as soon the Red Archers collapsed the Red Knights immediately to their right would spring on the flank of my Knights attacking the hill. As they only had 5 hits it was possible that they could survive a flank charge (if the Red Knights rolled a 1-2). Even if they did not survive, I wanted to be in a position to immediately counter-charge their flank, if possible. So I moved my Knights forward to threaten any relieving Red Knights.

My opponent thought it was a bad move. What do you think?

As it turned out, the Archers collapsed, the Red Knights sprang on the flank of my Blue Knights, which were rolled over in a single charge. My Blue Knights then counter-charged (without getting a flank position), but were apparently still blown from the previous combat as they were rolled over by the Red Knights in turn. (There is something about Knights in the relief force being particularly effective as in both games they wrecked several units in succession.)


However, by this time my (white) Knights had hit the Red Men-at-Arms in flank and helped eliminate them. (My troops had been getting very good rolls while his Men-at-Arms had been getting horrible rolls. After three turns at D6 / 2 they had only inflicted 5 hits on my Men-at-Arms!) So I turned my Knights around to intercept the Red Knights coming off of the hill. We were both at 8 hits ...

I charged and rolled a '1', while he countered with a '4', leaving me with 1 hit remaining. That was enough to allow me to eliminate his Knights in the next turn. But that meant ... another fresh Red Knight was coming from the relief force. It charged off of the hill and took my last Knight unit out.


I had 5 hits, but he was going to hit at D6+2 / 4 each turn, so basically a '1' to '4' was 1 hit and a '5' or '6' was 2 hits. His first hit he rolled a '1' ... and his swing on turn 15 ...


Summary


Two really great games, both with the attacker winning (as it was historically). OHW, like Memoir '44, due to its quick games and simplified play, lends itself to playing a scenario twice, once as Red and once as Blue, then seeing who did better overall across the two games. For this scenario, it was definitely  hard-fought draw, going down to the wire.

It was interesting to see what kind of biases I brought from playing other rules, things I did not even question as to whether or not they were in the written rules (such as flank charges having to originate outside of the front 45ยบ, or that there was no backwards movement defined). It was also interesting to see how close or far apart Shawn and I were on 'how things should be'. (Shawn is one of the few people that can stand playing with me, so I figure we must be closer in our gaming opinions than not.)

The more I play OHW the more I am impressed with how rich a game whose combat mechanic is 'roll D6 to accumulate hits up to 15 then remove the unit' and how tightly designed the scenarios are. I have used the scenarios for other rules, but you always had to modify a few things (like forces, number of turns, etc.) so you definitely lost the sense of how tight these designs are.

It was also really nice to be able to break out the old DBA armies, blow off the dust, and game with large units that had a better feel of 'mass'. Originally I had been playing using these armies with one base per unit, making units 40mm wide (instead of the recommended 4" to 6" wide). That allowed me to play on very small board (12" by 12", in fact). For this game I decided that I wanted to use units of the proper size, and using free movement no less! Each unit was 120mm wide (about 4.75") and with 15mm figures, it 'felt' great.

I was digging through the closet looking for DBA knightly armies and found a whole (large) Norman force that I don't remember purchasing, and had definitely never played with. Shocking. But this game played so well, I can see a lot more medieval OHW games in the future.

Gaming 2019


I did not do one of those end of year posts outlining what I accomplished, etc., but I guess I will tack it on here.

My last year was mostly wrapped around computer gaming, online education, and vegetating in front of the television. I got very little painting done, no big miniatures projects done, very few games played, and very few blog posts written. It really wasn't until December that I pulled myself out of that pattern and started gaming again. In my Solo Battles blog I published six posts in December, five posts here since Thanksgiving, but unfortunately none in my Wooden Warriors blog. (I have one coming up, however.)

The biggest change to my gaming was trying to get into mainstream gaming rules, like Warhammer Underworlds and Star Wars: Legion (SWL). The former was largely unsuccessful because everyone around here has pretty much stopped playing it. The latter, however, seems to be just starting up in this area.

So, why SWL? I am not a big Star Wars fan. I am not a big 'popular games' fan. The system is actually the kind I generally do not like (competition oriented; players like to min-max lists; points driven; scenarios are that in name only; figures are expensive; lots of tokens on the table; uses special, expensive dice; rules are 82 pages long; units have lots of special abilities, requiring cards to remember everything (but you will still forget a few); uses eyeballing line-of-sight and estimating the percentage of the figure exposed; and other such goodies. So why am I inflicting this upon myself? To be more social, to be honest. I have a very hard time meeting new people and asking if I can join in. As I get older I find that I get pickier, so my natural inclination is to solo game more. But solo gaming, well, is a lot of work. And it is lonely. I need to break out of that shell.

Gaming 2020


So, SWL will be more on the menu this year. Don't expect any battle reports anytime soon though. My painting of commercial figures has slowed down, especially as my eyes seem to have worsened. (I am getting my 'painting hand' back though.) I really don't like to do battle reports with unpainted figures and I can see it is going to take quite some time for me to paint all the figures I have purchased already. (Trust me, Citadel contrast paints can be a real time saver, if you use them correctly. Which is to say, not the way Citadel tells you to use them.) So I will be gaming with others using some primed but unpainted units [yuck] largely against opponents that have unprimed units (if current games are any indication). I have no intention of photographing my shame. I will post pictures of my painted troops from time-to-time, however.

I thought about having the figures sent out for painting but Stormtroopers are black and white, for goodness sake, and my Rebels are Hoth-themed so they are black, white, tan, and gray. I cannot bring myself to pay someone to paint such simple schemes.

Shawn and I keep talking about how we would like to sell all of our miniature collections and start over. One scale for mass battles and one scale for skirmish, maybe. Maybe not get into every period you can think of (except Pike and Shot; I have still resisted that!). Maybe spend more time on terrain.

But, I can never bring myself to actually do it. So I duplicate periods in different scales.

I am resolving to get rid of a lot of rules and game systems that I know I am not going to play again. I may do some serious digitizing of the rules and magazines. But there are so many game systems I have that I cannot bring myself to throw into a landfill and I don't want to pay to have to have it hauled off. For my old collectible card games, for example, I am probably just going to give it to a FLGS just to get rid of it. That alone should free up some space.

If you have ever seen some of my cartoony wooden figures that I make, well, I will probably be doing a lot more of that. When I was about 13 I started making figures out of wooden beads. Knights mostly. Now that I am grown (HA! my wife would say) I still find I like the style. Also, I very much like painting freehand. It is much easier than painting modern commercial figures with an incredible amount of sharp detail cast into the figure. It may not sound like it, but trust me, it is. And "making" a figure these days is pretty much gluing one bead on top of another and adding a toothpick for a weapon. I am currently working on making vehicles using "granny grating". My first attempt is a pickup truck for my modern African army. (It will debut on the Wooden Warriors blog when I am done.)

My temperament is such that I tend to rotate between activities and projects. For a long time that was computer gaming. Right now non-wargame computer games have diminished appeal. I need to paint and that can take a lot of time, but as my eyes fail I won't be devoting as much time to that. My solo gaming efforts are going strong, probably stronger than my non-solo gaming efforts. I am trying to change that, but I don't see myself ever moving away from solo gaming completely. So, hopefully, this year you will see more activity on this blog and my Solo Battles blog.

Blog Archive

Blog and Forum Pages

Popular Posts

Followers

About Me

My photo
Huachuca City, Arizona, United States
I am 58 yrs old now. I bought a house in Huachuca City, AZ working for a software company for the last three years. To while away the hours I like to wargame -- with wooden, lead, and sometimes paper miniatures -- usually solo. Although I am a 'rules junkie', I almost always use rules of my own (I like to build upon others' ideas, but it seems like there is always something "missing" or "wrong").