My blog about my wargaming activities. I collect a lot of 15mm miniatures for the American War of Independence and so collect a lot of rules for this period. I started miniatures with Napoleonics, so I have a number of armies in 6mm and 15mm figures for skirmishing. I have15mm WW II figures that I use for Flames of War, Memoir '44, and someday, Poor Bloody Infantry. Finally there is my on-again, off-again relationship with paper soldiers that I sometimes write about.

Showing posts with label Tin Soldiers in Action. Show all posts

Friday, November 18, 2022

Attended MillenniumCon 2022

Now that I am retired, I can finally travel without feeling like I have to rush. Well, at least the reason for rushing has changed. It used to be that I needed to get back to work and now it is that my wife needs to get back to work! Equality, baby!

The original goal was to go to Fall-In 2022 in Lancaster, PA – a mere 2,200 miles/32 hour trip, each way – and make it a road trip across the U.S. but too many things fell through. I was going to combine the trip with a visit to my father, who was 94 at the time, but he passed right after I got out of the hospital. So we decided to wander around the West before heading to MillenniumCon 2022 in Round Rock, TX.

We started from home in Huachuca City, AZ and headed for the Apache National Forest to stay in Alpine, AZ, making it in after dark. From there we stopped at Chaco Culture National Historical Park where they have a number of cliff dwellings of the Pueblo people. When you think of American Indians (Native Americans, if you prefer) you tend to think of Hollywood's depiction in Westerns, but Chaco dates from AD 900 through 1150, well before what we think of as American Indians after the American expansion.

We did not stay there – there is really nowhere to stay as it is in the middle of nowhere – as we were on the way to Durango, CO. We had a timeshare unit there so it was really comfortable, but we were there for the Durango Train. Unfortunately the trains do not run for the first two weeks in November as they switch from the Fall to Winter theme and do maintenance on the trains. Guess when we arrived! Not only that, the museum is closed too!

To make up for that we decided to take a side trip to Mesa Verde National Park. This is another Pueblo culture site, dating from AD 600 to 1300. It was a beautiful drive and when we got to the top we found the museum … closed for renovation! I was feeling irritated by that until I heard another guy remark that this was his fourth time to Mesa Verde and every time he was there it had been closed for one reason or another, so I did not feel quite as bad.

My wife wanted to see Meow Wolf in Santa Fe, NM so we headed there next. Basically it is an interactive, experimental art project that you walk through with room after room of different themes.

My wife has also wanted to take me to Carlsbad Caverns National Park in NM and we finally went. Unfortunately, the bats were already gone for the season so we did not see them. But trust me, after walking 1 ½ miles in a cave more than 750' underground in a very humid 57º, the last thing I wanted to do was come back and watch bats in low light (as the come out/come back from hunting).

With those adventures under our belt we were getting close to the start of the gaming convention, so we made a dash for Austin, TX, which is a short drive from where the convention was being held. We stayed at a Wyndham timeshare downtown, was held hostage by salespeople, and eventually given a $150 gift card and promptly spent it on a very nice dinner at a posh place.

With my wallet screaming Uncle after buying yet more timeshare points it was off to Round Rock, TX for MillenniumCon 2022. We stayed there through the weekend then headed back home, stopping only to sleep in Van Horn, TX. Whew!


MillenniumCon 2022

This is definitely a smaller convention, as far as U.S. gaming conventions go. There were about 1-2 dozen games going on at once. What I had not realized is that there was a section to sign up for games before the convention started. When I got there and saw all of the sign-up sheets, they had all of the player slots full, some even with the stand-by slots full! I basically could not sign up for a game and be assured of a spot unless it was in one of my gaming buddy's games. (Not because his games were not popular, but rather because he would make a spot for me.)

My buddy is a real fan of Two Hour Wargames (THW) rules and he has been trying to refine Morale Napoleon (MR) and All Things Zombie (ATZ) for some time now. I think ATZ is in a good place now – it feels very episodic – but MR is closer to THW's old school 'wargame' designs rather than the newer RPG-lite designs. I promised him I would help him playtest any ideas he had and we played about six games of it. I think it is a better design now, by far, but think it still has some testing necessary, by people other than us.

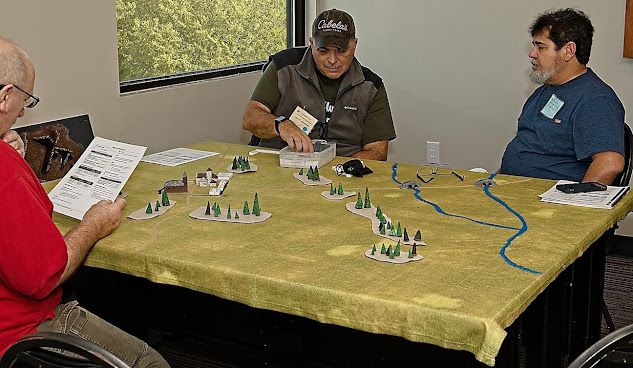
A game of Morale Napoleon in progress.

One of the games of Morale Napoleon that I did not participate in.

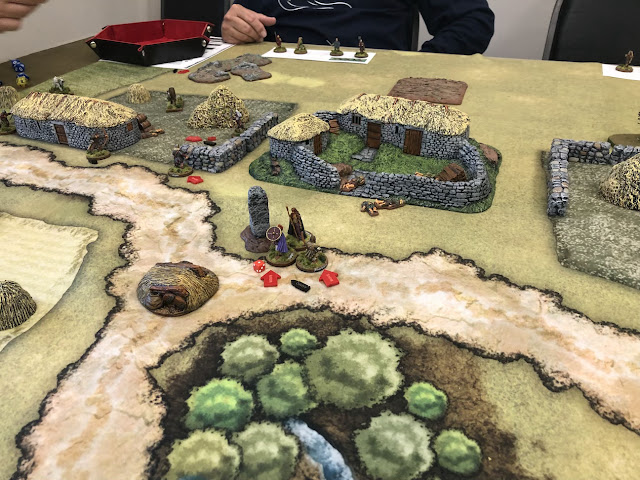
One game that I did play in that was a standout was Raid on Downly Green put on by Faron Bell and his son, using the rules A Fistful of Lead (FoL) and the supplement Might and Melee, both of which I have been experimenting with of late. The scenario takes place in late 9th Century Britain and raiders are attacking a village to steal their treasure and capture their Witcher woman. I was on the raiding team – in fact I was playing the raid leader – and we ended up slaughtering the defenders. We did not get the treasure, but we did get the Witcher woman, in addition to wiping out ⅔rds of their force, by the time the game was called.


Why this game was a standout was definitely because FoL is a great set of rules for convention games (easy to teach, element of suspense) and because the figures and terrain used was outstanding. It almost made me buy 28mm terrain at the vendor booths!

My leader drags the Witcher woman away to the longships.

Speaking of vendor booths I tried to limit my purchases to terrain, rules, and scenario materials, but failed in some instances. I did not find any rules whatsoever that interested me – I was hoping for an old cardboard box filled with old rules – but I got one very interesting book filled with scenarios on the War of 1812 between Great Britain and Canada and the U.S. I look forward to converting them to other rules, probably Tin Soldiers in Action and One-Hour Wargames for mass battles and Fistful of Lead and One-Hour Skirmish Wargames for skirmishes. Unfortunately, there was little terrain for 15mm other than Battlefront terrain for Flames of War, which I have plenty of. There was a lot of laser cut MDF terrain, but all of it was 28-32mm. I talked to the guy about that and he told me that he used to make models for 15mm, but they just did not sell. Further, he does not sell the digital files so you can cut your own. So all I walked away with were three books, one paint set, and some miniatures I regret buying and will probably end up selling.

I also got two more games of Tin Soldiers in Action (TSIA) in, playing the classic scenario Hook's Farm (from H.G. Wells' rule book Little Wars). The first game I was attacking and was absolutely slaughtered, so no pictures of that! The second scenario, however, I was defending and it turned out quite different.

Justo delayed coming onto the hill until turn two. This allowed me to press forward with my infantry and defend in depth.

You can see Justo's cavalry in the lower right corner. He snuck around the flank, but lost the draw of the cards and my cavalry switched to counter his move and I decided to pull my artillery out of the line and canister his cavalry.

This next picture shows Justo's beaten cavalry turns later. My cavalry charged him and forced him to rout. It then turned around and made a desperate charge at his artillery (with supporting infantry no less) and ended up overrunning them against all odds.

When the sun went down I was still in possession of Hook's Farm with units that had been severely mauled by his infantry and artillery fire. Again, this was a very different game from all of the others I have played with artillery chasing cavalry to canister them and light cavalry charging artillery and actually pulling it off.

One of the reasons for the renewed interest in TSIA is that I have been corresponding with the author, Rüdi, and he has new rules to cover from ancients to modern era (and beyond?) and he wanted us to reacquaint ourselves with the rules before attempting his Hastings scenario. More on that later.

Ironically, I took a few pictures at the convention, but it was mostly of the terrain boards and not of the games in progress. Also interesting is when people come up to a game in progress and look, but rarely ask questions, even when you attempt to engage them. The one exception, for me, was when Justo and I were playing TSIA with these handmade wooden figures. People did not care about the rules or the scenarios, but the miniatures. They are such a curiosity these days, especially when people are now 3D printing whole beautiful armies and here I am gluing beads together and painting them. I have never had anyone criticize them either, and you know how some people can be, pointing out that "…you have only painted five buttons when the 1812 uniform had six!" The 'harshest' comment I have ever gotten was 'it seems like it would take so much time to make them' or 'I could not paint something that small'. No one has ever refused to game with them nor made fun of the cartoonish terrain I use (which is strangely appropriate for the figures). (By the way, I used my laser cutter to cut out those board and score the grid on them.)

I have long realized that this, wargaming, is not a single hobby, but multiple ones. For me, I continue to like to make my own minimalist figures with large heads and small bodies.

Sunday, March 24, 2019

Rules and the Art of Abstraction

So, tip of the hat to ECW 40mm Project (Allen), who made the following comment on my blog post Conclusion to Tin Soldiers in Action:
The rules sound like they hit a sweet spot.

The only thing I don't think I could leave untweaked would be that there is no flank or rear. It's such a basic aspect of the structure of humans [go down a dark alley in a bad section of town...do you get mugged from the front or the rear?] and the structure of units [especially when Units are supposed to face front and pay attention there] that I would have to do something about it. Not that it would be hard.

However...I am wondering if the designers have an explanation as to why they left it out? After all, it is as basic a game design as cavalry move faster and artillery shoots farther, so surely they left it out on purpose, so...why Why WHY??
First, I am not the game designer, nor do I speak for Rüdiger Hofrichter – who is very approachable, by the way – but given your accurate statement "The rules sound like they hit a sweet spot", I can speak to why I don't tweak the rule, and why I continue to leave it as is.

A flanking rule would be a distraction, and in all probability, inaccurate. To me, Rudi decided to abstract our flanks. Let's break it down a bit.
  1. Tactics of muggers are discounted simply because I am not gaming at that level. I am neither playing an individual mugger nor an individual victim.
    1. The level I am playing at is either a unit is a regiment (American War of Independence) or a brigade (Austro-Prussian War).
    2. Each unit has its own commander, responsible for keeping that unit in the correct orientation (facing) and formation (column, line, or square) for the current situation.
    3. As the Commander-in-Chief it is my responsibility to direct units to location and give them missions (order them to move either to positions or combat).
Let's stop there a minute, because if you don't agree with the abstraction of not reflecting a unit's formation, we are already at an impasse. At the scale I am playing, when using Tin Soldiers in Action, these are things I simply do not want to micro-manage.
If you are still with me – that abstracting away control of the atomic unit from the player and assuming it is the unit's commander and that, in general, they will face in the correct direction and use the most appropriate formation – then let's continue on.
  1. If a commander is oriented in the most appropriate direction and formation, in relation to the enemy, how is an enemy unit attacking from a "flank" an advantage?
The answer is, it doesn't unless there is also a force engaging it to its' front.


When you are assuming that a unit is properly positioned, when threatened by a single unit, there is no advantage, so why model it?

Well, they are being attacked from two sides, right? That has to have some kind of advantage, right?

Sure, but now let's take a page from the King of Abstraction, Neil Thomas. In Wargaming Nineteenth Century Europe 1815-1878 he writes:
For complex rules tend to suffer from conceptual flaws. The chief among these is what can be referred to a 'double jeopardy', or to be specific, accounting twice for a contingency that should only be considered once. For example, units which are behind cover frequently enjoy a morale bonus in complex rulesets; however this fails to account for the fact that the role of cover has already been accounted for, given that the unit within would suffer fewer casualties than its more exposed comrades. If the unit behind cover is still suffering sufficient casualties to endure a morale test, then it is clear that the cover is no longer doing its job – and should not therefore confer any morale bonus.
So, if we have agreed that coming at the flank of the enemy with a single unit does not confer a bonus as the enemy simply turns to face you, i.e. it is not "flanking", then a flanking situation occurs only when a unit is being engaged by two or more units, coming at you from front and side or rear.

But, what is that actual advantage? Well, one is that you have effectively placed two units onto one, therefore you have a concentration of firepower. But that would also be true if you were engaging with two units from the front. So that is not the advantage of flanking.

Well, the combat power of the flanked unit is diffused because it is facing two directions and firing at two units. But saying you have diluted combat power is just the opposite of saying the enemy has concentrated combat power. Again, this would be true if facing two separate units from the front. So that is not the advantage of flanking.

Some rules put forth the concept of enfilading fire, defining enfilade similar to Wikipedia:
A formation or position is "in enfilade" if weapon fire can be directed along its longest axis. The benefit of enfilading an enemy formation is that, by firing along the long axis, it becomes easier to hit targets within that formation. ... Enfilade fire takes advantage of the fact that it is usually easier to aim laterally (traversing the weapon) than to correctly estimate the range to avoid shooting too long or short. Additionally, both indirect and direct fire projectiles that might miss an intended target are more likely to hit another valuable target within the formation if firing along the long axis.
Here is where the rub is. In order to model enfilade, you have to track a unit's exact position and formation at all times. And you have to care. Neil Thomas, despite having rules to track a unit's position and formation, still provides no flanking bonus as suggested by Allen, in the ruleset cited above. So clearly Neil feels that flanking bonuses fall into the realm of 'double jeopardy'. So do I.

If we read the descriptions of any battle, how do you know which factor produced the 'devastating fire from the enemy'? Was it their Elite morale bonus? Was it their Superior Training rating? Was it their First Fire bonus? Was it just that they rolled a '6'? We don't know because the truth is we are not trying to create an accurate simulation of war here. Hell, we cannot even model the track of a hurricane accurately, much less weather in general because of the complexity in variables, so how are we to succeed with war? The truth is that we add bonuses and subtract penalties because it 'feels right', not because it represents a measurable, quantifiable, factor.

So I say that flanking fire is more effective because you are pouring fire (or swinging swords) from two units versus my one. This represents the concentration of combat power on your part and a dilution of combat power back. Yes that is the same as if you were attacking with two units to my front. Prove that moving one unit some number of degrees to the side has a measurable, quantifiable benefit and I will consider modeling what has been abstracted away.

So, we've looked at whether it should have a benefit or not. Let's look at the benefit versus the cost of having such a rule. As previously stated, the first requirement to getting a flank bonus is defining a unit's flank. That means you must track a unit's position and orientation, at the very least. Given that enfilade of a line is from the side and enfilade of a column is from the front, formation is now another data point you must collect.

Let's go back to the first assumption at the top of the post: we have non-player commanders responsible for that, leaving me, the player, free to focus on higher level information and not mired in the minutiae of unit administration. You have to decide: are you player a Commander-in-Chief or are you playing a collective of unit Commanders?

From a rules detail perspective, think of all of the rules that you have read and how they deal with flanks. Some say that if you end the move behind an imaginary line running along the front edge/through the middle/running along the back edge of the front stand/unit then you are on the flank. Other say the same, but only if you started and ended behind that line that turn. Maybe the rules align stands in combat and thus the requirement is your unit's front face is flush against the enemy unit's side face, but only if at least half/all of the unit is in contact. The combinations are endless.

Do you know what these sort of rules produce? Arguments. Did you meet the conditions before you started the move? Did you have enough move to get to the exact position by the end to count as flanked. Is it really realistic that you don't could because you were 1/4" too far away? (Don't get me started about grids...)

You know what else these sort of rules produce? Pages or explanations. Generally up for interpretation (unless they were written by Phil Barker ... on second thought, those are too).

The core principle of Tin Soldiers in Action is to produce a set of rules that do not produce arguments. It does not accomplish this by being precise, but rather by abstracting away the elements that we like to think we can accurately define, but are actually fooling ourselves by saying we not only understand why a unit in such a position would have an advantage, but what percentage bonus should be applied.

So Allen, what flanking bonus did you apply when you tweaked Wargaming Nineteenth Century Europe 1815-1878? How many words did you have to use to define what a flank was and when a bonus would be applied in combat? How did you determine what the bonus should be? Just curious.

Sunday, January 28, 2018

One More Square and the Impact on Engagement

Last post I described a battle using the Tin Soldiers in Action (TSIA) rules with a scenario from One-Hour Wargames (OHW). I posted notices in various places and it has led to some good discussion – primarily with the author of TSIA – about scenario design.

In my last game I was trying to be true to TSIA while also being true to the intent of the scenario in OHW. The issue for me was that OHW's scenarios have a few assumptions built into them, mainly that you are using the rules published in OHW. So when deciding to use the scenario with another ruleset, the first thing I had to consider was how they differed, to see if the scenario needed to be adjusted. As I outlined in the previous post, the time scales of a "turn" are significantly different between the two rules, requiring an adjustment in the scenario length for example. What else might need to be adjusted.

The author of TSIA recommended some changes, one of which was to adjust the board to 8 by 8 squares. One of the tenets of OHW is to provide "practical tabletop battles for those with limited time and space". Although I was certainly not space limited when playing that scenario (I played it on a 3' by 3' section of a 6' by 4' table), I often do play on a smaller table and so I was trying to keep to the spirit of OHW. Nonetheless, it got me to thinking. What would have been the impact of adding one additional square (6") to each edge of the board?

Adding a Square to the West Side

The focus of the scenario is on the two hill squares. Control of these squares trumps all else in the scenario.

Given that this was a horse-and-musket game, these were the key squares to attacking and retaining control of the hill. Because of musket range, only the squares marked in red could attack the hill.


Adding a column of squares to the west side of the board would have done little in altering the dynamics of the scenario, in my opinion. I understand the desire to avoid the "wall-to-wall" troop effect and by having six units and a board six squares wide, you would think that adding squares to the flanks would alleviate that. It would not. The "wall-to-wall" effect was a function of the scenario design calling for the entry of six units onto the board on turn 1.

Had there been an additional square to the west I probably would have shifted the light infantry from a position on the east, approaching the woods, to the new square created on the west flank. This would still have resulted in wall-o-wall troops, just shifted left one square.

I do not mean say that the addition of the square would not have had an effect; it just was not going to have an effect on trying to get the troops to space out. As long as the focus was on specific squares, troops would naturally cluster around those points. Adding a square to the west would have allowed more firepower to bear on the western flank's key control squares, potentially dislodging a unit and allowing an attack on the hill.

Adding a Square to the East Side

Given the range of the musket (one square for full fire, two squares with skirmishers) the east side was largely out of play. Throwing a woods on that flank ensured that side was going to swing around onto the east side quickly and easily in order to attack their opponents in the rear.

If the east flank had been extended a square, presumably there would have been woods in the same positions in the new column. If there had not been, you would have essentially been negating the presence of the woods in the first place, which would have been a violation of the spirit of the scenario.
Note: because square grid movement in TSIA counts the diagonal the same distance as the horizontal and vertical, moving around obstacles is very easy in TSIA. So positioning a woods on the flank would have presented no obstacle to movement, and thus to time, unless the woods were also present in the new column of squares.
I see no value in adding a square to the east, as it leave more of an area out of play. This is a function of the scenario having the terrain objectives offset from the center.

Adding a Square to the South Side

Adding a square to the south, where the French attack from, modifies the dynamics of the scenario quite a bit, and this was my main objection to changing the board size. Let's start by looking at the decisions the French Commander has.
Note: when I rate rules I have a category called Engaging that represents "do the rules allow the player to make meaningful decisions that lead to consequences?"
The key determinant on the French Commander's decisions is whether the enemy units on the hill have already activated this turn or not. You can actually break down the French Commander's thought process using a truth table.

Allies Move First (Turn 1)French Move First (Turn 1)
Bet Allies Will Move First (Turn 2)
A
B
Bet French Will Move First (Turn 2)
C
D

A. In this situation the Allies will not get to fire on the first turn as the French are off the board, but because they act first on the second turn they will be able to take two Fire actions before the French can act.

B. In this situation the French are forced onto the board where they can be fired upon, and then have to withstand an additional two Fire actions in the second turn before they can act. This is the worst situation for the French Commander.

C. If the Allies move first there is no firing, as the French are off of the board. If the French then move first after coming on the board they can act without any fire from the Allies first. This is the ideal situation for the French Commander.

D. This situation is only better for the French as they would get two volleys into the Allies on the second turn, but that is after they had received two from the Allies on the first turn.

So the French Commander's decisions are strongly influenced by the firing potential of the Allies before he can act with full firepower with his own units. Let's look at this in detail.


When the French turn to act occurs, they have two actions available to each unit. Each action can be either Move or Fire. (There are more actions, but these are the two we will only concern ourselves with at the moment.) The Move action will allow the unit to move one square in any direction, as long as the square is unoccupied. The Fire action will allow the unit to fire at full potential into any adjacent square, or to fire weakly at any square up to two squares away (given some limitations on line of sight, which we will ignore for now).
To understand the firepower potential, each Allied unit will get to throw 6 dice for each Fire action if at a unit one square away, and 1 die for each Fire action if at a unit two squares away. Each French units firepower potential is 3 dice and 1 die, respectively. The differential in dice is not due to unit quality, but due to possession of the hill.
For the first action, the French have no real choice; they must take a Move action to move onto the board. For the second action the French can either take an additional Move to get adjacent to the enemy on the hill or they can take a Fire action and fire weakly at the enemy (about 1/3rd of the firepower of a full volley). Which should combination of actions should they take?

Going back to the truth table, this is what the firepower potential of the Allies looks like if the French take two Move actions on the first turn. (French firepower potential is in ( ). As it will be at one square the second French turn would consist of two Fire actions.)

Allies Move First (Turn 1)French Move First (Turn 1)
Allies Move First (Turn 2)
12 (6)
24 (4)
French Move First (Turn 2)
11 (6)
11 (6)

Now let's compare that to the truth table if the French take one Move action, followed by a Fire action on both turns 1 and 2. Again, this is the firepower potential of the Allies. (French firepower potential is in ( ).)

Allies Move First (Turn 1)French Move First (Turn 1)
Allies Move First (Turn 2)
2 (4)
4 (4)
French Move First (Turn 2)
12 (4)
14 (4)

Just looking at the change in the tables shows you that the decision the French Commander makes has a tremendous impact on the game and its pace. (It also shows you how much of a gambler I was.) This example also shows why I rated TSIA a 5 out of 5 in Engaging. Such as simple decision – do I Move/Move then Fire/Fire or do I Move/Fire then Move/Fire – can result in drastically different odds and outcomes.

Now, let's add a square to the French baseline. When the French unit acts its first action will be Move, just as it was previously. It must enter the board. The second action, however, cannot logically be Fire as nothing is within range. If the French Commander decides he does not wish to move into range of the Allied units, then he would Pass for the second action. But why would he do that? The firepower would only yield 1 die per Fire action. Hardly enough to be concerned about. So on turn one, rather than having a decision on whether the second action should be Move or Fire, leading to radically different potentials for turn two, you have no real decision. Further, on turn two the French Commander's decision is also pretty much set. Being one square away, the choice is to Move then Fire.

So, what does that extra square gain you, the players? It actually leads to fewer real choices. It may be more realistic, in that the outcome of who moves first on the first turn results in less drama, but it is interesting that the simple addition of a square essentially delays the action, thus delaying the opportunity for the player to make real, meaningful choices.

Are your scenarios engaging? Have you made decisions about timing, terrain placement, and force disposition that leads to more or less engagement by the players? Is adding that extra square (or subtracting it) really as simple as just giving all your troops a little more elbow room?

Wednesday, January 17, 2018

TSIA and One-Hour Wargames

If you don't play games with your miniatures often you are less likely to want to paint more of them, reducing that lead, plastic – and in my case, wood – pile. I needed to get back in the saddle and game, having spent too much time recently gaming on the computer and watching old television shows on Amazon Prime.

I wanted to introduce a couple of gamers in the area to Tin Soldiers in Action (TSIA), but I needed a scenario. As I have a limited number of units per side (I was going to use my wooden Napoleonic miniatures for the game) I needed a scenario with a limited unit count. I knew that Neal Thomas' various rules tend toward that idea, so I started looking around in his books for ideas. I cracked open One-Hour Wargames: Practical Tabletop Battles for Those With Limited Time and Space (OHW), looked through the scenarios, and settled on Scenario 4: Take the High Ground.

Take the high ground is a simple scenario. Side A starts with two units on the board, on a hill, closer to Side B's baseline. Side A's remaining four units start off-board. Side B's six units also starts off-board. Side B moves first, with all six units coming on the board on turn 1. Only the on-board units of Side A can move on turn 1, with the off-board units coming on the board on turn 2.

The objective is to hold the hill at the end of the game, after 15 turns. Whoever holds the hill wins.

Translating the board to TSIA is easy as OHW draws their maps on a three square by three square grid, each square representing a 12" square area. As TSIA uses 6" squares, each OHW square thus contains four TSIA squares. Here is the table for the scenario.


The Allies (British and Spanish) are Side A and the two on-board units are British Line Infantry, on the hill. This view is from the South (French / Side B) side.

I decided that I wanted to try and have the units in the scenario match more of what the units were painted as. As it stands, it is a bit of a stretch as I was using Prussian Landwehr as Spanish Militia units. (Actually they look passable ... except for the long coats, caps, and the yellow cross on those caps.) So, against all sound judgment, I decided to try the following order of battle.

  • Allies
    • British Infantry (Ace of Hearts)
      • Commander in Chief
      • Two British Line Infantry units (Infantry, Average, Professional, 12 figures, muskets, attached skirmishers)
    • British Cavalry (Two of Hearts)
      • British Light Dragoons unit (Light Cavalry, Superior, Professional, 6 figures, carbines, sabers)
    • Spanish (Ace of Diamonds)
      • Spanish Line Infantry unit (Infantry, Average, Professional, 12 figures, muskets)
    • Spanish Militia (Two of Diamonds)
      • Spanish Militia Line unit (Infantry, Inferior, Amateur, 16 figures, muskets)
      • Spanish Militia Light unit (Light Infantry, Inferior, Amateur, 12 figures, muskets, skirmishers)
  • French
    • French Infantry (Ace of Clubs)
      • Commander in Chief
      • Four French Line Infantry units (Infantry, Average, Professional, 12 figures, muskets, attached skirmishers)
    • French Lights
      • French Light Infantry unit (Light Infantry, Average, Professional, 12 figures, muskets, skirmishers)
    • French Cavalry
      • French Gendarmes unit (Heavy Cavalry, Average, Professional, 6 figures, sabers)
So, the French had a quality advantage, but the British had a (slight) numerical advantage (although they were equal in unit count) and an advantage in command count (giving them more cards and thus a greater chance to move something first).

I also needed to change the scenario somewhat as TSIA and OHW are on two different time scales. In OHW an infantry unit move 6" per turn (one TSIA square) and can either move or fire. In TSIA an infantry unit gets two actions per turn and can either move one square or fire in each of those actions. Effectively, two OHW turns is equivalent to one TSIA turn. So I halved the scenario length of 15 turns to 8 turns.

The next issue was the turn sequence. OHW is a traditional IGO-UGO and TSIA uses card (random) activation. The scenario called for Side B (in this case, the French) to move first, allowing only the on-board units of Side A to move on turn 1. At first I decided to partially honor that sequence:

  • Turn 1
    • Activate all French units
    • Activate all on-board Allied units
  • Turn 2 through 8
    • Use cards to determine activation order of all units on both sides
The more I thought about it, however, the more I realized that TSIA's card activation also represents more than just who acts first. It also injects a fog of war that can result in units not acting in a timely manner. Consider the opening situation.


Infantry units with muskets have a one square range. If the unit has attached skirmishers then the unit can fire one additional square, but only with a single die. So the French unit has a choice:

  • March on one square and fire with one die, or
  • March on two squares
Note that this choice leads to how well the British can retaliate. If the French move one square and fire with one die, the British only get to retaliate with a single die for each Fire action. (They cannot risk advancing off of the hill as the French units would simply swing around the flanks and capture the hill.) However, if the French move two squares, the British retaliate with two full volleys.

Looking at it with random activation, if the British activate first, they will get no fire (as the enemy units are off of the table). If they activate after the French do, they essentially get the same choices as they would with IGO-UGO. So, using random activation allows you to simulate whether the attack is being launched with surprise or not. (If the British activate first, it is a surprise French attack; if the French activate first, it is not.)

For this game I decided to go with the TSIA activation method rather than a modified activation method. You will see the impact of that decision later.

As only one Allied command can act on turn one, the chance of some surprise was high, as they only had one command card while the attacker had three. But the reality is closer to the odds being 50-50 as it really only mattered whether the French Infantry command moved before or after the British Infantry command.

Game Preparation

To prepare for the game I laid out the command cards (four for the Allies and three for the French), created a cheat sheet to remind me which card belonged to which command, then wrote out two casualty rosters, one for each side, so I could mark off hits and keep track of stats. That would minimize markers on the field (in theory), as I have to use several hits per figure. (I am using six figure units, counting for 12 soldiers.)


I did not have one commander figure per command, only one Commander in Chief for each side, so I decided to use just one Commander. (I need to make more proper Commanders and Generals.) I was okay with that as both the commands and the board are small. It meant I had to keep everyone except open formation units within 2 squares of the commander. Not very hard on a board six squares by six squares when your command radius is five squares by 5 squares!

I also decided not to re-read the rules before playing. I did that intentionally because I wanted to see just how much of the rules I have retained from the last time, how many of the details of the rules were memorable, and where the rough spots were. A ruleset is more likely to be played after a break if its rules are memorable.

Turn 1

The British Line drew the first command card, so they had to move first, indicating that the defender was surprised. As there was nothing for the units to do, they passed.

The French Lights moved onto the board in open order, heading towards the woods. The French Cavalry moved cautiously onto the board, covering the left flank of the light infantry. They could have moved four squares, but they only moved two. The French Line moved straight onto the board two squares, heading for an assault on the hill.

No strange moves, although I did consider what I could do with the road movement for the unit on the road. I had to look up the road movement rule, as I had never really used it in any previous game. Basically each move action allows you to move up to three squares with infantry, but you end the action disordered. It did not really seem worth taking the disorder so soon, just to get off one volley.


Turn 2

The Spanish Militia Lights moved in open order two squares straight ahead towards the woods. (I remembered that Amateurs get two actions only if performing the same action, otherwise they get only one action.) The Spanish Militia Line was on the road and could move quite some distance, but I again decided to move conservatively as I did not want to end the movement with Disorder, and I could not Move once and Rally with the second action as the unit is Amateur.

The French Line got the jump on the British, further showing the surprise that the French had! I start with firing on the left at the units on the hill. I remembered the basic formula was 0.5 dice per figure with muskets. I believed the hill halved the firepower, but I had to look it up to be sure. (I was right.) So each unit gets three dice, needing a '6' to score a hit.

The first French unit scores two hits when I remembered that I didn't really remember the rules on how units gets disordered (other than by moving through terrain in close formation and by using road movement). I remembered that there is a Tenacity check, and it occurs after firing and before close combat, so I decided to check there. Yep, units suffering casualties from firing check tenacity. If they fail that check they become disordered and if already disordered, suffer from desertions. Simple.

The second volley from the first unit only produced a single hit, resulting in three hits on the British unit in the left square of the hill.

Moving next to the unit on the road, it fired at the right British unit on the hill in order to soften it up. It's two volleys produced two hits.

Now I remembered that attacking in close combat against intact units that are not isolated is a rather painful proposition, as adjacent enemy units can support the defender. So unless I wanted to attack both British units on turn 2, I needed to continue to wear them down and potentially deliver the killing blow with my French Cavalry. So I continued with the fire, but get no more hits on the British Line on the right square of the hill. It had a total of two hits.

So, time for Tenacity tests. I remembered them, but decided to double-check everything just to be sure. The only thing I really forgot was whether the target number was to roll equal or lower or roll lower than the number of figures in the unit. (It is equal or lower.) Both British units passed.


The French Cavalry was next to move, so I decided to immediately launch a charge on the east end of the hill, hitting the British Line.
Note: it may sound a little crazy that I launched a charge so soon. It was. I initially had rolled too many dice for the French fire. I calculated three dice per volley and two volleys, so six dice. I then rolled six dice twice for each unit, stupidly not realizing I had already accounted for the two Fire actions! By the time I had made the French Cavalry move, I realized my error, re-rolled the original casualties and moved on. Of course, I did not re-examine my decision of charging with the cavalry until I started calculating the odds...
I had to look up the Close Combat Test. Basically roll 1 die for each unit and on a 1-2 the French Cavalry is disordered and on a 1 the British Line is disordered (it had a tactical advantage, and thus a lower chance of failing the test). The French Cavalry gets disordered!

The British Line gets first strike (defensive fire), getting 10 dice, hitting on a '5' or '6'. The British completely whiff! Not a single hit! The French Cavalry get 6 dice, scoring a single hit. The cavalry wins, driving the first British unit off of the hill.

This is a big decision for the cavalry though, as now it can take the position. Note that it cannot take a breakthrough against the second British unit as it did not inflict more hits than the enemy unit had remaining. (I did have to look that up.) Taking the position leaves it in a vulnerable position, but denies the enemy from simply marching right back onto the square.

Disorder has the effect of requiring one action to remove it, but if you don't, you can still move and fight. The problem comes that your combat dice are halved, and failed tenacity or close combat tests will result in desertion.

I decided to have the cavalry take the position.


The French continue their momentum with The French Lights moving next. They decided to push through the woods, denying them to the Spanish Militia Lights.


The British Light Cavalry take a conservative move and station themselves by the Commander and the shaken British Line. Finally, the British Line get to activate. The retreated line swung to the west side of the hill after rallying off the disorder. The Line on the hill had a choice: throw two dice for each volley at the cavalry or five dice for each volley at the infantry at the base of the hill. I decided to hammer the French Line on the west end, hoping to create a weakness in the line. The British scored two hits. (The French passed their Tenacity check.)


Note that three cotton balls represents a units getting off two volleys, two cotton balls represents one volley, and one cotton ball represents firing skirmishers.

Turn 3

The one thing about random activation that some people like (and others hate) is when a unit gets the last move on one turn and the first move on the next. It essentially looks like a "double move" and it can be a powerful game changer.

The British Line, after activating after the French Line in the previous turn, activated first in this turn, granting the British four actions before the French got to act. The unit on the hill again attempted to pound the French at the end of the line, hoping to create a hole, but failed to score any hits after two more volleys. The second Line unit scored one hit with its one volley. The French handily pass their Tenacity check. A great opportunity lost!

The French Line immediately retaliated. The unit on the road moved further down, skirmishing with the Spanish Militia on the road, to no effect. The two French units on the left at the base of the hill fire two volleys each at the British on the hill, while the third fired one, then charge, led by the Commander. Amazingly, the British failed their Tenacity check, causing them disorder. Both the French and the British passed their Close Combat checks, however.

The British, despite being down 25% in manpower and disordered, inflicted as many casualties as the French inflicted in return (both scoring two hits). Although it is a draw, the French had their Commander attached, so they win. The British retreat, losing five (!) to desertion, leaving them with a single figure, so the unit disintegrated. The French take the hill.


The Spanish Militia continued to push down the road, with the Militia Lights covering their flank. Unfortunately, because the troops are amateur, they can only perform one type of action, and in this case it is Move, so they cannot Fire at the French on the road or in the woods.

Unfortunately for the Allies, the French Cavalry activated next, so they Rally. I consider charging with them, but even inferior amateur troops are not that bad in close combat, especially if they are not disordered. First, they would have to pass a Close Combat test. Granted, the militia fail on a '1' through '3', but the Cavalry fails on a '1' or '2', so the Cavalry has a substantial chance of failure too. After that the Militia roll 16 dice (or 8, if they had been disordered), needing a '5' or '6' to hit, so they would inflict about five casualties on the six figure cavalry unit. No thanks. The Cavalry stay put.

I had really wanted the British Cavalry to go before the French Cavalry, as I would have charged the latter while they were disordered. But now that they aren't, I would have to wait for another opportunity later in the game.

All of the remaining units fire to no effect, leaving this the positions on the board at the end of the turn. Things look bad for the Allies as they are down one of their best units and the French are in full possession of the hill.


Turn 4

The British Line again gets first activation and fire up the hill to try and dislodge the French Line unit there, inflicting a hit, but with the Commander not a casualty the unit does not need to check tenacity.

I swear I shuffled despite the order of the first two activations being the same! The French Line at the base of the hill started pounding the British Line, scoring four hits before one of the French units declares a charge. Meanwhile the French on the hill fired down on the Spanish and pound them with four hits also. Finally, the French on the road pound the militia for two hits.

The British check tenacity, failed, and were disordered. The Spanish passed, as did the militia.

Both the British and charging French passed their close combat tests. The British whiff their defensive fire (they are really terrible in close combat!) and the French completely wiped out the British with six hits.


At this point I bring the scenario to a close. There is no way that the single Spanish unit is going to hold off three French units, much less retake the hill. On the East flank two French average, professional units face two inferior, amateur Spanish units. The Allies have lost.

I need to rethink this scenario, especially the quality differentials. Maybe I should use the points system...

Aftermath

The first issue was wanting to match the units' paint jobs to historical performance despite the scenario not calling for any quality differentials. That is why I should always listen to that little voice that says "play it straight until you understand the dynamics, then you can start changing it".

The scenario practically assumes that you will lose the two units on the hill, or barely hold on, so the units coming on-board as reinforcements have to be equal to the task or re-taking the hill.

Secondly, if you are going to use different quality troops, using the ones that cannot fire and maneuver as your reinforcements and the ones that can fire and maneuver as your static defensive troops is a pretty stupid move. Had the militia been on the hill they would have been able to fire twice despite being amateurs. Had the British marched on, they would have been able to march forward and fire a volley on turn three.

Finally, not using the French then Allied activation sequence on turn one ensured that there was not a fair chance for the Allies. If the British activated first, they lost two Fire actions and ensured that the French would be right on them starting on turn 2. If the French activated first they had the choice of moving slowly and skirmishing, not being in a prime position on turn 2, or marching aggressively on turn 1 and gambling that they would activate first on turn 2. By leaving it to chance there was a 50% chance for a tough decision for the French versus 50% chance of a no-brainer, can't lose decision; by forcing the French to activate first there was a 100% chance of a tough decision for the French.

Clearly I need to replay the scenario with the quality of both sides being equal (as their are no real quantitative differences), even if not all units are of the same quality. Paint jobs be damned!

Another consideration is to have one single command per side as these armies really are pretty small. That would not only make the game feel more IGO-UGO, as was designed for the scenario, but you could still use the random activation to see which side activated first. So you get a little of TSIA and OHW's turn sequence.

Do the ratings I gave TSIA still hold, especially in the Unobtrusiveness (5 out of 5) and Heads Up (5 out of 5) categories? Yes.

Saturday, January 07, 2017

When it Comes Down to the Last Roll of the Last Unit on the Last Turn

The last game I played was a scenario called "Hook's Farm", which was adapted by the author of the rules Tin Soldiers in Action (TSIA) from a scenario of the same name in H. G. Wells' book Little Wars. I had built my version of this scenario in order to play it with my gaming buddy, Justo. I live in Arizona (USA) now and he lives in Texas (USA), so we were going to play it over Skype by each of us having a board, miniatures for both sides, and markers. As TSIA is played on a square grid it is very easy to call out the grid number of the unit moving or firing and the grid number where you are moving to or firing at. Sort of like the old Milton Bradley game Battleship.

I was farther along with the miniatures and board, so when Justo missed the first deadline, my wife offered to game with me as we had not gamed together for some time. It was a mercy killing. Although technically she lost, she had beaten the snot out of me and her main attacking force was still intact.

Justo got his miniatures finished and we played a game at the tail end of the New Year's holiday and it was fun. I was attacking that time but ... well, I got smashed again. Really stupid move on my part right at the start and it put me on my back foot for the rest of the game. I got so distracted by that error – and Justo was on the hunt for blood – that our picture taking sort of petered out. That is why there was no battle report.

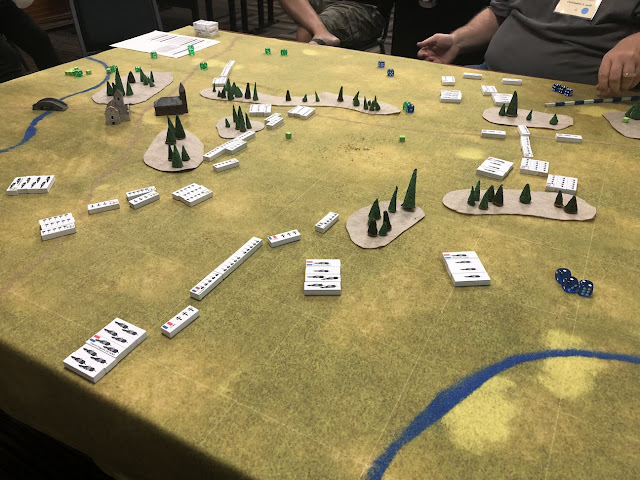
So, we decided to run the game again last night/this morning with Justo attacking this time. Hopefully this battle report will show more of the subtleties – and dare I say it (because the author of TSIA will read this), some of the peculiarities – of the rules. Also, you will get a double view of each turn! The first picture of each turn will be Justo's version of the game, while the second picture will be mine. Note that he was using American Civil War paper figures (and a cat), while I was using handmade, wooden Austro-Prussian War figures. Note that most of our pictures are end-of-turn shots.
Actually, neither Justo nor I are using the right period figures for the scenario, although Justo's is probably closer to the mark. The scenario has the infantry armed with rifled muskets, so that works for both sides of the ACW and for the Austrians in the Seven Weeks' War, but not for the Prussians, who are using early breechloaders. The artillery in the scenario have smoothbore muzzleloading guns. Again, this still works for the ACW, but due to them being rated as "medium", they are insufficient to be used as 12 pounder Napoleons. Ironically, the Prussians were still using smoothbore artillery, but the Austrians were already using rifled artillery. As for the cavalry, the scenario gives them only close combat weapons and no ranged weapons or revolvers, so they are really not suited for either ACW or the Seven Weeks' War cavalry. Probably the best representative would be armies from the 1850s, such as the Franco-Austrian War of 1859.

The Scenario

You can get a copy of the PDF of the scenario by following the link or searching in the files section of the TSIA board on BoardgameGeek.


The Blue defender can set up their forces anywhere in rows 1 through 3, with a single unit being able to occupy square D4, Hook's Farm. The Red attacker set up their forces in row 8. The objective is to hold Hook's Farm at the end of turn five. The two forces are identical, save that the defender must eliminate one unit of their choice before the start of the game. If a player loses their Commander-in-Chief, they automatically lose (or draw if both players lose them).

The houses rarely come into play, save for Hook's Farm, but the woods have a large spoiling effect on wide sweeping movements. The largest impact is from the two hills.

Hills have several effects on the game. Shooting uphill is penalized, but downhill is not. Close combat attacks are not penalized, either uphill or downhill, but they can affect morale before and after close combat by giving an advantage to an uphill defender. The greatest impact, however, is on line of sight (LOS).

The easiest way to describe the line of sight rules with hills is to compare it to other rules. The closest I can think of is Memoir '44 (M44). Hills are plateaus, not ridgelines. Line of sight from hill square to hill square is unimpaired by all terrain at ground level (elevation 0). However, there are a few peculiarities that may surprise people. Like M44, the 'plateau effect' means that other hills block LOS to the ground level. Looking at the map below, a unit in C4 could see A6, for example, but not B6. The hill in C5 blocks the LOS to the latter. Here is the complete LOS for square C4. Gray squares are not visible.


As you can see, hill squares are actually very restricted in their LOS. Knowing that the defenders start in row 3, on the back edge of the hill, you can see that the entire rows 7 and 8 are out of LOS, allowing the attacker to approach the hill without coming under fire, only being fired upon once they get up onto a hill square. Given that the attacker starts in row 8 they have a fundamental choice to make: move to row 7 on turn 1 and stay out of firing range moving up and firing on turn 2, or move to row 6 on turn 1 and take the fire. If the defender moves first, the latter is the obvious choice, but if the attacker moves first...?

This also means that there are 'power squares', in terms of LOS. For the defender, one would be square C6. That square dominates two directions, plus one-half of the hill.


That is a long way from the defender's start line and a big gamble to take at the game start. But I digress. The point was to show how LOS to and from hill squares work.

Deployment

Only one picture for this, from my game, as Justo's picture did not come through.


The attackers (Prussians, in my case) are at the bottom of the picture in row 8. From left to right: two infantry brigades, a limbered artillery battery, the cavalry reserve with the Commander-in-Chief, another limbered artillery battery, and two more infantry brigades.

The defenders have an infantry brigade defending Hook's Farm, then in row 3 from left to right: an unlimbered artillery battery, two infantry brigades, and a second unlimbered artillery battery. Finally in row two is the cavalry reserve with the Commander-in-Chief.

I am a bit perplexed by Justo's deployment. I was not expecting the cavalry to be directly in front of Hook's Farm. Given that he made a very successful charge early in the last game, I figure that he wants to duplicate that success, so will be aggressive with this cavalry.

I still have not painted the central hill, put the roofs on the houses and am missing two guns and three limbers models from my units. Oh the shame!

Turn One

Justo is taking pictures from the right flank of the defenders/left flank of the attackers. He has advanced his light cavalry (which is in open formation) into the woods on his left flank. (Note that in my picture I have this wrong. I thought he was still behind the woods.) Either way, I reacted by moving my cavalry reserve to defend against a flank sweep.

Justo was unlucky in that he was forced to move his troops first, so he decided to move up to the base of the hill and not expose himself to the full fire of my forces on turn one. Only one infantry brigade exposed themselves and they took a single hit as a consequence.


Note that because Justo took his infantry and cavalry around his left flank, I did not move the artillery battery in C3 forward to C4, where I normally move it. Moving it to C4 would have not only limited me to one shot that turn (although it would have been canister and not round shot), but it would not expose my artillery to fire from the infantry in A6. Not having made that move will have a significant impact the whole game because that artillery battery's fire will not only be reduced in strength (because it will continue firing round shot from long range and not canister), it will be limited in its targets because of the narrow LOS.

Turn Two

The infantry brigade I threw out front into E5 was crushed by the weight of fire coming from Justo's gun line, as was his infantry brigade in C5 from mine. We both ended up pulling our units back. (I took the worst of it though as my unit had lost 50% while Justo's had only lost 25%.)


A second infantry brigade (in D6) of Justo's was badly battered, but he started inflicting hits on my infantry brigade defending Hook's Farm. I decide to gamble a little by moving an infantry brigade into F5 (in front of my battery on the right, which had already fired), but honestly I forget why I did it. If rushing an infantry brigade out front resulted in its slaughter last turn, why would this one not turn out the same?
Now you may wonder why I would make that move. Would it not block the LOS of the artillery battery? Well, actually, no. For those used to LOS rules in US boardgames, this may seem a little peculiar. Unit A has LOS to unit B.


In most US boardgames there are rules that say something like: "LOS on the 45º diagonal (or down the hex spine for hex-grid games) is blocked if there is blocking terrain or a unit on both sides of the line, but is not blocked if there is blocking terrain or a unit on only one side of the line." Not in TSIA. The rule specifically states that "if the line of sight passes through a square containing an obstruction", the LOS is blocked. The key is: "passes through a square". How do you know if a line passes through a square when you are on the 45º diagonal?

I thought about it this way. If I were moving from square A1 to B2 – along the 45º diagonal – would I first move into squares A2 or B1? No. So if I can move directly from A1 to B2 without passing through another square, why would LOS be any different? Turns out I was right. By the way, this only applies to the 45º, 135º, 225º and 315º diagonals. LOS is determined by going from the center of the starting square to the center of the ending square, so if the line is not at one of those four angles you will be passing through another square, which may in turn block the line of sight.
Justo decided to move his cavalry reserve back out of the woods, then close up into close formation. Looks like he is preparing to charge!

Turn Three

My gambit with the infantry brigade is crushed as Justo's forces all get first fire, leaving me with 75% casualties! I retreat to the house on my left flank, never to be useful again. Otherwise, units continue to be whittled down.

Reinforcements! Peanut makes a flank attack!

Justo long considered charging with his cavalry against mine, but after discussing the Axis of Attack rule – which essentially forces a charging unit to charge to its 'front' at the end of their movement – we agreed he could not charge.

This is a legal attack by A. The charge into B (square A3) is within the Axis of Attack after moving into square A2,
Further, when he considered charging my artillery in C3, we went through the odds of that succeeding and again he decided against it. In the end he pulled his unit back into reserve in the center, looking for an opening against a weak unit.

My unit defending Hook's Farm continues to get whittled down, having lost five tin soldiers from the fire of Justo's gun line. Further, there was the sudden appearance of an infantry brigade on its flank. I must do something about that!

Turn Four

This turn and the next is all that remains of the game. My defending unit in Hook's Farm is starting to look really weak. I do not have much time to save them and for some reason I have no fresh reserve infantry brigade to replace them.

Fortunately, my units were able to act before his infantry brigade on the hill could fire, so I pour all fire into that fresh unit, causing it three hits. It passed its morale check, however. I had more luck coming as my cavalry reserves' card was drawn next. After much hemming and hawing, I decide to charge them into the infantry brigade threatening Hook's Farm, mostly to work through a close combat example. (Justo had played a game previously with his son, and he said that he probably messed up that part of the rules.)


This is a fairly good charge as there are no units that can provide supporting fire.
Supporting fire occurs if an enemy unit is adjacent to a charging unit. If so, it can fight in close combat by providing fire into the charging unit before the charge hits home! You do not want to make charges into supported units as you will simply be shot down. Note that supporting fire is taken by units with ranged weapons, but it is played out as close combat, not ranged combat. One big difference is that cavalry no longer gets a defensive modifier.
The infantry get first strike as they have ranged weapons, but they score a measly one hit. With 11 figures remaining and 22 dice for close combat, the light cavalry cut the infantry brigade to ribbons.

The '5' and '6' are hits. All nine infantry are cut down.
This allows me to take a cavalry breakthrough.
In TSIA, cavalry are pretty much fire-and-forget, one-shot weapons, which to my mind is as it should be. A cavalry breakthrough occurs when attacking heavy cavalry simply wins a melee or attacking light cavalry wins the melee by completely wiping out the enemy unit. A cavalry breakthrough allows the cavalry to continue the charge and attack units adjacent to the losing unit.
At first I hem and haw over whether to stand, advance and take the position, or take the cavalry breakthrough. The second option – to advance but not take the breakthrough – makes no sense. To stand means that my cavalry will be blocking my artillery's shot next turn, unless I get lucky enough to move my cavalry before my artillery is commanded to act. To breakthrough, however, means that I will take fire from both an artillery battery and an infantry brigade (albeit one with 50% losses). Justo points out that I will still take the fire if I stand there, laughs and calls me chicken, so I go ahead and take the breakthrough. (Real strategic thinking there, eh?)

But now the issue is: which unit to charge? If I charge the artillery, here is the sequence of events for resolving close combat.
  1. Both sides take a morale test. The artillery cannot fail the test because it is superior, unlimbered, and has an attached commander.
  2. The infantry conducts supporting fire with three dice.
  3. The artillery conducts defensive fire with nine dice.
  4. I conduct my close combat attack with the remaining figures, getting two dice per tin soldier.
  5. If I win, there will be no more units within my axis of attack, so the cavalry breakthrough ends.
If I charge the infantry, here is the sequence of events.
  1. Both sides take a morale test. The infantry will fail 33% of the time. If they fail they will be disordered, halving their dice in combat and making them more susceptible to losses if they lose the combat.
  2. The artillery conducts supporting fire with nine dice.
  3. The infantry conducts defensive fire with three dice, unless they failed morale in which case it will be two dice.
  4. I conduct my close combat attack with the remaining figures, getting two dice per tin soldier.
  5. If I wipe out the infantry, there are additional units within my axis of attack, so the cavalry breakthrough can continue.
Clearly the infantry are the better odds, but the artillery would be a bigger loss to Justo. Justo continues to razz me saying that the only real choice is to continue to kamikaze with the cavalry. I choose to charge the infantry to show him that my cavalry is just as fearless as his were last game!


By the way, I have my Commander-in-Chief with me, so if I lose him, the game is over for me unless I can kill his Commander-in-Chief too!

Justo rolls and whiffs, something like one or two hits. I cut the infantry brigade down and continue on to his second crippled infantry brigade cowering behind the artillery.

Now ponder that for a moment. My cavalry will be charging into a third, half-strength infantry brigade with two artillery batteries firing canister in support. The artillery batteries alone will be firing 18 dice and the infantry six dice (assuming it holds morale, otherwise it would be three), so that it 21-24 dice, needing ...

All of the sudden it dawns on me. I say: "Justo, have you been counting only the '6's as hits or both the '5's and '6's as hits?" He bursts out laughing and then groans. He has been whiffing because he was only counting '6's! I tell him that I don't know how to back out of this and do it over. He tells me not to worry about it, let's keep going. I allow the first artillery battery and the infantry to hit on '4'+ (but the second battery is still '5'+) to somewhat make up as compensation. But his dice went cold and he still whiffs, but at least this time it was legitimate.


That said, the losses are just too much and I lose the combat. I retreat in disorder to the woods, take a single loss to desertion, and lick my wounds.
As it turns out, Justo was right. To not advance and take the breakthrough would have been a waste of the unit. I was going to take all that fire anyway when his cards came up. You pretty much have to view cavalry as one-shot and do as much damage as possible once you decide to commit them. If, in the end, you are allowed to retreat, count your blessings.
Oh, and my Commander-in-Chief survived.


My infantry brigade defending Hook's Farm is down to four tin soldiers. It is looking grim. My cavalry is down to three figures. (I have a yellow marker in my photo instead of an orange, so it is mismarked. Justo has a missing stand in his photo, but I suspect that is the work of Peanut, who has been batting Justo's paper figures around as he takes a paw in the game.)

Turn Five

This is the critical last turn of the game. (We are not playing the optional rule, Variable Ending, which gives the attacker an advantage by letting the game play out as long as seven turns.) It is after midnight for Justo and approaching midnight for me. We are both getting punchy.

Luck continues to be with me. I rotate out the infantry from Hook's Farm and move in my artillery unit. What I have noticed is that the artillery simply do not fail morale rolls. All of my units fire first, so I pour fire into his artillery in an attempt to whittle them down. Each artillerist lost can cut his dice down by as much as three dice per tin soldier.

I fail all of my rolls. I throw the crippled unit in the house (G4) into the fray (at F5) in hopes of blocking a charge by Justo's infantry on the left flank (in G6). It does not work. Justo's cavalry charges and wipes me out, clearing the way.

Justo ends up with the last three cards of the game. Everyone he has that can pours fire into Hook's Farm. I go from four artillerists to two. Justo's last unit moves and charges into Hook's Farm. I have two artillery batteries and one half-strength infantry brigade defending or providing supporting fire. They cut him down from 11 tin soldiers to four. Justo rolls his last attack and scores no hits.


The game is over and I have won.

How close was this game? If the artillery unit in Hook's Farm had lost one more figure, it would have been reduced to one remaining artillerist. In TSIA that means that the unit is removed as the remaining figure runs off. That would have left my Commander-in-Chief holding the Farm.

When a unit commits to charging into a square for close combat and the preceding fire or morale tests causes the defending unit to be destroyed, the charging unit automatically wins the close combat and may advance into the square. The infantry brigade would have avoided all of the supporting fire.

When the infantry brigade reached the square, it would have found a lone Commander-in-Chief. I would have had to roll a die and on a '6', I would have been captured and would have lost automatically. On a '1' through '5' I would have been forced to retreat, leaving him the victory square, and thus also have lost.

Now, I do not like to point out an error of my opponent any more than I like mine being pointed out and published in a blog. But – sorry Justo, this is an important point – if his infantry brigade behind the artillery had moved as indicated with the dashed arrow to square D6 and fired, he could have obtained that last hit. What were the odds? Well, there were four tin soldiers left, firing at one die per two figures, shooting at unlimbered artillery (half dice), so he would have had a single die roll, needing a '6'. Not good odds, but...

Conclusion

Man! What a close game. This was a real nail-biter of a game of TSIA and certainly one of the most intense games of all time for me. To have the game break for one side or the other on the loss of a single figure! You do not see that very often.

Hopefully this will help others understand the TSIA rules a little better and highlight some of the areas where they differ from US and UK rules, especially boardgames (which we usually associate with grids). To be honest, my first reaction to some of the differences of new rules to the old way that I am used to playing is always somewhat negative, because it is not how I cut my teeth on grid-based games. But that is because it is all a bit unfamiliar. I think that the more I dug into Richard Borg and Neil Thomas rules, and how they made the case that simplicity of design does not make the game duller, but actually enhances the experience, the more it allowed me to appreciate these rules.

Justo was pretty clear when he said that these rules have a really clever design to them and that they are clean. I think he has some of the background that I do with "standard boardgame rules" and thus some of it feels counter-intuitive. But as I explained above about the line of sight rules, when you start thinking it through and challenging those old assumptions, the rules are more cohesive and consistent with very few exceptions. As the author Rüdiger told me in a chat, given that he stopped buying commercial rules more than ten years ago, he hasn't been corrupted by them and how they all play the same way either.

What's Next?

My next project with these rules will be a skirmish game, although I am not sure when I will get to it. I need to think through some ideas because I think my concept of a skirmish game is a bit different than the author's. It is something more than just "one figure equals one man". It is about scale, about zooming in on the action. It will probably involve bending some TSIA rules...

Blog Archive

Blog and Forum Pages

Popular Posts

Followers

About Me

My photo
Huachuca City, Arizona, United States
I am 58 yrs old now. I bought a house in Huachuca City, AZ working for a software company for the last three years. To while away the hours I like to wargame -- with wooden, lead, and sometimes paper miniatures -- usually solo. Although I am a 'rules junkie', I almost always use rules of my own (I like to build upon others' ideas, but it seems like there is always something "missing" or "wrong").