My blog about my wargaming activities. I collect a lot of 15mm miniatures for the American War of Independence and so collect a lot of rules for this period. I started miniatures with Napoleonics, so I have a number of armies in 6mm and 15mm figures for skirmishing. I have15mm WW II figures that I use for Flames of War, Memoir '44, and someday, Poor Bloody Infantry. Finally there is my on-again, off-again relationship with paper soldiers that I sometimes write about.

Showing posts with label hex grid. Show all posts

Sunday, October 22, 2023

Remote Game of Age of Penda

Revisiting My Age of Penda Review

I used to review rules with giving a playtest, simply analyzing the rules on paper. That was a big mistake when I rated the rules The World Turned Upside Down. The analysis was so off, that I am not even going to link to the old blog post. The ideas on paper looked so compelling, but the game was unplayable, in my opinion, unless you had the author (or maybe a veteran player from the author's group) present and guiding you through the murky bits.

I knew I wanted to review Age of Penda (AoP) because the rules were exactly what I was looking for: grid-based; Dark Ages; any basing scheme; simple to learn; and a game that required some planning, even if it was short-term. But, given the TWTUD disaster I knew I had to play it first, to make sure that what I thought about it on a read-through matched how it felt in a game. But, I played it solo.

Why is solo gaming an issue? Normally it isn't, but sometimes, when a ruleset is written simply and plainly, you have an interpretation of the rules that might not be shared. I have one rating category that is affected by this idea of shared understanding, i.e. is a rule written so clearly that two different people generally interpret it the same, and that is the Tournament Tight™️ rating. I gave AoP a rating of 4 and, after playing a game of it remotely with remote gaming buddy Shaun Travers, I think I have to lower it to a 3.

So, what are the issues?

Suggestions, Not Directives

There are a number of minor quibbles about how to do some things, like building an army, setting up a board, who goes first, and so on. The rules are written with several alternatives to handling the topics with one particular method that seems to be what the author prefers. But it is not always crystal clear.

Terrain

What terrain types there are and how it affect movement and combat is all pretty clear. What terrain is to be used follows along the lines of "place the terrain as indicated in the scenario, but if you don't have a scenario, use this random generation method instead." Again, it is not hard to figure out what to do, it just seems like and afterthought rather than the method to use unless you have set up a scenario. (Have you tried searching for a map of the battlefield, or an order of battle, for a battle in 7th Century Britain?) Minor quibble, I know.

Deployment

This one is a little more unusual. When I think of deployment, especially the typical game mechanic of alternating deployment, I envision "I place one unit, you place one unit" and so on until all units are deployed (or designated as an off-board reinforcement. But the phrasing in the rules are "… take it in turns to deploy your units into one area at a time". To me, this sounds like you designate an area on your baseline and then place all of the units that will deploy there. Once you have deployed to an area, no subsequent units can be added to it.

Now some might read it as "one unit at a time", but to me the subject is the "area". But then again, I know I have issues with Phil Barker's wording in De Bellis Antiquitatus and he is very precise with his wording, so my my English comprehensive is simply not good enough. Then again, when I pointed this out Shaun agreed that it does seem to be saying one area at a time, so I felt better about what I see as a non-standard game mechanic.

In a way, I like it because it makes you think in terms of groupings of units, and you have to do that before the first unit, I mean area, is deployed. Who is under which leader's command?

Rally

In AoP all battling is done by area. When you shoot you add up the Battle Ratings (BR, not Battle Strength or BS, like I indicated in the original post) of everyone shooting into the designated area, with close combat you add up the BR of all units on your side in the area, and when you take damage it is inflicted on the enemy in that area; the owning player allocates the damage to the units.

If you rally the rules say to "select one area with units in it that belong to you and where at least one of these units has lost Battle Rating at any previous time during the game". It then instructs you to "roll a dice for each such [wounded] unit". Based upon the die roll you will regain 0-2 BR. The issue is that it says "regain n Battle Rating", not "regain n Battle Rating on that unit". So, does the player apply the BR to the unit or to the area, the latter allowing the player to choose how to apply the BR? If this is not clear, here is an example.

King Penda decides to rally. He has three units (with remaining BR): Armored Warriors with Leader (5); Armored Warriors (3), and Skirmishers (1). All three have lost BR. The player rolls 3D6 and scores for each, respectively, 0 regained, 1 regained, and 2 regained. (Note that the Skirmishers started with 2, had lost only 1, but rolled to regain 2.) If you apply the rolls to the unit then the Armored Warriors with Leader regain 0, the Armored Warriors regain 1, and Skirmishers regain 1 (as the BR can never go above the original value), for a total of 2 regained. If you apply the rolls to the area (like you do with damage), then you regain 3, and you can allocate it any way you choose as long as no unit ends with more BR than they started with initially. These are two significantly different results.

Shaun and I chose to apply it to the unit, i.e. point to a unit in the area, roll the die, and then apply the result to that unit. I am beginning to suspect that it should be the area. Yes, you have to manage the number of BR each unit has, but the rules intent is to abstract away as many specifics about a unit as possible, like facing, formation, position in the battle line, etc. Applying it to the area is more in the spirit of the rules and doesn't have this 'gambling' aspect to it, i.e. losing good rolls to lightly damaged units or not getting the unit you want rallied. If you can protect a unit from damage, why can't you favor a unit for rally?

Moving From an Enemy-Occupied Area

This rule was not ambiguously written, the rules were very clear: you must keep track of each unit's area that they moved from, when moving into a new area. Why?

Because the rule for moving out of an area containing enemies require your unit to move back into the area from which it entered, it’s a good idea to place units angled to represent their entry point, or remaining alongside the edge through which they entered the area.

This rule creates so many issues and does not logically follow the design the author put forth in the first place. Here are some examples.

A unit’s precise location within an area is unimportant for all other aspects of the rules.

Why are there no outflanking rules?

Outflanking is factored in when you roll dice for all of your units in an area. My vision, streamlined here like so many aspects of these rules, is that enemy units will not allow themselves to be outflanked unless they are outnumbered and therefore cannot face all of their enemies at once. Rolling dice for all of your units doesn’t just represent them fighting, but also the effect of pinning their enemy’s front while other units approach the weaker sides. Strength in numbers and all that!”

“Unit facing does not affect shooting.

Note that units do not need to be in base-to-base contact to fight one another, just in the same area. It is assumed that your on-the-spot commander will place their unit in the correct position; as you are your army’s warlord, you don’t need to worry about this. That said, feel free to move units within the area to suit your taste – putting opposing units in contact makes no difference in play but we all know it looks correct and your dice roll better if you do so.

So facing, positioning, and flanks don’t matter because it is all abstracted away, but the army general is supposed to track which area each unit comes from in order to specify a retreat path?!? And note that it does require it even if the area was not occupied by the enemy when you entered the area; if they are there now, your previous line of march is what matters. In a ruleset that doesn't pin units exact position and formation.

Shaun initially viewed this movement restriction as something akin to DBA's rule on blocking retreats. That never occurred to me, especially as there was no language in the rules about blocking movement (other than area capacity for three units from each side). There are certainly no 'automatic destruction' rules like DBA has for blocking retreats. But it was an interesting idea.

Well, Shaun and I thought it fiddly when we tried our test games, but we decided to play it straight for our remote game and we have now decided to discard the rule and replace it with this one:

If beginning a Move action in an area with enemy units present, you may only move to an adjacent area that does not contain enemy units, i.e. you can't move directly from an enemy-occupied area to an adjacent enemy-occupied area.

This takes away the hassle of tracking this information for each unit while keeping to the spirit of allowing flexible movement. We considered a rule that says you must move towards your baseline, but then would have had to add another rule that indicates what you do if the area is enemy-occupied. This is simpler. Needs to be tested though.

Who Holds Initiative

Who holds the initiative is a very important aspect of these rules. The player with initiative makes the first pick on the tactic chart in the Tactics Phase and makes the first action in the Action Phase. Given that close combat allows you to strike first, with your opponent striking back with whomever survived, being first is a strong advantage.

Now the rules are clear on who holds initiative at the start of the game. (The player with the most mounted and skirmishers has initiative for the first turn. If tied, roll a die.) It is also clear that you seize (or retain) the initiative if you choose the tactic Seize the Initiative. What is not clear is who holds the initiative if no one chooses to use one of their four precious tactics tokens to play Seize the Initiative.

There are really four possibilities: 1) whomever currently holds the initiative retains the initiative (I've got it so I keep it); 2) initiative passes to the other player (I did not maintain the momentum); 3) initiative is determined by the rule that determined initiative for turn 1 (count remaining mounted and skirmishers, highest gets it); and 4) randomly determine who gets it. Honestly, I have seen all four mechanics in various rules.

There is nothing in the rules that would suggest #4 was correct, however. The rule for first turn initiative states "for the first turn", so unless there was a rule that states "use the rule for determining initiative on turn one", that seems a less likely choice. So the only logical choice are retain and pass. Therein lies the issue. The rule for the Seize the Initiative action states:

"If you have selected this tactic, follow these rules when you activate it:

  • Taking this action allows you to take (or retain) the Initiative from the start of the next turn. You may wish to use a marker to keep track of who holds the Initiative.
  • In some scenarios, this tactic can also be used to trigger a "special event" such as dicing for reinforcements, inspiration from praying by monks, and so on. (Chapter 4 suggests some ideas.)"

The confusing part is the phrase "… allows you to take (or retain) …". It implies that if you don't take the action you are not guaranteed to retain the initiative. But if you do not automatically retain it, then how do you determine who has it? There is another irritatingly worded rule in the Phases of Play:

"3. End Phase. Check victory conditions and end the game now if these have been fulfilled. Otherwise, check which player holds the initiative for the next turn and begin it."

If initiative is automatically retained, if no one chooses the Seize the Initiative action, why would it tell you to "check". Again, how do you check? (It has a rule for turn 1, hence why I felt it was option 3.)

The phrase "… if you have selected this tactic …" is also key here in that the only mention in a rule of taking the initiative is in this rule. So taking the initiative, other than the initial determination for turn 1, requires you selecting that tactic.

In the end Shaun convinced me to go with initiative is retained if it is not explicitly seized by your opponent.

Uncertainty

While I now think the rules are a little less clear than before (when no one was disagreeing with me), I also realize that there is more uncertainty built into the system.

As a solo player it is hard to surprise yourself. (I even wrote about the subject on my Solo Battles blog, which Shaun and I batted back and forth in the comments.) But this game (below) opened my eyes about the uncertainty that I forget about because I am playing both sides and it is hard to divorce your mind from considering the impact to one side while making a decision for the other side.

One element of uncertainty that has a large impact on the game is random terrain generation and placement by the players. I had two woods in my test game (plus a hill) and I let the dice essentially place the woods out of play. Players won't do that.

Another element is deployment. (Both Shaun and I admitted that when we played our solo test games we simply laid out one side completely, then laid out the other. We didn't follow the process.)

Finally, the process of selecting tactics actually produces less uncertainty than I thought initially, but it does produce some, surrounding who will spend their precious tactics point to seize (or retain) the initiative. But for the most part, tactics selection is pretty formulaic.

For these reasons I am changing the Uncertainty rating of Age of Penda from 3 to 4.

Summary

So, what does all this mean? I think I have to change my Tournament Tight™️ rating for AoP from a rating of 4 to a 3 and the Uncertainty rating from 3 to a 4. With a few changes to the wording – which may or may not reflect the intent of the author – I think you can get the former to a 5.

The rules are still very much recommended.

Remote Gaming

In a comment on the last blog post Martin Rapier mentioned remote gaming which, given that Shaun is in Australia and I am in the USA, is what we had to do. Our setup was to use a private Discord server for voice, chat, and image sharing (from our cameras) and an online die roller for rolling dice and logging actions sequentially. The die roller is nice because AoP uses a 'bucket of dice against a target number' combat mechanic so you can type something like #14D6E4, for example, and it will roll 14 D6 and count the number of dice that were 4+. There are all kinds of dice codes to simplify die rolling.

We continued to use Rolz because it is the tool we used when we played One-Hour Wargames by email. We could roll the dice when it was our turn, tell the other person it was their turn, then they could confirm the transcribe the results on the copy of the map they were keeping. Plus it keep a log of the action, so you can write comments like "Attacking with the Knights from A4 to B3" and then follow it immediately with a die roll.

I considered using my iPhone for video – gaming buddy Justo and I did that once – but it was a pain to get pointed in the correct direction so it covered the map yet wasn't in the way of me gaming. So instead I just took picture of my copy of the board after each action and uploaded it to the Discord channel.

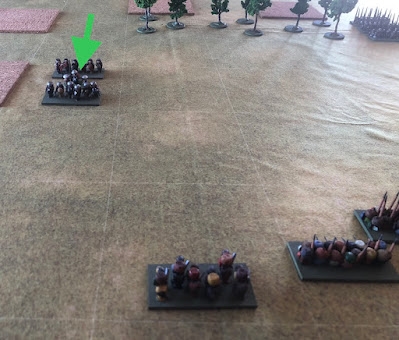
As you can see in the image above, I decided to use painted Jenga wooden blocks to represent the unit. I did this not because I don't have any well-painted or appropriate figures. I do. But I think it is very hard to figure out what is going on when you are trying to first figure out what exactly you are looking at.

In the picture above it is clear that once side is blue and the other side is red and white. The white blocks are red's mounted troops, the medium red are their unarmored warriors, and the dark red their armored warriors. Blue's mounted troops are brown and blue (dark brown being the leader), light blue are skirmishers, and medium blue are unarmored warriors. This makes it easy to discern who is what.

Not to knock Shaun's setup, but to illustrate the point, this is his version of the same starting deployment.

I think the unarmored warriors at the top are three figures to a base versus four being armored warriors. If only one of us were keeping track of the movements and the other player was playing remotely, with no setup on their side, I know which version I would rather use. Are my blocks as aesthetically pleasing as miniatures? No. My they are more easily identifiable through a remote camera. Nonetheless, I would like to hear from you that do remote gaming, how do you do it (exactly) and what challenges have you faced (besides people actually following through and doing it)? Put them in the comments or hit me up on Twitter/X where I am @DalesWargames.

The Game

I decided to try a little experiment. My first game was a pretty standard Normans versus Anglo-Saxons, except that I was at a 60 point game (rather than the standard 80). The second game was a little different. I tried a Viking raiding force against Anglo-Saxons, but the Vikings chose a superior Warlord for 20 points, leaving them with 60 points of troops. The Anglo-Saxons had the standard Warlord and applied the full 80 points to troops.

The basic formula for AoP is that every two points grants you one Battle Rating (BR). So a standard army is always 41 BR (the extra 1 point is your free Warlord). If you take a superior Warlord you are essentially giving up 10 BR, or ¼ of your combat power in exchange for one tactics token each turn. Is it worth it? Well, the Vikings lost, but AoP is a very dice-heavy game so it could have been bad luck. On the other hand  dice are generated by BR so the more BR the army has, the more dice it gets to throw and more hits it gets to absorb.

That said, I decided to give a superior Warlord a try again. Also, I wanted to try and maximize the advantage of mounted warriors and skirmishers as both of those troop types share two special tactics: Rush, or the ability to move two squares; and Skirmish, or the ability to shoot then retreat one square. So my army was as follows:

  • King of Strathclyde (brilliant leader) at the head of a Mounted Warrior unit
  • Three additional Mounted Warrior units
  • Two Skirmisher units
  • Two Unarmored Warrior units

As a note, I misread the unit selection rules. I did not read that Skirmishers can only make up ⅓ of your army, at most. My original plan was four Mounted Warriors and five Skirmishers. But when Shaun pointed out the rule (in a QRS he wrote up) I quickly changed three Skirmishers for two Unarmored Warriors about 5 minutes before the game.

Shaun went with a Frankish force (I believe he said), with the following:

  • Dux Travers leading an Armored Warrior unit
  • One additional Armored Warrior unit
  • Three Mounted Warrior units
  • Five Unarmored Warrior units

Here was the board, terrain placement, and troop deployment.

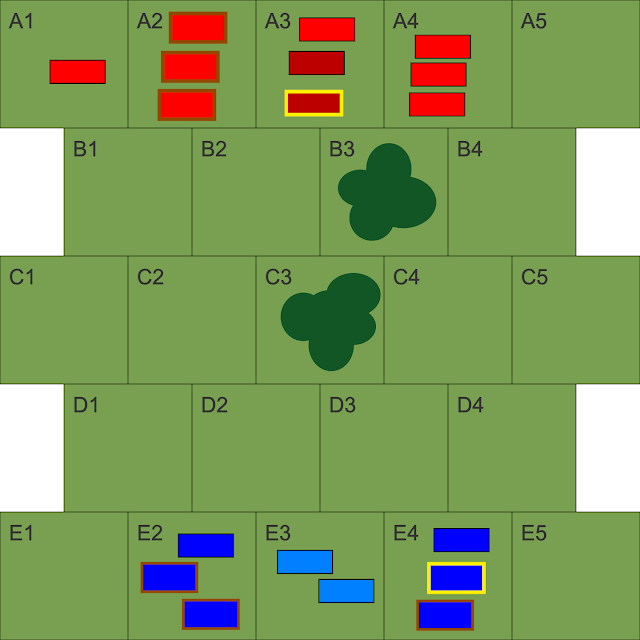
The dark green blobs are woods. There is no other terrain on the board.

The blue forces are the Strathclyde troops and the Franks are in red. Blocks with thick, brown outlines indicating the Mounted Warrior units, those with a yellow outline indicate the unit with the commanders. The medium color blocks are Unarmored Warrior units, the dark color blocks are Armored Warriors, and the light colored blocks are Skirmishers.

I should start by saying that the last minute change to my army list wrecked my initial plan and rattled me. I deployed poorly (as you will understand in a moment).

My plan was to move my Skirmishers into the woods using a Rush. As it happens, this also allows Mounted Warriors to move at the same time. So with four Mounted Warriors and five Skirmishers I would have captured the woods in C3 and had all of my Mounted Warriors anchoring their flanks on both sides of the woods in row C. Instead, because I deployed my Unarmored Warriors with my Mounted Warriors, one unit per area, I ended up leaving the two Unarmored Warriors on the baseline, in two areas no less, requiring two Move actions later to try and recover from the situation. Instead, I should deployed with each area having only two units, keeping the two Unarmored Warriors together. Details, details…

The other lesson for why I should play a game with another player before doing a formal review is because sometimes I don't take certain actions because they don't make sense to me, even if they are allowed in the rules. For example, the idea of a line of Warriors on foot charging into a woods is just something I would not have done, leaving the woods as an anchor or moving troops in slowly. I definitely would not have thought about using Charge or Rush to allow Mounted Warriors to do so. But both of those actions are allowed. When Shaun did it I was surprised. I didn't say anything because I knew it was allowed and that I had simply put blinders on because of rules I have played in the past. It is things like that, your own personal biases due to rules you have played previously, that can distort your thinking about a new set of rules. My problem is that I just get so excited about a ruleset that I want to share it.

Continuing on – you've probably guessed at what happened – because the Skirmisher firepower had been lowered from 10 dice (five units firing from two areas) to 4 dice, my shooting was much more ineffective. Further, when he charged his Armored Warriors into my woods, the odds were fairly good that he was going to wipe out the Skirmishers and they would not even get a return attack. Even if they did, it would be very weak unless Shaun got very unlucky.

With the Skirmishers gone and my forces scattered across the board (six units in four separate areas), it felt like what happens to me in DBA. My lack of discipline at keeping my groups together means it takes more actions (PIPs in DBA) to control the force. At least I had the extra tactics token.

What was interesting was that – save for the first turn – our pattern of tactics selection was nearly always the same.

  • Dale: Special Tactics
  • Shaun: Special Tactics
  • Dale: Rally
  • Shaun: Battle
  • Dale: Battle
  • Shaun: Move
  • Dale: Move
  • Shaun: Move
  • Dale: Move

Here is a reminder of what the Tactics Chart looks like. Recall that each player alternates placing tokens and only one player may place one token in any given box, i.e. the action in that box can only be used once, by one player.

Why this pattern? Once I selected Special Tactics if Shaun chose anything other than Special Tactics then he would have been denied a Charge that turn. That is why he did not get to Rally until he Seized the Initiative. The third play is always Rally, if only to deny the enemy a chance to rally or as a safety move if a battle goes poorly.

Same with Battle. Once someone chooses Battle the next player's play must be to grab the second Battle otherwise they could be hit up to three times where their opponent strikes first.

Every so often I would hear Shaun pause on his fourth selection, and I would always say "thinking about whether you should take Seize the Initiative?" He was. It comes at a painful price, especially when it effectively lowered him to three actions while I would have played five. With two Move Actions I could have moved two areas away, denying him the ability to Charge me as the first action next turn.

At least in theory. Because of the broken rule where you have to move out of an enemy-occupied area to the area you came from previously it made for some strange moves.

Long story short, my Mounted Warriors wiped out his Mounted Warriors, but were blown from the combat. His Armored Warriors followed up behind his mounted and wiped out half of my mounted in turn. That left me with an even combat, which I did not want to risk. So I went after his troops that were isolated while he went after mine. Eventually he ended up with two foot blobs hiding in the woods and my mounted circling, looking for an opening to charge him out in the open. Eventually it came and I rolled poorly on my dice, and ended up so wounded I could not sufficiently rally, even with having that action all but one turn.

I was down to where I had three BR left, one for each of the remaining units, so my King decided to retreat with the mounted troops, leaving the Fyrd behind to cover the retreat. They were quickly eliminated and my army routed from the board. It had been a very bloody battle.

Honestly, it felt right. Cavalry pretty much being blown after a single charge in which they don't overrun the enemy. The woods dominating the battlefield.

What didn't feel right were the movement rules previously discussed. That is why Shaun and I have decided to change them for the next game. What also did not feel right to me was mounted being able to charge or rush through woods, and non-skirmisher foot being able to charge into woods. Maybe that is just the influence from other rules, but I still see these as formations, even if the details of handling those formations is abstracted away. Even though it adds complexity, I would like to see those additions.

Finally, AoP has a very restricted troop selection process. Skirmishers must always be 2 BR/four points and Mounted Warriors must always be 5B/10 points. Given that every troop type is two points per BR, why not allow a range of values of each troop type? Mounted Warriors at 5 BR means they are always heavy cavalry. For Age of Penda, that just isn't right. There were plenty of cultures that had lighter cavalry.

Had I been allowed my army selection would have been: two Armored Mounted Warriors (5 BR each); six Unarmored Mounted Warriors (3 BR each); and four Skirmishers (3 BR each). This would have given me my 31 BR (counting the 1 for the Leader) and my ratio of 1 Skirmisher for every 2 Warriors. I think that would have better represented my concept of Strathclyde (which is heavily based on what the Saga rules say they should be).

Game Summary

Gaming with Shaun opened my eyes to some of the rules and concepts that I took for granted, some of which were incorrectly interpreted. The longest discussion Shaun and I had regarding the game was whether taking the extra tactics token for 20 points was worth it. Well, because we were using the online die roller that logged all of the rolls we can look at some statistics.

DaleShaun
To HitHitsDice% HitHitsDice% Hit
4+327244%326847%
5+2540%144035%

The first thing of note is that the deficit of having 10 BR fewer troops than Shaun meant I rolled far less dice; 77 versus 108. That basically tracks in that I had an army 75% the size that he had. But that also shows the damage. I took 46 hits on an army with 31 hit points (overkills were still counted) while he took 34 hits on an army with 41 hit points (again, counting overkill hits). Any claim I might have on 'bad luck' is simply not born out. The telling effect was that the weight of numbers seem to far outweigh any value of having an extra tactical token. That token does not allow you to generate any more hits.

Funny, Shaun and I were discussing whether the extra token was worth 20 points or less. It has to be worth something, but it definitely doesn't seem worth 20 points to me. Then again, my deployment and play was flawed, so another test is in order.

I definitely see a lot of possibilities with these rules, including carrying it out to the Horse & Musket era and a WWII infantry game where players command about a company, plus additional assets (a tank, ATG, or off-board artillery).

Tuesday, October 17, 2023

Dan Mersey's 'You Command' Series

The 'You Command' Series of Rules

Dan Mersey, who wrote the titles Song of Arthur and MerlinLion Rampant, Dux Bellorum, and The Wargamer's Guide to the Desert War 1940-1943, along with many others, has a series of wargame rules called You Command. They are billed as "a series of light miniature wargames. When you play a 'You Command' game your goal is to defeat your opponent by out-thinking them tactically using the innovative Tactics Chart and then by out-fighting their model army on the tabletop battlefield."

Each of the titles have progressed to a "big battle" gridded wargame where the player represents the top of the command chain, the overall Commander. As such your role is to choose where and how to focus your troops and control the battle's momentum, ignoring the minutiae of unit-level tactics or the exact armament of your troops. (Put another way, a lot of tactical detail is abstracted out of the rules.) The battle is fought out on the tabletop as well as the Tactics Chart. Your focus is on winning at the highest tactical level rather than getting lost in the details of weapon types and armor saves.

Troop types are very broad and dependent upon the period you are playing. (So far they are the Dark Ages Britain, Medieval Britain, and WW II, although the WW II version and the earliest Medieval version is not played on a grid.) For Dark Ages there are four unit types: Mounted, Armored Foot, Unarmored Foot, and Skirmisher. For Medieval he expands it to Knights, Sergeants, Foot Knights, Spears, Long Spears, Warriors, Missiles, and Levy. The troop type essentially indicates two things: its starting Battle Strength; and the special rules that apply to it.

Battle Strength (BS) is the heart of the combat system. A top-tier unit starts with a BS of 5 (+1 if your Commander is attached to that unit), second-tier has a value of 3, and the lowest tier has a value of 2. The BS represents not only the number of hits a unit can take, but its offensive power. In combat the unit will roll a number of dice equal to their current BS. Thus, as units take hits their BS is reduced and they roll fewer dice when they attack. Combat is a simple roll of your attack dice, requiring a 4+ to hit (5+ if they are in cover or a Shieldwall). Note that combat is by area (square) so you add up all of your units' BS values and roll that many dice, counting hits. Your opponent then removes that many BS from their units in the area, i.e. they choose how to distribute the damage. Once a unit's BS is reduced to 0, the unit is removed from the board. (In this regard, it has a very similar mechanic to One-Hour Wargames (OHW). Unlike OHW, however, your offensive power goes down as your hits go up.)

As indicated earlier, the table is gridded with squares, but they are offset. (The author admits that you can use hexes if you want.) As you will see in my test game I used a regular square grid. Although I don't think it matters greatly, it could if there are large numbers of ranged troops involved.

The field of battle is rather small, being 5 rows by 4-5 columns. However, each square must be large enough to contain up to three of your units and three enemy units. So when I played using my homemade 12mm troops, I was using 6" squares as my troops are on 3" x 1 ½" bases. Still, this allows me to use a gameboard as small as 30" square, which is very convenient as my local gaming store's tables are 30" deep.

Terrain in an area affects the entire area, not matter how much of the area it covers. Here is how the terrain breaks down.

Woods and Villages: the defender in ranged and close combat are hit on a 5+, while the attacker is hit on a 4+.

Hills: the defender in close combat are hit on a 5+, while the attacker is hit on a 4+.

Note that the "attacker" is the side that is shooting into the area (even if they are already in that area). In close combat it is the one that initiated the close combat (and thus strikes first). These designations can change from combat to combat, depending upon who initiated the combat.

Also note that a Shieldwall (see later) overrides this attacker/defender difference. When a Shieldwall is employed, both sides hit on a 5+.

Streams, Fords, and Marshland: these areas impede movement. To move out of one of these areas each individual unit must roll a 4+ on 1D6 in order to succeed (failure means the unit stays in the area).

Deep Streams and Deep Marshes: these areas impede movement as indicated for Streams, Fords, and Marshlands above, and affect combat as per Hills.

Rivers: these areas are impassable to all units.

Bridges: count as open terrain across Streams, Deep Streams, and Rivers.

So I have covered all of the basic parts, now let's get to the most important part, command and control, or his Tactics Chart.

First off, the Tactics Chart is period specific. This one is for Age of Penda (Dark Ages Britain), but most are very similar. The 'secret sauce' tends to be in the Special Tactic boxes.

The game has a pretty simple turn sequence. One player has the initiative and is designated as the first player. The first phase is the Tactics Phase. Each player is given two to five tokens based on their Commander's competence. Starting with the first player each place one of their tokens on one of the squares above. You may not choose a square already containing a token, thus there are a limited number of actions you might be allowed. Once both players have placed all of their tokens, the game moves to the Actions Phase.

During the Actions Phase, starting with the first player, they pick up one of their tokens from the Tactics Chart and take the action indicated on that square. Players continue to alternate until all tokens are removed. A player cannot pass by not taking a token, but they can choose not to perform the designated action.

The last phase is the End Phase. This is where you determine if the scenario's victory conditions have been met, and if not, if the initiative changed hands.

The Tactics Phase

Here are the basics for each Tactic.

Seize the Initiative: Because the player with initiative selects tactics first, and plays their action first, having the initiative can be very important when the action gets hot. Is it worth spending one of your tactics token to ensure you get the initiative next turn?

Shoot: this allows you to target one area with ranged combat. Shooting distance is up to one square so every firing unit adjacent to the selected area can fire on it. If the target area contains friendly units, however, only the missile units in that area may fire.

Rally: all friendly units in the designated area may recover Battle Strength. Roll a D6 for each unit and reference a table to see whether you recover 0-2 BS.

Battle: all friendly units in the designated area may attack the enemy in the same area. Once they roll and damage is assessed, the enemy units get to battle back if they were not eliminated.

Move: all friendly units in the designated area may move one area. Units do not all have to move to the same area.

Special Tactic: this is a catch-all for allowing the game designer to add period flavor and specific tactics where he wants to limit the usage. A good example is "Shieldwall", which means that all combat in the designated area requires a 5+ to hit. Another is a "Charge", which is a combination of a Move and Battle in one action. (Moving into an area with the enemy does not automatically trigger close combat. You must play a Battle tactic to initiate close combat.)

Because you are limited to only placing one token in any given square, claiming a tactic also denies it from your opponent. Sometimes you will find yourself claiming a tactic that you cannot use at the moment, but might use in reaction to your opponent's actions, or simply you don't want them to take that action. Good examples are "Rally" and "Seize the Initiative", which only have one box each.

The Actions Phase

As with the Tactics Phase the Action Phase starts with the first player using one of the tactics tokens. Once that action is fully resolved the second player uses one of the tactics tokens. This continues until all tactics tokens have been used.

These rules do not use the usual rules for activation. A unit can take as many actions as the player has tokens, if he chooses. The player could, for example, select the "Move" tactic four times and then during this phase use that action on the area containing the unit, effectively allowing it to move four squares that turn.

Most actions complete immediately, i.e. you fully resolve it before moving on to the next action. However some actions last through to the end of the turn, like "Shieldwall". There are very few of the latter, however.

Summary

Comparing these rules to something like OHW you can see a lot of differences, despite both combat systems being relatively simple. OHW versus You Command.

  • Activate all units versus only a limited number of units.
  • One action per unit (move or shoot) versus potentially multiple actions per unit to no actions.
  • Close combat occurs automatically when a unit moves or is already in contact with an enemy unit versus being a separate action which can occur more than once per turn.
  • Unit loses no offensive combat power as it takes hits versus direct correlation between damage and offensive power of a unit.
  • I would say one uses freeform movement and the other a grid, but I have long converted OHW (and some players) to a grid!
  • Fixed sized army versus points-based army.
  • Fixed player order versus shifting player order.
  • 1D6 with modifiers for combat versus buckets of dice.
  • Straight IGO-UGO versus alternating unit/area activation.
I am sure there are more, but that is a good start.

Test Game – Age of Penda

Age of Penda (AoP) is the Dark Ages Britain version of Dan Mersey's You Command series. It was published in 2021 and follows Scottorum Malleus and Scottorum Malleus IV, both Medieval Britain versions in the You Command series. (The other two in the series are Armour Storm (WW II) and Arrowstorm (Scottorum Malleus updated).)

First let me state that I did not play it straight. (Bad Dale!) I did not make a gridded offset square gameboard, but simply used my 6" square grid gaming cloth. I don't believe it made a difference, but I will discuss why later.

Secondly, I did not have enough troops for a 'standard' sized game – 80 points – suggested by the author. Mine was smaller at 60 points. (There was a 20 point option I could have selected for both sides to fudge it, but that just seemed silly.) I honestly don't think this made any difference. The author indicates a game is typically 6-12 units, and both sides had the minimum count.

Thirdly, I had no missile troops. In AoP the only troops that can normally fire are Skirmishers, and I did not have any made yet. I do have 15mm DBA Dark Ages armies that I could have used, but they do not mesh well with my 12mm wooden troops, so I went without shooting. Because of this lack of shooting I don't think using a normal square grid affected play. Only shooting combat take place from area to area, so an offset grid means a unit can be attacked from six adjacent areas. Given that the enemy is likely to be coming from your front that is more realistically only from two adjacent areas. But a normal square grid means attacks can come from eight areas, or three from the front. So I can see where this difference could be significant. All future games will be on an offset grid, as the author intended.

The Scenario

Come on. Kill the enemy, of course. Per the rules an army with 6-7 units routs when it is down to two Warrior units or less, while all larger armies route when down to three Warrior units or less. (Note that only Skirmisher units are not counted as Warrior units, and neither side had Skirmishers.) So the Normans lose when two units remain and the Anglo-Saxons at three units remaining.

The Map

As it so happens, all of my randomly rolled and placed terrain ended up on the edges. The hill did come into play, however.

Turn 1

The Normans started with initiative as they had more mounted and skirmisher units than the Anglo-Saxons did (3 to 1). I placed the tactics dice as indicated in the figure below. (Normans will use white dice and the Anglo-Saxons green dice. The number of pips indicate the first, second, third, and fourth placement if you are curious, but have no significance in the game.)

As it was the first turn I did not really care if the Normans retained the initiative. However, as I was pondering the Anglo-Saxon (hereafter referred to as 'AS') placement, I thought that them seizing might allow them to control the Tactics Chart (TC), as that is when combat will likely begin. Further, by grabbing the Battle tactics, if the Normans did engage on the first turn, the AS might be able to strike first. Finally, if there were casualties, the AS could recover with the Rally tactic. Then again, if no combat occurred it would not be much of a loss as the AS intended to keep their right flank anchored to the hill.

The Normans begin with a Special Tactic called "Rush", which allows mounted and skirmisher units in one area to move two squares rather than the normal one.

The AS spend their Seize the Initiative token and calmly wait. The Normans move their Foot forward.

The AS see that the Normans still have one Special Tactic available, so they could do another "Rush" with the mounted units. They decide to burn one of the Battle tactics as they continue to wait.

The Normans do indeed "Rush" with their mounted units, moving two squares to be in the same area as the AS cavalry. Note that close combat does not automatically occur just because the units are in the same area as the enemy.

That said, the AS play Battle so that they can attack first, before any Normans can battle back. The AS have a BS of 5 and thus roll 5 dice looking for a 4+. They score 3 hits. This lowers the Normans BS from 16 to 13, so they only roll 13 dice in return, also requiring a 4+. They score 3 hits also. (Ouch!)

Note that when the Normans took the three hits they could distribute the hits amongst the three units however they wished. As I learned later, you never want to reduce a unit to 0 unless absolutely necessary as the unit is removed and cannot be rallied.

The Normans used their last move to advance the foot troops. The AS tried to Rally the cavalry, but did not succeed. The AS cavalry is badly damaged having only 2 BS remaining.

Turn 2

With the AS having the initiative, here is the tactical play. The AS want to retain the initiative, so that is their first play. The AS were also able to lock up all the Special Tactics and one of the Battle, but at the cost of not getting a Rally. They could have gotten a Rally, but as the cavalry is so outnumbered it did not seem worth it. However, they could have taken it to deny the Norman cavalry a change to recover. I am already liking the impact that a player's decisions have on play. They are meaningful and impactful to the game's results.

The AS decide to use their Battle against the Norman cavalry. It may not be much, but at least they get to strike first. They inflict one hit before the 12 dice in return obliterates them.

The Normans move their foot troops forward, sending one unit up on the hill to check the two AS levy units there from making a flank attack against the advancing Normans at the base of the hill.

The AS foot, see the victorious Norman cavalry rout the cavalry covering their flank, use a Special Tactic to "Form Shieldwall!". Note there are special rules that dictate whether a unit can form shieldwall, such as there being no mounted or skirmisher units in the area when it is formed. From that point until the end of the turn, all combat in this area requires a 5+ to hit. (As an aside, I got this incorrect initially, thinking that only the units in shieldwall benefit from the 5+ cover, but that is not the intent. All combat slows down when the shieldwalls go up.)

The Norman cavalry uses a Move tactic to enter the area with the shieldwall. Combat does not occur yet.

The AS use the Special Tactic "Drive Them Back". This is essentially a Battle tactic but the attacking units get 1 extra die per unit. This allows the shieldwall to inflict 4 hits while only receiving 2 in return. (Although, I am pretty sure I played it wrong, with the Normans hitting on 5+ while the AS hit on 4+. Oh well.)

The Normans used Rally first, then used their only Battle tactic to hit the shieldwall again. With only 4 BS to the two AS units, the shieldwall quickly collapses and the units rout.

Things are really looking bad for the Anglo-Saxons. That said, the Norman cavalry is fairly blown. They have slowly been whittled down by four successive combats. The next units in the AS line are the Warlord and his Huscarls, and they are fresh (11 BS).

Turn 3

The AS still have initiative but this time they want to lock out the Normans, if at all possible. They start by locking down the Special Tactics blocks while the Normans Seize the Initiative and Rally blocks. Once the  AS had taken one of the Battle blocks the Norman had to ask himself, was it really worth grabbing the last Battle? Without moving first there was no one to fight.

The AS have an advantage on the hill, so I decide to try a "Charge" (Special Tactic), which requires that you first Move at least one square, then Battle, all in one action. Note that this is two units versus one or 6 BS versus 3. But, because it is a hill, the attackers hit on a 5+ and the defenders on a 4+. So the weight of numbers did not help much; both sides inflicted one hit.

This convinced the Normans to shift their foot troops from the base of the hill to the top, in order to stop the attack in its tracks.

That freed up the AS Warlord to charge with his retinue against the exhausted Norman cavalry, hitting them for 5 while only taking 3 in return.

The Normans have had enough, so they retreat (and eventually restore some hits with a Rally).

This leaves the Battle on the hill, with the Normans still not finding their stride, despite having the numerical superiority now. That said, the two AS levy units have 1 BS apiece remaining.

This is how the battle is shaping up at the end of turn 3. The Normans have lost no units while the AS have lost three. One more unit and the AS rout. With the levy being as weak as they are, next turn is probably the last.

Turn 4

The Normans desperately need to Rally their cavalry, so that is the first selection. The AS know that if they do not get the initiative back they cannot stay in the game unless they get a Rally, so they need to Seize the Initiative. If they can survive this turn, that is …

Amazingly, the Normans strike first on the hill and … whiff!

The AS levy quickly move off the hill, forcing the Normans to chase them.

The Normans decide to Rally the cavalry first, knowing that the AS are not going to go anywhere. The levy, however, decide to go into Shieldwall, so maybe they can continue to hold on until next turn.

The Norman foot advances down the hill, marching up to the shieldwall.

The final battle occurs and the Normans rout the remnants of the levy, taking only a single hit. With two Warrior units remaining, the Anglo-Saxons army is routed.

What I Messed Up

The two areas that I messed up were shieldwalls and hill combat, both involving modifying the to hit roll in combat.

With Shieldwall all combat in that area, until the end of the turn, requires a 5+ to hit. Both sides, regardless of who initiated the shieldwall, regardless of unit type. I think the justification is that the side with the shieldwall is turtling, so not only are they harder to hit, but they have a harder time hitting. I can get behind that idea.

With the hill (or woods or villages) the idea is that the "defender" is uphill of the attack. But because this area is abstract you need to think of it as rough ground where the one receiving the attack has a temporary advantage. So the attacker is 5+ to hit and the defender is 4+ to hit. But this lasts only through the current action. If they next action the other side does Battle, they are now the attacker and thus they are disadvantaged. It is nuanced. So the battle on the hill could have seen the levy stand their ground there and simply never perform another Battle action, i.e. attack. They would have had the benefit, but would only strike after the attacker. Again, I can get behind this abstraction.

@WargameCulture on Twitter/X mentioned that he thought the use of a non-offset square grid would have an effect on the game. As I stated earlier, I think that would only come into play with ranged combat, but I am willing to move to an offset square grid. I have already started making a dedicated 30" high by 40" wide 'You Command' gameboard to get rid of that question altogether.

Summary

As I indicated in my last blog post, Age of Penda scratched the itch I was trying for with my Saga Lite. It solved the puzzle of tying damage to offensive power, while keeping a simple combat system (bucket of dice like Saga instead of 1D6 with modifiers like OHW). Most importantly, it brought the element of pre-planning a turn that Saga is so famous for. Not only will this series of games find its way onto my tabletop, but you can probably expect an American War of Independence variant called Give Me Liberty, the Hell With Death or some such. I would love to see how a Horse & Musket game, when ranged combat is brought to the fore, rather than being a peripheral element.

The Rating

I haven't done this in a while.

Dramado the rules create tension during play? 4 out of 5

For the most part, combat actions have a 50-50 success rate. But the asymmetry of close combat, where the attacker inflicts damage before the defender battles back leads to more tension than the standard melee where both sides strike simultaneously. One would think that this would also lead to the dreaded 'Alpha Strike' – where one side moves in from outside of combat range, then attacks before the other side can act – but the rules making movement and combat separate actions the norm tends to remove this problem. It can happen, but it is 'special'.

Drama also occurs during the planning stage, not just the action phase, as players try to outwit their opponent by developing a viable plan while in turn denying their opponent their best plan.

Uncertaintyare there enough elements that introduce uncertainty into the game?  3  4 out of 5

The primary mechanic that creates uncertainty, other than combat, is whether you will be able to carry out your plan with the units that you want to act with. When you find that your opponent has taken a tactical option you wanted, can you alter your plan, recover, or will this turn simply be a wasted turn?

The fact that the rules intentionally abstract away so many tactical elements – facing, outflanking, enfilade, etc. – it takes some of the uncertainty from combat. What uncertainty in combat that there is, is due to the randomness of the dice.

Engagingdo the rules allow the player to make meaningful decisions that lead to consequences? 5 out of 5

The meaningfulness of your actions start with the planning, where you decide do you want to achieve a plan of your own, or disrupt what you think is your opponent's plan. Do you spend one of your precious action seizing the initiative, which will not help you until next turn?

Then, having set out a selection of actions, the order that you play those actions, and in which areas, definitely can be meaningful. Should you delay your troops attack to rally first? If you do, they may form a shieldwall, blunting your chances of routing them in a single round of combat.

Unobtrusivenessdo the rules get in the way? 4 out of 5

No. The rules largely make sense. You likely will make a mistake or two in the beginning, but that is only because these rules are so different from what you probably play normally. We all 'read into' rules and how that is interpreted is largely a function of the rules we have played in the past. Once you understand what was abstracted away from the game, and justify why they rules are 'correct', it will be easier to play.

Heads Upare the rules playable without frequent reference to a quick reference sheet? 4 out of 5

Other than a few specific wordings that I re-read during the game, the only time I referenced the rules consistently was to read the options for the Special Tactic. Once you have played enough games, you will likely not even need that. However, the one area that you may find that you keep referencing is the unit roster. Every unit has 1 to 6 Battle Strength and these get ticked off during gameplay. If you have a system for reflecting a unit's current BS without distracting you then this probably won't be an issue for you. (I used a roster with a single die reflecting the current BS of the unit, placed on the roster, not the table. The dice on the table were to show losses, only for the battle report. I would not normally use them otherwise.)

Appropriately Flavoreddo the rules 'feel' like they represent the period or genre being played? 4 out of 5

Ultimately the period flavor comes from the unit types you can select and the options available behind the Special Tactic tactic. Age of Penda provides 8 different options, of which you are supposed to only choose four. Arrowstorm provides another 10 options, some of which overlap AoP. Armour Storm naturally uses a completely different Tactics Chart, given the emphasis on armored warfare.

Both AoP and AS provide army lists, with their corresponding Special Tactic choices. At this point it would take a lot more game play to be sure that the games would have appropriate period flavor, but it seems like it would. I know that I intend to push this back to Ancients and forward to Horse & Musket, so that should indicate a belief you can build that flavor into it, around the game's core mechanics.

One final note: the author indicates that some of the core rules might change slightly to reflect period differences. For example, in AoP a unit can move out of an area that contains enemy units, whereas in AS they cannot.

Scalablecan the rules be scaled up or down – in terms of figures or number of units played – from a 'normal' game? 3 out of 5

A standard game in AoP is 80 points, with players getting four tactics tokens. You can opt to have three tokens and spend an additional 20 points on troops, or have five tokens for a cost of 20 points. In general that means that means that you are acting with potentially one area per token (although in some turns, less than that). An area can contain three units and the board is five areas wide at its widest so having more than 15 units at the start means having units start the game off-board.

The limiting factor with a standard game is more about the tokens than how many areas the table consists of. Tokens equals action, so you can have more units and more area to operate in, but you are still only going to move a certain portion of your army each turn.

That doesn't mean you can't create additional rules in order to scale the game. The simplest is to use the old medieval 'battle' system whereby the army is divided into portions with each portion having a separate commander, which in turn could have its own tokens and a Tactics Chart to share with his opposing commander. Think of it as Left Wing, Center, and Right Wing, each having a Tactics Chart and the commanders there having their own forces and tokens. That also provides a solution for team play.

Scaling the board can also happen. In the end having more squares generally means the game will take longer as it will take more moves before the two sides contact.

There are other ideas to explore, like scaling the Tactics Chart, i.e. adding more boxes. Right now I think the chart is pretty well tuned to two players with 2-5 tokens each, so I probably would not change that.

Out of the box, though, these rules have a specific scale intended and the author provides no guidance on changing that.

Lacks Fiddly Geometrydo the rules require fiddly measurements or angles? 5 out of 5

It is a square grid. There are no angles or measurements.

Tournament Tight™ Rulesare the rules clear and comprehensive, or do the players need to 'fill in the blanks'?  4  3 out of 5

Let me start by saying that my preference is towards tighter rules, where everything is spelled out clearly by the author, not looser rules where the author leaves certain mechanics up to the individual players, gentlemen's agreements, and a roll of the die where agreements cannot be found. So a high value means 'tight' and a low value means 'loose'. If you like looser rules, subtract my rating from '6' and that would probably be your rating!

Tight rules are generally required because the rules are complex or not very straightforward. Although I initially misinterpreted some rules it was because I did not fully read the rule or assumed that it was similar to something I had already played, or fit some rationale in my mind. For example, my first read of Form Shieldwall! was that it was formed one side and that side was 5+ to hit and that there no benefit for the other side. Why would the other side get shieldwall benefits just because you formed a shieldwall? Once you realize that a shieldwall creates a benefit and a penalty, it makes more sense.

Fewer and simpler rules make for tighter rules and fewer arguments. Using a grid also makes for fewer special case rules, as does abstracting away thinks like facing, flanks, formations, and so on.

Solo Suitabilitydo the rules have elements conducive to solo play? 3 out of 5

There are no hidden elements to the game so that alone usually grants the rules high solitaire suitability. The three decisions that need to be made are: what choices will the non-player commander choose on the Tactics Chart; what order will actions be played; and which area will benefit from the action being played. The rules in the You Command series answer none of those questions so a solo player will be forced to develop his own mechanisms to answer these question. This is pretty standard with miniatures rules, thus garnering its average rating.

Component Qualityare the components provided made with quality? 3 out of 5

I am not aware of whether these products can be purchased as books, but I purchased mine as PDFs. There is no hyperlinking of the table of contents to pages. The graphics are functional but minimal (which for me is a good thing, making it printer friendly). The layout and text is easy to read. All very standard to me.

Recommended.

UPDATE: I have changed the ratings for Uncertainty and Tournament Tight™ Rules. This is explained in my next blog post.

Saturday, May 14, 2022

Map Campaign Part 3

 No, I have not given up on the map campaign, The First Elopean War. While I admit that most of my time had been spent painting of late, what stalled the campaign most was trying to organize it. To be honest, I sort of rushed the moves in order to get to my first battle and so I kicked some organizational tasks down the road. Well after the first battle all of that came due as I could not really pick up where I had left off with complete confidence. So I basically started over, so to speak, by calculating where every unit was.

But in order to do that accurately, and not end up with the same issue every time I stopped for a battle, I needed to fix my maps. The hexes needed grid numbers on them so I could make references in my campaign diary as to where each unit was on any given campaign day.

Reorganizing

At first I tried putting just the row letters and a few column numbers on the map. That worked for a little while, but I found myself counting hexes so frequently that I decided the only logical thing to do was note all the grid numbers for each hex that I would use. As the campaign rules require you to stick to the roads in order to maintain supply, I really only needed numbers for each town, city, and road hex.

Although it is hard to see without clicking on the images to expand it, there is a letter followed by a number for each of the hexes containing towns, cities, and roads. Now I have an easy reference for unit location. Needless to say, this took a bit of time to modify.

Once that was done I could go back and create a campaign diary, listing each unit of each army, by day, and note their position on the map.

In this example I have a section for the weather, by day, and the entry for April 3rd for the Westonian Army (which mobilized first and it attacking Eastonia). Each entry shows the city where units were starting, which city they were mustering into Brigades, and how many companies, by type. On subsequent days they would show hex grid references.

Here it shows units in motion, plus the two Brigades that have fully mustered by April 12th (and with Brigade SeLasTraga in battle at Firnskuppe, Eastonia).

Campaign to Tabletop and Back

As I was mulling over some of the comments on the blog and in Facebook (both the Solo Wargaming with Miniatures and Wargaming Neil Thomas Rules groups)

Hearkening back to the discussion about how Neil Thomas treats casualties in One-Hour Wargames (OHW), the real losses to personnel do not occur until the unit has taken quite a few hits or has been eliminated from the board. I decided that I wanted to revamp the table. Rather than focus on losses in 'companies' I decided to keep the units whole and track the number of hits it had.

Given that the initial hit losses, according to Neil Thomas, are morale and not very many men, most of those hits can be shrugged off.

OHW Combat Result TSWG Campaign Effect – All rolls are 1D6
6-10 hits remaining on Infantry or Cavalry Lose 5 hits on '1'.
1-5 hits remaining on Infantry or Cavalry Lose 5 hits on '1' or '2'.
Infantry or Cavalry removed by musketry Lose 10 hits on '1', 5 hits on '2' or '3'.
Infantry or Cavalry removed by Artillery Lose 10 hits on '1' or '2', 5 hits on '3' or '4'.
Infantry removed by close combat Lose 10 hits on '1' or '2', 5 hits on '3', '4', or '5'.
Cavalry removed by close combat Lose 10 hits on '1', 5 hits on '2' or '3'.
1-5 hits remaining on any Skirmisher Lose 5 hits on '1'.
Any Skirmisher removed by musketry Lose 10 hits on '1', 5 hits on '2'.
Any Skirmisher removed by Artillery Lose 10 hits on '1', 5 hits on '2' or '3'.
Any Skirmisher removed by close combat Lose 10 hits on '1' or '2', 5 hits on '3', '4', '5', or '6'.

Note that Mounted Skirmishers count as Cavalry for casualty determination in the above table.

As it stands, the outcome of the first battle has not changed. Neither unit lost any hits permanently.

Campaign Progress

On April 14th, after having regroup from the clash at the town of Firnskuppe, and being joined by additional forces, Eastonian forces close in from the East and South onto Firnskuppe in an attempt to harass the Westonian vanguard garrisoning the town.

Meanwhile, East of Nuevo the Westonia Brigade NoSeLasTraga clashes in the woods with Eastonian light cavalry.

Again, this will be two clashes in which the Westonian forces outnumber the Eastonians. The latter are desperately trying to hold back the Westonian armies while the Eastonians continue to muster units and form their one brigades.

I will post the battles on my Solo Battles blog, as I experiment with more techniques for solo gaming.

Saturday, February 22, 2020

A First Look at Undaunted Normandy

Undaunted: Normandy (UN) is a card, tile, and counter game of small-unit infantry combat in Normandy 1944. It is called a "deck building game" by the publisher Osprey Games. When most people hear that term they think of something different than what it really is. You do not pick and choose your cards from a large pool of options. Rather, the scenario defines what cards are available because the cards are the soldiers in the fight. If you have ten "Rifleman" cards you have ten soldiers with rifleman qualities.


The box contains all that you need for a game. It is smaller than a standard Letter size page and about 3-4" thick, so the game is very compact. Inside is a nice plastic tray to hold the game tiles, four 10-sided dice, and the two decks of cards (German and U.S.).


Underneath the plastic tray there is more than enough room to hold all of the counters in the game.


The game includes a rule book, which contain more than enough examples of play, and the scenario book. The rule book is very thin as this is really a fairly simple game. Don't let that fool you, however. The gameplay is very thought-provoking.


This is what the first scenario setup looks like. Each tile has a number and a side A and B. The map shows you which tiles to use, how to place them, what units are in play, and what additional markers to use (such as objectives, control, scouted, and spawn markers).


This is why I say it is not really a deck building game. Half of the fun of the game is building a deck and tuning it over time. In UN the scenario specifies which cards are in your starting deck (black circle with white D), which cards are in your reserves (white circle with black S), and which are not in play at all.


In the beginning scenario both sides start with two squads of five riflemen and two teams of three scouts – represented by four unit counters on the board – one platoon sergeant, and two squad leaders – represented only by cards.

Here is the board, set up and ready to go.


First thing to notice is that each area of the map is a square tile. Note that the squares are offset so each square is surrounded by six adjacent squares, much as a hex grid would be, rather than four adjacent orthogonally and four adjacent diagonally as in a square grid.

Each square has a white number inside a black shield at the bottom center. This represents a defense value given to any unit in the square being shot at. Values in this set of tiles range from 0 to 3.

In the upper-right I have placed the light brown objective markers, which look like guidons. Each has a value from 1 to 3, indicting the number of objective points allotted to the player that controls the square. In this scenario the German player starts with control of 3 objective points (last column, middle row square). In this scenario, the first player to reach 5 objective points immediately wins the game.

In the upper-left corner of the square I place the control markers. A control marker for your side can either show binoculars, indicating you have scouted the area, or an insignia, indicating you control the area. If you control the area then you claim the objective points in the square. A square can have scouted control markers from both sides, but only one side can claim control of the square (have the insignia side up).

In the early scenarios there are two basic unit types: riflemen and scouts. Scout units move through areas, placing scouted control markers in each square they pass through. Riflemen units can only move into areas that have scouted markers for your side. Once in a square they can attempt to control it, earning the objective points if successful.

That is pretty much the game. Use scouts to scout out areas then move riflemen in to control them and score objective points. Whichever side scores enough objective points first wins.

Turn Sequence

Your cards exist in one of six places: the deck; supply area; your hand; the play area; the discard pile; and the dead pile. Here are what the cards look like.
The number is the upper-left corner represents an initiative value. Each turn both players draw four cards from the deck to the hand. They will pick one of those cards in the hand to use to bid for initiative. The card with the higher value wins the bid, gaining initiative. (In the case of a tie, the player with initiative retains it.) That bidding card is then placed into the discard pile.

The player with the initiative plays one card from the hand at a time into the play area, taking one of the actions indicated on the card. For example, looking at the card for the Rifleman in Squad A (second row, middle column), you can see the actions below the green stripe: Move 1; Attack 1; and Control. This allows the unit to move one square, attack once, or control the current square.

The player plays all of the cards in their hand, one at a time, until all of the cards are played and none remain in the hand. All of the cards in the play area are placed in the discard pile. The player that lost initiative now does the same, playing each of the cards from their hand one at a time until done, then moving the cards in the play area to the discard pile. The turn is now done and a new turn is started.

  • Draw Cards
  • Bid for Initiative
  • Initiative Winner Plays Cards
  • Initiative Winner Discards Played Cards
  • Initiative Loser Plays Cards
  • Initiative Loser Discards Played Cards

Note that there is no "check for victory" phase. As soon as one player fulfills the victory conditions, play immediately stops; it does not continue until the end of the turn. Thus holding initiative has an inherent value.

Once a player's deck is exhausted, their discard pile is shuffled and then becomes their new deck.

Command and Control

The cards represent your command and control ability. You can only act with the units that were drawn into your hand that turn. Because you only have three cards to play, your ability to act more than once with a unit relies on the luck of the draw. But, there is a way to change the odds.

You have several cards which represents soldiers on the battlefield, but not on the board as a separate unit: the Platoon command staff (Platoon Sergeant and Platoon Guide) and the Squad command (Squad Leader). These cards have special abilities like Bolster, Command, and Inspire.

Bolster

The Bolster action, available to the Platoon and Squad commands, allows the player to move cards from the supply area (think of them as reinforcements) to the discard pile. This is how you increase the number of cards in your deck of a certain type, increasing the odds of drawing that card and of drawing more than one of that card.

Command

The Command action allows the player to draw additional cards from the deck to the hand, thus changing the number of possible actions a player can play in one turn.

Inspire

The Inspire action allows the player to take a card from the play area, i.e. a card already played this turn, and place it back into the hand, effectively allowing a player to play a card more than once a turn.

Hunker Down

One final action a player can take – although it is not listed on any card – that impacts your card composition is Hunker Down, which is done with a unit card. This means that the card is played from the hand back to the supply area.

The Fog of War

There are a specific number of Fog of War cards that are placed in your deck and supply, dictated by the scenario, that represent the loss of command and control. These cards effectively clog your hand, allowing you to take no action. Scouting an area will transfer a Fog of War card from your supply to your discard pile, a Conceal action will transfer a Fog of War card from your enemy's supply to their discard pile, and a Recon action will transfer a Fog of War card from your hand to the dead pile. Note that all of these actions are only available to Scout units. Also note that you cannot Hunker Down with a Fog of War card as it is not a unit card.

Combat

As discussed previously, the square tile that a unit is in indicates it defense value. Each unit also has a defense value, indicated on the unit counter in the lower-left corner inside the shield. Finally, the farther a unit is from the target it is shooting at increases the total defense value.


To resolve combat, a unit takes an Attack action and adds the square's and unit's defense value to the number of squares from the firing square to the target square. In the example figure above, the German Rifleman Squad A fires one square at the U.S. Scouts Team B. The range is 1 + 5 defense value for the unit and 0 for the square's defense value for a total of 6. The attacker then must roll a '6' or higher on a D10 to score a hit.

If a hit is scored one card of the type in the squad indicated by the unit counter must be removed. The card is removed from the hand, discard pile, or deck (in that order) to the dead pile, and if no card is found, the unit counter itself is removed (even if there are still cards of that type in that squad remain in the supply area). Continuing with the example above, if the German scores a hit, a Scouts Squad B card must be removed as indicated above, otherwise the unit counter will be removed.

Each scenario indicates a spawn point for each side. A unit counter can be returned to the board at the spawn point if a card for that unit type and squad is brought into play, such as with a Bolster command.

Note that there are other types of combat such as suppression (requires discarding a card in lieu of taking an action) and HE attacks (called blast attacks). This covers the attacks by two other types of units not represented in the first scenario, machine guns and mortars. The final unit type is the sniper.

Final Note

There is no variance between the cards of a single unit type, other than the name of the person and a squad designation. So one Rifleman card always has the same initiative value and actions available as every other Rifleman card in the game. The variance is between the card types, i.e. Rifleman cards are different from Scout cards which are different from Mortar cards, and so on.

Sample Game

Here is the first scenario at the start. The Germans start with 3 objective points under their control, but only one objective point between the German and U.S. starting positions. In order for the Germans to win they must either take the objective in front of the U.S. starting position or one beyond the U.S. starting position.


By turn 2 the U.S. forces were able to push their rifle squads into the farm, capturing the first objective (worth two points), making the score 3-2 Germans. The U.S. Scouts are contesting the objective to the north. Given that the defense value of that square is 2, it will be hard for each side to dig the other side's Scouts out.


By turn 5 the U.S. have controlled another square, making the objective point score 3-3. In the upper-left corner you can see the face down U.S. cards. That represents the dead pile, meaning that the Germans have been scoring casualties while the U.S. have been scoring objectives.

In the north the Germans have doubled up to try and dig out the U.S. Scouts, which is largely where those casualties came from.


By turn 7 the Germans have eliminated four U.S. cards and removed the U.S. Scouts Team A unit counter (which spawned back on the board by the end of the turn). This allowed the Germans to take back the lead in objective points, 4-3.

Meanwhile the U.S. has been causing German casualties of its own (two) while U.S. Riflemen Squad A is poised to control the final objective for the win. Despite the Germans blazing away at the unit, it has not been able to take it down. As you can see on the left side of the image, all of the supply cards for units have been added to the U.S. deck, save for a few Fog of War cards.


By turn 8 – despite not having the initiative – the U.S. secured the last objective, putting them at 5-4 for the win. Overall the U.S. lost five men to the German two, but the U.S. kept their eye on the objective and prevailed.


This was an interesting scenario to start with as the Germans have to either attack close to the U.S. reinforcement (spawn) point or attack across an open field (square 3B in the second column, bottom row) to control the farthest objective (square 6A, first column, bottom row). The objective to the north (square 7A) is a distraction to the Germans, and should the U.S. challenge it, it will be slow for the Germans to control it due to the good defense value of the square.

Overall Impressions

One of the hardest decisions to make when gaming solo and using rules where you do not have full control, i.e. not every unit can act in a single turn, is decided which unit should act. UN solves that problem for a solo gamer as this decision is taken away as a core mechanic.

That said, having hidden information in a game is generally the bane of the solo game and it has two: card hand management and hidden bidding. I talk about how to deal with that in a post over on my Solo Battles blog. Some say that any randomization of the bidding is detrimental to the game as initiative is core to the game, but I did not find it so. There were turns in which I intentionally gave up the initiative in order to get rid of a dead card in the U.S. hand. But then again, I need to play it a lot more to really get a feel for the true importance of initiative.

The rules are very simple and there was nothing I had a question on. I can see that might be a problem with a future scenario in that there are no explicit canal rules that I can find.

The concept of dividing cards into a deck, representing forces actively engaged, and a supply, representing temporarily ineffective members of a squad, or even off-board reinforcements that enter at the reinforcement (spawn) point, is a really slick concept. If playing a campaign game, say with something like Platoon Forward, you can easily assume cards in the dead pile as simply rendered ineffective for the remainder of the battle. After the battle is over you can roll to see if you find them cowering in the rear, at the first aid station, wounded and out of action for awhile, recipient of a million-dollar wound, or in fact dead.

I can easily see myself playing Undaunted: Normandy again, and I have already pre-ordered Undaunted: North Africa, which is the sequel pitting Britain's raiders from the Long Range Desert Group against the Italians in North Africa. (I can foresee playing the Italians as the non-player side.) My hope is that this game will introduce light vehicles.

Recommended.

Miniatures

I can easily see using 15mm miniatures with, say, 6" square tiles. For each unit card in the deck initially you would have a miniature by the corresponding unit counter. As more cards are added through the Bolster command, you would add more miniatures to the units. As cards are sent to the dead pile, so would the corresponding miniature.

Would this be necessary? Of course not. But nor are miniatures necessary for practically any miniatures rules out there. (Well, maybe the skirmish ones that take true line-of-sight and figure silhouettes into account. But you know what I mean.) I could see using this sort of ruleset to play out miniatures games the same way people use Command and Colors (Ancients or Napoleonics) for the rules, but use miniatures instead of blocks for the units. It looks much more glorious, but plays with the rock-solid rules that board games tend to have.

Blog Archive

Blog and Forum Pages

Popular Posts

Followers

About Me

My photo
Huachuca City, Arizona, United States
I am 58 yrs old now. I bought a house in Huachuca City, AZ working for a software company for the last three years. To while away the hours I like to wargame -- with wooden, lead, and sometimes paper miniatures -- usually solo. Although I am a 'rules junkie', I almost always use rules of my own (I like to build upon others' ideas, but it seems like there is always something "missing" or "wrong").