My blog about my wargaming activities. I collect a lot of 15mm miniatures for the American War of Independence and so collect a lot of rules for this period. I started miniatures with Napoleonics, so I have a number of armies in 6mm and 15mm figures for skirmishing. I have15mm WW II figures that I use for Flames of War, Memoir '44, and someday, Poor Bloody Infantry. Finally there is my on-again, off-again relationship with paper soldiers that I sometimes write about.

Showing posts with label basing. Show all posts

Thursday, October 27, 2022

News and Such

Face-to-Face Gaming

Fistful of Lead

As you saw with the last blog post, I recently tried out the rules A Fistful of Lead (Reloaded), which focuses on the Old West. Although I made a hash of the rules I have since purchased A Fistful of Lead Core Rules and Fistful of Lead Fantasy: Might & Melee. The Reloaded rules are an abbreviated/simpler version of the Core Rules and does not have all of the options and nuances available to the player that the latter two do. Honestly, the differences in the core mechanics are so small, especially viewed in terms of increased page count, one wonders why Reloaded stripped them away. I hope to try these rules again with gaming buddy Bill.

Brigade Fire & Fury

I am part of a Facebook gaming group dedicated to gaming in the SE section of the state and I have always noticed that one person was always posting about the terrain boards he was making and the figures he was painting – ACW, Napoleonics, and Napoleonic-era Age of Sail – just massive amounts of work. He would invite people to come to his house and join in, but he rarely got a response. I asked him where he was and he told me a place out in the middle of nowhere about 2 1/2 hours away. (Hey, this is SE Arizona. We are all practically out in the middle of nowhere!) His games were on Friday nights at 6 PM and I could just never make it. With three hours of prep and driving that would mean I would need to leave at 3 PM. That was possible when I was working but then there would be the gaming of at least two to three hours, then another 3 hours getting back. I was thinking that would be about midnight before getting back, after a (partial) day of work. It just sounded too taxing. Now that I am retired, I decided to give it a try, only I decided to stay in a cheap motel and make the drive back the next morning.

First off, it is a nice drive there, not too bad. I drove through the city of Tucson between lunch hour and rush hour so traffic was not too bad. On the way back I took a different route (not the interstate) and it was a very nice change (for desert terrain).

The game played was a pseudo-Gettysburg battle oriented towards learning the Brigade Fire & Fury (BFF). The host is building a 12' by 6' game board for playing Gettysburg in Warlord's Epic ACW scale, which I believe is 12.5 mm. He wants to play Gettysburg soon and this was a dry run of sorts. He is also building a Waterloo game board and the corresponding forces for that. His collection was truly daunting.

It has been some time since I have read the Age of Eagles rules, the Napoleonic variant of BFF, but I slowly got the hang of the rules as the turns rolled by. As you can see from the image below, it was a fairly sizable game. We (the Union) "won" but that was because we substantially outnumbered the Confederates and our rolls to move were definitely better, so we reached the objective (the central ridge) first, forcing the enemy to charge uphill to dislodge us.

At some point the host will finish up his painting and the game board and he will do another dry run of the game. If I do it again I will have to be sure that I get a better hotel room as this game lasted four hours and my back was killing me reaching across this 6' deep board and I needed a much softer bed!

Still More Marvel United

Our Marvel United games are still chugging along every Monday night. I lost one player to pickle ball and Middle Earth Strategy Battle Game but picked up another so we still have four to six players each game night.

Here is the Loki figure that I painted. Not a powerful villain, but still interesting.

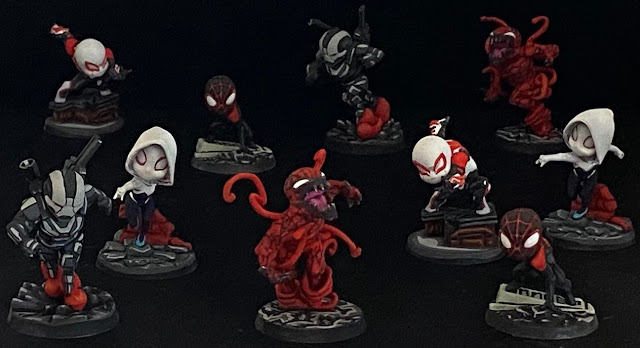
I also commissioned Spiderman 2099, Miles Morales, War Machine, Spider Ghost, and Carnage, plus a few others not in this picture to be painted by Smooth Blend Studio and I think they turned out very well. The X-Men core set is being worked on right now.
Playing Around with Laser-cut Base Designs

I have been playing around with multi-use base designs again. Right now I am working on my 6mm Napoleonics whereby each group of figured is mounted on a 1" by ½" base which slots into a large 4" wide base for use in One-Hour Wargames. I intend to add additional figures as decorations to the base. As you can see in the image below, I will place line officers at the ends of each unit, NCOs behind them, and a general and his staff in the center of the base.
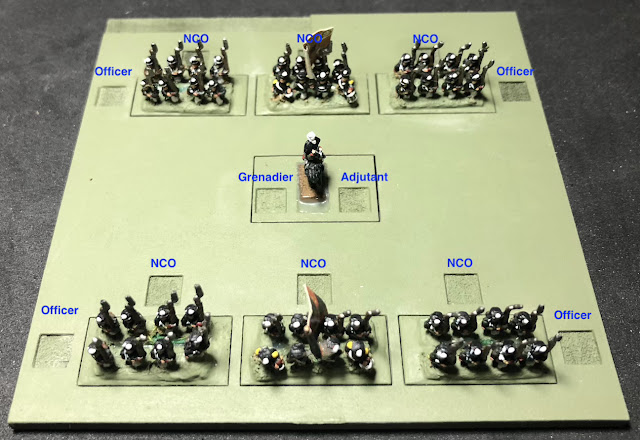
Russian Napoleonic Infantry 'Brigade'

If I were doing more of these units I think I would decrease the depth of the base so there is less empty ground between the two units and probably put the command staff at the rear.

The space showing in the upper left corner (which is actually the lower right corner when the base is facing away from you) would be were a label, specific to the rules you are using, would be affixed.

When I bought the rules Men of Bronze from Osprey I thought to myself "do I want to paint up a new set of figures (I have them in a lead pile) or do I want to take my huge DBA collection and rebase it?" I was thinking along the lines of something like this.


The idea is that I would base each figure separately, on a small base (white rectangles with a red line). When playing DBA (upper left and upper right) the number of figures per base and the base dimensions (gray rectangle with black line) would be correct. But I could then pull the individual figures out and slot them into larger individual bases (lower left) and use them for other systems.

The one catch in all of this is that one set of figures I would really like to use with this basing scheme have a beautiful basing scheme. The idea of destroying that for something lesser I would do is hard to contemplate right now.

I have been thinking about doing the same sort of scheme with my 15mm AWI figures. Currently some are based 2-3 figures on 40mm by 20mm bases, single figures on ½" square bases, and single figures on metal washers (of at least two different sizes). This scheme is sort of a 'cake and eat it too' dream.

That said, I may get rid of these figures...

My Wooden Soldiers

I have always enjoyed making my wooden soldiers. I have heard people say "that takes too long", but once you've assembled multi-part plastic models, scraped off their mould lines, and filled in the gaps you realize that making minimalist figures like mine is actually quicker. Also, having no cast details means you can paint only those details you want freehand, so it goes much quicker.
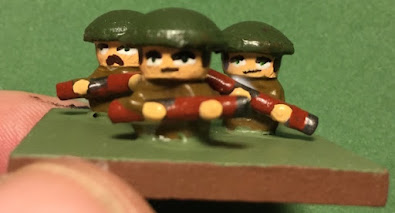
WWII British Infantry

Every time I bring out my wooden figures, or post them in battle reports, people always remark on them. I once played in a DBA tournament with handmade wooden figures and no one refused to play against me because 'they aren't real miniatures' as I imagined they might.

I know one of the things that has stopped me from selling many of my miniatures has been that I don't want to 'lose capability', i.e. not be able to play a genre or specific ruleset because I sold my miniatures. I also find myself trying to find rules to use because I have painted miniatures and the ones they were originally painted for have fallen out of favor. (WWII and Flames of War comes to mind. I like Hail of Fire, but they keep changing because the author comes up with great new ideas.)

So my new plan is to make and paint new miniatures for the collections that I have – maybe not so many this time – and then when it is replaced with wood, sell off the metal and plastic. (It is going to be hard to part with my beautifully painted Thracians though. I may keep them just for display.)

What do you think?

Scale75 Instant Colors

As those who have read this blog for a while know I have been experimenting with Citadel Contrast Paints, Army Painter Speedpaints, and transparent acrylic inks, washes, and paints. The idea is to paint a figure white, or primer black and then dry brush gray and white to highlight (now called the 'slap chop' method), before putting on the transparent colors. I like this style but have struggled with the various products.

To date, Citadel has been the winner, but as I watch more videos I have come to realize that the manufacturer's advice on how to use all of these products – one thick coat – is not the way to really use it. Better to use thinner coats and allow the dark and light of the undercoat show this. (Called 'value sketching'.)

There are several other competing products out there, mostly because Citadel's Contrast Paints have been so wildly successful, but I have not tried them. Green Stuff World's Dipping Inks, the upcoming Express Colors from Vallejo, and Scale75's Instant Colors have all been avoided, until now.

When I saw the first videos of Instant Colors – on Scale75's YouTube channel no less – I thought the results looked absolutely horrendous. Blotchy and pale. For some reason a video popped into my feed about 'underpainting and Instant Colors' and because I am always interested to see what color people use to underpaint with – such as underpainting with pink if the color will be yellow – I decided to watch it. I was actually amazed that the final product was so good and he used Instant Colors. So I went out to a hobby shop and bought one set (8 paints for $50) to give it a try.

What I found is that you need to treat these like paints, i.e. use thin coats and not thick ones like the manufacturer suggests. Unlike Speedpaints (and many Contrast Paints) which are very saturated with one coat, Instant Colors increases saturation as you lay down more coats. The figure below shows what I mean.

One Coat Two Coats Three Coats

Okay, they fewer the coats, the blotchier it is, but seriously, the above looks like they came from three different bottles of paint. Further, because they act as filters due to their transparency, if you use different colors on top of one another, you effectively make new colors without mixing. This document provides a really good example of what each Instant Color looks like over a specific color of primer. This has been my second most serious complaint about Speedpaints; they are too saturated and you have to thin with expensive medium to desaturate it. With Instant Colors it looks like it would be much easier to replicate the desaturated color palette from pre-industrial dyes. (That is a good resource for what colors to really use, by the way.)

So, as this is more the way I like to paint now, white base with transparent colors, followed by blacklining with inks to separate colors, Instant Colors not providing a strong contrast actually works better for me. (I went out and immediately bought a second set to test.) It will be interesting to see how this plays out on wooden figures.

Well, that is it for now. Next time, an update on one of my favorite rules, Tin Soldiers in Action and a report from a convention I will be attending. (Unfortunately not Fall-In 2022.)

Sunday, August 07, 2022

Laser Cut Custom Bases

As you may remember I purchased a Glowforge Pro Laser Cutter and Engraver in order to support my woodworking hobby, which largely consists of making wooden toy soldiers. Last post I showed the French Marine of the Imperial Guard figure where I used the laser cutter to cut out the shapes for the feet, arms, shako, and plume. Well recently I have been experimenting with cutting out custom bases.

One of my gaming buddies laments that, like me, he has a problem with deciding on a basing scheme, so he ends up re-basing a lot. Me, I end up splitting my collection across multiple basing schemes, thereby not having sufficient units for any one system for large games, despite having a large enough collection. (I have at least five different basing schemes for 6mm French Napoleonics.)

One of the ideas that I have been toying with is using sabot bases to facilitate these different basing requirements. The first problem is that the smallest bases have to fit within the larger base. Given that my primary goal is to use both a single figure basing scheme within a multi-figure basing scheme I usually find that the minimum size for a grippable single figure base is too large to fit the required number of figures inside a multi-figure base.

The image above is a good example. The multi-figure base on the left is a standard Epic 40K base measuring 40mm x 12mm. (An alternate size is 25mm x 25mm.) The three bases on the right are single figure bases, measuring 1/2, 3/8", and 1/4" across. Using the 1/4" base adds about 67% to the depth of the multi-figure base. Unfortunately, I find the 1/4" bases too small for my sausage fingers.

I decided to try my hand at a few designs. You can look at things on paper, but until you cut them out you really can tell how effective they will really be.

Once I got a good look at them and put a few figures on them (the dark areas are where the laser engraved out a well for the figures to sit, sinking the top of the figure's base level with the top of the wooden base) I could see that I preferred the rounded square single figure bases best of all.


This led me to another idea, which is a base within a base within a base. Why? Well the innermost base is single figure, either for skirmishing or single-figure casualty removal. Those bases go into a smaller surrounding, multi-figure that is for more tactical games, say where you might have four bases form a unit. Finally, you have large larger base that allows you to use the mid-sized bases to form a larger unit.

Here is what I have in mind.

The outer base (black line) is 4" wide. A single base like this might be used for something like One-Hour Wargames (OHW), which incidentally has a Warhammer 40K variant based on the Machine Age rules in OHW. The inner bases (green line) represent the tactical bases, in this case two squads of infantry. Finally, the innermost bases (blue line) are the singly-based figures, in this case 10 infantry and one APC.

As I experimented with this concept I realized one issue: in order to make the sabot bases useful as movement trays I have to put a bottom below it. I generally use (unused) pizza boxes lined with magnetic sheet to hold my 6mm troops, so the bottoms of bases are either lined with more magnetic sheet, paper steel, or sheet metal. If the middle bases (green line) and outer bases (black line) both have bottoms, then the middle bases will not sit flush with the outer bases. In the end that may not matter, especially if I use very thin material like paper steel, which is only 0.025 inches thick.

Alternately, you could make two sets of outer bases, one of tactical base size and one of strategic base size. This would allow you to custom configure the larger base with individual figures and not be limited to how the middle bases are configured.

The more I think about this as I write, the more I like this idea better. It allow me to do things like change the spacing or pattern of the singly-based figures within the base, adding variety.

Speaking of lasers … these days I have noticed a lot of advertisements for the xTool D1 Pro laser engraver and cutter. It is far less expensive than my Glowforge. What I like about the xTool is that it has a rotary engraving attachment (so does the Glowforge, apparently, but I do not have it) – which I think would be interesting to use to try and score details onto my pawn soldiers – but more importantly it allows you to connect the computer to the machine via USB or wirelessly on a local network, rather than requiring an internet connection. That last point is important if you are putting your smokey, smelly laser cutter in a garage (and you should) and you don't have a great internet connection out that far. Further, the xTool uses standard Lightburn software while the Glowforge software is on a server that they own. If they ever go under then your unit might become a brick. (They have promised to release the software to the public should they ever go out of business, but who knows what the bankruptcy courts would decide, if that ever happened.)

The D-series is an open box, whereas my Glowforge is a closed system with ventilation. Given the smell of cutting wood, even with the ventilation, I am glad I did not start with an open system. I would have filled my work area with smoke. xTool does make a closed system, which is slightly more expensive. If I were buying another, I would probably buy the open system and get it to where I want it before selling the Glowforge. But at this point, I am not looking to change, despite how cheap the new systems are and even though they are so much better now than mine (faster, finer cuts, etc.).

If you are considering a laser, the xTool ones look pretty good.

Saturday, November 20, 2021

Clear Acrylic Bases

I had a truly horrendous mishap with a set of plastic Warhammer 40K figures that I have had for at least 20 years. I put them in a Sterlite plastic tub that – although not airtight, had a pretty good seal – and some sort of material started decomposing to a gas. When I was excavating through my pile, looking at old troops and found these in a long lost vein of plastic and pewter, I opened the tub and out came a very strong chemical smell, much like plastic solvent.

When I started going through the troops I realized that nearly all were damaged. The bases were curled or melted, and guns were warped out of shape.

There are a number of things to fix with some of them – like the above Dark Eldar army I bought – but my beloved Tau were the things I wanted to fix first, which largely only had base damage.

I have seen clear acrylic bases for sale, mostly touted for basing in skirmish games (individual figures or a weapon team), with the advantage being that your bases would 'match' the surface you are gaming on because you would see the board, table, cloth, or mat below. No more troops with a desert landscape scheme on top of your NW Europe landscape board. Because I had to rebase these troops, I decided to give Litko's bases a try. (This was before I purchased my own laser cutter.)

Here are the troops on a simple 'desert' felt gaming mat.

Same troops on a 'grass' felt gaming mat.

Same troops on a textured 'desert' canvas game board.

And finally on a cyberpunk-themed, silk-screen on neoprene, game mat.

Clearly, the bases are not going to be 'invisible'. The light will always catch the edges. But one thing I have noticed is that the smaller the scale of the figure, the more that it is the base of the figure(s) that catch the eye and not the figures themselves. So not having a large contrast between the base and the board does seem to make the figures pop.

What do you think?

Monday, December 12, 2016

Using Tin Soldiers in Action for the American Revolution


I wanted to have another go at the rules Tin Soldiers in Action to see:
  • How it would play unmodified (i.e. correctly played),
  • Whether the "feel" of the rules change by period, and
  • How much of an issue it would be to use bases with multiple figures on each.
I don't really anticipate any issues, but I always like to check my assumptions. Of course, in order to do that you have to have a sufficient collection of figures in one period where you have both sides! For me that is really only 6mm Napoleonics and 15mm American Revolution. (I have a sizeable 15mm Ancients collection, but given that they are De Bellis Antiquitatus armies, they are scattered across three thousand years of history in packets of 12 stands each.) Given that I am currently rebasing my 6mm Napoleonics, that left my trusty American Revolutionary War (ARW) troops. Time to blow off the dust!

After I pull them out of the cupboards I see the issue: I never finished that basing project from the last time I pulled them out. They are based properly (for what I was going for), I just did not finish dressing the bases. So they don't show very well in pictures. Nonetheless, they are certainly functional for gaming.

Tin Soldiers in Action, American-Style

So the first thing I need to do is organize my figures into units, commands, and armies. Most of my units are four bases each of three figures, so 12 figures per unit. Given the small size of ARW units, that seems fine. Some of my units are a little larger (18 figures), some a little smaller (8 figures for cavalry), and one a huge militia unit (27 figures), so I thought this would be a good test to see how well each unit size worked.

It seems like a unit size of 12 is pretty significant in that it will have a Tenacity of '2' and can likely sustain 3-5 casualties before you start worrying about whether you will pass your Tenacity Test. It is also significant in that a square can only have a maximum of 12 infantry figures firing out of a square.

It also looks like a unit size of 18 is significant in that it aligns with the maximum number of infantry in a square that can fight in close combat.

One of the reasons why I do not play a lot of ARW is because I have never found a satisfactory set of rules that felt right to me. Most rules are obscene in that they rate all British as vastly superior and all Patriot militia as trash troops. The facts are that, like the Napoleonic Wars and the American Civil War – every war that has lasted over the course of several years – you cannot paint the troops of the early period with the same brush as troops of the later period (no matter which war you are referring to). There were British units that were green and performed poorly and there were Patriot units that performed superbly.

Infantry Rating

Personally, I tend to play the Southern Campaign ("where the war was won", as we Southern boys like to say), only with Northern Campaign unit sizes and uniforms ('Yankee Doodle' units). By 1781–82 I think things started becoming very much like described in the Rebellion supplement to Black Powder:
When infantry met infantry on the battlefields of Eighteenth and Nineteenth Century Europe the dominant tactic was for opposing battalions to form lines facing each other and fire their muskets at close range until one side could take no more and ran away or surrendered. Bayonet charges and hand-to-hand combat were considered rare.

At the outset of the rebellion, the British battalions in America retained the close order line as the preferred battlefield formation. ... Within the British drill manual there were three further arrangements. "Order" placed the files 18 inches apart, "open order" increased separation to 36 inches and "extended order" to as much as ten feet between men in the same rank. Each of these also progressively increase the gap between ranks and collectively they are sometimes referred to as "loose order". There was not specific skirmish formation, but in battle the command "to tree" would direct the men to disperse in woodland to take advantage of cover. The latter instruction could be given to any infantry and was most definitely not reserved only for designated "light infantry" or "skirmishers", although some units were naturally better suited, equipped and trained for this kind of bush fighting.

Upon assuming command of the army, General Howe re-trained his battalions to adopt "order" in two ranks as their default battlefield formation and with some exceptions this remained the case for British and Loyalist infantry for the majority of the conflict. This change in preferred formation reflects a number of the reasons why the rebellion is unique amongst Eighteenth Century wars. Firstly, the lack of effective cavalry meant the infantry were seldom compelled to adopt dense formations to repel charging horsemen. Secondly the terrain of North America made maneuver in close order a slow and cumbersome process; by adopting a looser formation the British were able to move faster than rebel battalions, who lacked the proficiency to do this, allowing them to gain the tactical initiative. Thirdly the two sides were fairly closely matched when it came to exchanging small arms fire, but the rebels would seldom stand to face a charge, prompting the British to adopt shock tactics which required the ability to maneuver at speed, only closing files at the point of contact. It is important to remember that the tactical flexibility of being able to open and close files rapidly as the situation demanded, required infantry who were drilled to a high standard and sufficiently battle-hardened to not panic when changing formation in the face of the enemy.
For this reason, I decided to try something I had never done with other rules: classify a large number of troops as light infantry. In terms of Tin Soldiers in Action (TSIA), this meant giving a lot of troops the light infantry designation rather than infantry. This creates a bit of issue in that:
Light infantry encompasses all types of jaeger, rifles, fusiliers, tirailleurs which are trained as skirmishers, in ranger combat, or in reconnaissance. Light infantry fights in skirmish line, marches in open formation, utilizes cover and operates independently.
This actually goes a little too far. What we want in infantry that can use open formation and get the benefits of cover, but does not operate independently. So the question becomes: do we change infantry by allowing it to use a new special ability (+) to operate in open formation or do we add a new special ability (-) of not independent to light infantry?  First, I wanted to look at TSIA and its references to infantry versus light infantry and open formation versus close formation to see what made more sense.

Under Unit Size (page 52) it refers to "Infantry, closed formation" and "Infantry, open formation" with no reference to light infantry so we can see here that it is referring to "infantry" as a branch and not as a unit type. Under Action Phase (page 63) it breaks it down as "Infantry in Closed Formation" and "Infantry in Open Formation". The only references to light infantry are to the action "adopting open formation" being limited to light infantry. It is when we get to the Multipliers For Ranged Combat that we start to get to decisions that have to be made.

The multiplier "ranged combat against light infantry in open formation" (emphasis as indicated in rules) implies it is the open formation that is granting the benefit, rather than being light infantry. That said, there are three modifiers that discuss getting cover in structures and they are worded as "ranged combat against (light) infantry in [structure] (except by heavy artillery or siege artillery)", which implies – correctly or not – that it is the aspect of light infantry that grants the benefit and not being in open formation (which is not a requirement of the modifier). There are the same sort of modifiers for "(light) infantry" defending structures getting a benefit in close combat, regardless of formation.

So, there is a difference between classifying these special troops as infantry that can adopt open formation or light infantry that is not independent. Initially, I decided to choose the latter, but as I write this I have decided to change to the former. The light infantry designation implies a much greater ability to defend structures that merely operating in open formation would bestow. So, there will be a new Special Ability (+) added to the list:

Can Operate in Open Formation: allows the unit to adopt open formation. Wherever a rule states "light infantry in open formation", treat it as applicable to this unit. Thus the unit is granted the benefits of rallying in terrain, cover, etc. as if light infantry in open formation. Note that this does not grant the unit a designation of light infantry.

Skirmishing

The next issue to resolve is that skirmishers in TSIA are representative of 19th Century warfare and are not the same as skirmishers in ARW. Entire units skirmished, rather than a component of the unit skirmishing ahead of the rest of the unit. This concept of one die worth of troops being one square forward of the main body doesn't really work. As light infantry is automatically granted skirmishers and infantry can be granted that special ability, we need to add a new Special Ability (-):

No Skirmishers - Light infantry does not get the benefit of the skirmisher special ability. (Further, infantry may also not be granted the skirmisher special ability.)

Units Without Bayonets

Much ado is always made of Patriot units without bayonets despite everyone saying that men crossing bayonets in the open field is an extreme rarity. My main line of logic works like this:
  • A unit not equipped with bayonets tends to be inferior in quality.
  • An inferior quality unit tends to be poorly equipped.
  • A unit inferior in quality tends not to ever get into close combat, whether they possess bayonets or not.
  • Thus, applying a penalty for both inferior quality and possessing no bayonets is "double jeopardy" 1.
That said, it does not account for the case or Morgan's Rifles not being equipped with bayonets and the argument that they needed Dearborn's Light Infantry attached to protect them from British charges. So I am going to test a new Special Ability (-):

No Bayonets - all Close Combat results are multiplied by 0.5. Note that there is no effect on the Close Combat Test 2.

Dump and Run

During this period artillery trains were not militarized so artillery tended to be unlimbered rather quickly on the battlefield and the civilian teamsters retreating out of harm's way. TSIA alludes to artillery without limbers, but it implies that all artillery without draught animals and limbers were immobile. It does not account for pulling the artillery with prolongs (drag ropes). Although "grasshopper cannons" are normally accounted for a battalion guns in TSIA, that concept was out of use in the ARW. Grasshopper cannons were used by the Royal Artillery at both Cowpens and Guilford Courthouse as field artillery. There needs to be a means of moving artillery other than by limbering. And thus we have a new Special Ability (-) and a new Action

No Limbers - Artillery that cannot limber and unlimber. It may only move using a prolong action. Regardless of the professionalism of the gunners, the training of the unit must be rated as amateur.

Prolong - Light and medium artillery can move one square at the cost of one action, for a maximum of one square per turn. Terrain restrictions apply.

Preparation

Well, that looks like I have enough to get started. I wanted to minimize the number of core rules that I changed. Considering that it was only one (that infantry can use open formation if granted such by special ability) I think I did pretty good! Well, maybe two (prolong move for artillery) ... maybe three ... aw hell, I did it again, didn't I!?!

The British Line regiments and Converged Grenadier battalions will be infantry with can operate in open formation. The British Converged Light battalions will be light infantry with no skirmishers. The Royal Artillery will have No Limbers on the battlefield and if light or medium muzzle-loaders, can Prolong. The quality and training will tend towards average professional unless a designated unit (42nd and 71st Highlanders, 23rd Royal Welsh Fusiliers, converged Grenadiers and Lights, Guards, etc.) where they would be superior professional.

Many rules treat Loyalist units as lower morale British troops – sort of like the Egyptians in The Sword and the Flame – but their training and quality varied widely. Although they had a better training regimen than the Patriots, depending upon when they were thrown into the fight their rating might be as bad as Patriot militia for Loyalist militia, to average amateur (equipped, but not fully trained by British), to average professional (national Loyalist units) to superior professional if you are feeling generous. Off hand I cannot think of any that would rate that last designation, however.

The Delaware Continental unit I will be using are superior professional light infantry with no skirmishers. Other Continental Line could range from average professional infantry to superior professional infantry with can operate in open formation. State Line regiments would tend towards average professional infantry with some being average professional light infantry with no skirmishers. Patriot militia could run from inferior amateur infantry to average amateur infantry with rifle units being average amateur light infantry with no skirmishers to superior amateur light infantry with no skirmishers. Patriot artillery would generally be average amateur but you might designate Knox's and Lamb's artillery as superior if you are feeling generous.

Obviously I am not an Anglophile like I feel most authors of the American Revolutionary War rules are. But I am open to discussion. I feel like the above is appropriate if you are playing a pickup game. If you are playing a scenario I think your ratings for units should reflect your research.

Next up: the game!

Footnotes

1 "Double jeopardy" in rules is a concept introduced to me by Neil Thomas in his book Wargaming Nineteenth Century Europe 1815–1878, which he describes as "accounting twice for a contingency that should only be considered once." The idea of accounting for not having bayonets and inferior quality troops separately feels like double jeopardy to me. I would like to know what you think.

2 The reason for this is because the Close Combat Test is TSIA does not determine whether a unit stands or runs from a charge – there is no such test – but rather whether a unit will be "discomfited" by the charge, i.e. disordered or cause desertions. If the rules supported the concept of retreating in the face of a charge, I would consider applying a negative modifier there.

Monday, November 14, 2016

Testing Hail of Fire, Part One

After a few false starts I have decided not to review rules until after I get a good test game or two in. It is usually only one test if I think the results are good. If the game itself has some interesting concepts that I am working through I will sometimes post the battle report before post the review. That does not mean that the game has passed muster, but that it has certainly piqued my interest.

Hail of Fire (available in beta on WargameVault) is a:
company-level, WWII themed miniatures war game designed to be both simple and easy to learn while keeping both players engaged in the action! And best of all, the rules are only few pages long! So print out the PDF, throw some models on the table, and jump right into the exciting tabletop combat!

Using a fast, interactive turn sequence, players are always in the fight. The addition of hidden action points, fast and easy deployment, and a delayed combat resolution system ensures that both commanders will be fighting the friction and fog of war as much as they are each other!
After chatting with the author on TMP in various threads I also learned that these rules can easily be used with troops using Flames of War basing, which is why I picked them up. I like Neil Thomas'  Second World War Wargaming, and intend to give them another try, but I am still open to other rules.

I purchased the rules, downloaded and printed them out, and decided to give them a try this weekend. Now blogging the action while gaming always slows the game down tremendously, but it also helps you remember what part of the rules you got stuck on in the moment you got stuck. As I wanted to provide some good feedback to the author, I figured that in the beginning I needed to take this slower approach. Besides, I had already read the author's rules previously, resulting in asked questions, and I discovered that his writing style is a bit ... subtle. So here goes part one of the first test game.

Hail of Fire Test Game 1

Terrain

The battle runs east-west with the Americans attacking from the west and the Germans defending the east side of the board. Note that I am not playing on the long edges, but the short ones.

View from the South
View from the North
By the way, ignore the river that suddenly ends. That was the spot where I was keeping my iPad while blogging.

Forces

Initially I just started pulling out troops and using what looked good and sounded reasonable. At some point I thought I was way out of line in points, so I decided to buy my troops according to my Third Edition Flames of War army books. I used the generic ones, not any unit or battle-specific ones.

The Germans have the following forces:
  • Grenadierkompanie
    • Company Command HQ
      • Two Panzerfaust SMG teams @ 35 + 20 
      • Anti-Tank section of one Panzerschreck team @ 20
      • Mortar section of two 8cm GW43 mortar teams @ 40
      • Sniper section of two Sniper teams @ 100 
    •  Grenadier platoons 3 @ 120 + 10 each
      • Platoon HQ section of one Panzerfaust SMG team
      • Three Grenadier squads totaling six Rifle/MG teams
    • Grenadier Machine Gun platoon (under strength) @ 60 + 5 + 50
      • Platoon HQ section of one Command Panzerknacker SMG team
      • Machine Gun section of two MG42 HMG teams
      • Two HMG nests
    • Grenadier Anti-Tank platoon @ 80
      • Platoon HQ section of one Command SMG team
      • Two 7.5cm PaK 40 gun teams
    • Grenadier Assault Gun platoon @ 220
      • Platoon HQ section of one StuG G
      • Two Assault Gun sections of one StuG G each
Total: 1020 points.

The German forces arrayed
I am allowing all of the Company HQ to be on the board and not count towards the unit totals. Unlike man other rules, one-half of the defender's force must be kept off-board in reserve. That means three units are on the board (the Anti-Tank platoon, the Machine Gun platoon and a single Grenadier platoon) and three are off (two Grenadier platoons and the Assault Gun platoon).

The Americans have the following forces:
  • Medium Tank company
    • Company Command HQ
      • Two M4A1 Shermans @ 140
    • Medium Tank platoons 2 @ 205 each
      • Platoon HQ section of one M4A1 Sherman
      • Two Tank sections of one M4A1 Sherman each
    • Armored Reconnaissance platoon @ 110 + 5
      • Platoon Command M8 armored car team
      • M8 armored car team
      • Mortar Jeep team with Hull MG
      • Recon Jeep team with AA MG
    • Armored Infantry platoon @ 225 + 20
      • Platoon HQ section
        • One Command Rifle team
        • One Rifle team
        • One Bazooka team
        • One M3 half-track with .50 cal AA MG
      • Two Armored Infantry squads each of
        • Two Rifle teams
        • One Bazooka team
        • One M3 half-track with .50 cal AA MG
      • 60mm Mortar squad
        • One M2 60mm mortar squad
        • One Bazooka team
        • One M3 half-track with .50 cal AA MG
      • LMG squad
        • Two M1919 LMG teams
        • One Bazooka team
        • One M3 half-track with .50 cal AA MG
    • Field Artillery Battery (155mm) @ 110
      • One Gun section of two M1 155mm howitzer teams (off board)
      • One Observer Carbine team with Jeep
Total: 1020 points.

The American forces, all fuzzy
Any American units can start up to 14" on the board from the western baseline.

Pre-Game

I did change the pre-game rules a bit, but it should have no real affect on game play.
  • My playing area is 50" by 60", not 48" by 72".
  • My baselines were the short edges, not the long edges. I did that so I could have more range and because the terrain "felt better" going east-west than it did north-south. Plus, I did not want to rotate all of the terrain after I spent so much time setting it up.
All defending forces on the board are considered hidden and dug-in (in hard cover, until they move). All attacking forces are considered hidden1, but not dug in. The interesting part is that hidden troops do not need to pre-plot their positions and are revealed later in the game. This reminds me of the Flames of War ambush rules. When a hidden infantry or gun team is revealed it must be in the player's deployment zone – although it may possibly be deployed even farther forward (but not farther than their forwardmost unit) – and must be either outside of line of sight of the enemy or in concealing terrain at least 12" away from enemy infantry and gun teams or 4" away from enemy vehicle teams. Hidden, defending, vehicle teams that are concealed are spotted at twice the above distances. Reconnaissance units can spot enemy teams further still.

Turn 0

Hail of Fire uses a command system to determine how many orders each side gets each turn. At the start of the game each player secretly rolls a D6 and that is the number of "Hero" points that they have. These are essentially command points that can be used at any time. Once used they are gone. However, there is a luck-based system for replenishing Hero points.

The Americans roll a '4' for their Hero die while the Germans roll a '3'.

The Germans place their objective, a communications bunker to the east of the village, west of the river.

Objective for the Americans to capture
The Americans indicate that their objective is the farm house south of road.

Objective for the Germans to capture
It wasn't really clear to me on how to start. Technically both sides are hidden1, which means you cannot check line of sight to see who is revealed. So I decided to allow the Americans to deploy all of the units that they wanted to deploy onto the board, revealed. The rest would remain hidden and thus have to follow the rules of hidden units revealing themselves. After the Americans deployed all of the revealed units, the Germans would then reveal any of the units they wanted to and deploy those forces to the board.

If no units were in line of sight, it would still be "Turn 0" and the Americans could then move, unit by unit without regard to the number of Order (as described in the rules) until something did come into line of sight of the Germans. At that point Turn 1 would start. Of course, if after deployment by the Americans and Germans enemy units were in sight of each other, Turn 1 would immediately start.

The Americans decided to deploy their reconnaissance platoon and nothing else. As they are reconnaissance teams in vehicles, they can spot enemy infantry and gun teams out to 10" (to 20" for enemy vehicle teams). Because there are linear instances everywhere (hedges, but not hedgerows), the reconnaissance team is 16" from the centerline (which is the German's deployment zone) and they can only see 10" (there are no vehicles hidden on the board), the Germans can decide to deploy nothing. However, because they want the Americans to go to Turn 1 as soon as possible, they decide to deploy a sniper.

American recon moves in from the west while a German sniper is revealed as being deployed in a house

Turn 1

The Americans roll a '6' and the Germans a '5' for their orders. This means the Americans get one order while the Germans will get five and can act first. Ambush!

The Germans start by trying to bring one Grenadier platoon on (south of the road, east of the field complex) and the Assault Gun platoon on (via the east road) by using three orders. Only two infantry teams appear on the edge of the table. (No picture, because it is right where the iPad sits.)

The sniper wants to fire on the lead (recon) jeep so we can see how that works. Now there are no Sniper team rules in Hail of Fire so here is what I am doing.
Sniper: 24" range, Rate of Fire 1, Armored Vehicle Assault -, Infantry, -1 Firing modifier
In hindsight, the range should probably be 16" as the firing modifier allows the sniper to fire at double range and still obtain a hit fairly easily (4+).
The sniper uses the fourth order to fire and scores a Received Fire Point (RFP) on the recon jeep. The recon jeep will have to resolve the effect of the RFP once the unit receives an order.
The concept that you don't know the effect of your fire until the target unit receives an order is an interesting one. A player can completely avoid the effects of fire until he needs to unit to do something (like move or fire). This allows a unit to survive on an objective, for example, until it acts. Unfortunately, you have to take that Received Fire Check right at the time you need the unit to do something, so waiting too long increases the chance that the unit is destroyed from accumulated fire.
Now I reach a questionable part of the rules: can a unit fire more than once? It specifically states that "a Unit may be given several orders over a single turn" and does not put any qualifiers on that statement. Elsewhere in the rules it indicates a gun team may not use a fire order after having used a move order in that turn. But that is it. I am going to allow it, until I get an answer from the author on TMP.2

So, does the reconnaissance platoon want to use its order to return fire, move to cover in reaction, or does it want to wait until it is the acting player to move or fire?  There really is no reason to wait so the Americans decide to use its single order to make a reaction move.

First, the Americans have to resolve the RFP on the recon jeep team. This is passing a Received Fire Check (RFC). All small arms fire at soft-skinned vehicles resolve as if firing at infantry in hard cover. The sniper gets a suppressed result against the recon jeep indicating it must be rallied before it can move or fire. Rallying can be attempted each time the unit receives an order and it has no RFPs (so not this time). Rallying is basically passing a Quality Check, which is rolling a 4+ for this team.

The reconnaissance platoon rolls a '7' on 2D6 for a movement of 7". The command M8 can add 12" to that move if it stays on the road. Everyone moves to a position of cover (as best as possible).

The American recon platoon reacts to the sniper fire
However, the lead M8 has moved forward enough that it is within 10" of a hedge line that I was considering for placing my German grenadier platoon. If I don't place it now – allowing the recon unit to spot them – I will lose my chance to place them there.
There is a rule that states: "If revealed during enemy movement, subtract the distance moved from the listed ranges." So, the M8 moved 7", reducing their spotting distance from 10" to 3". That rule allows the Germans to reveal an infantry or gun team in concealing terrain as close as 3" away if done in reaction to the M8 unit's move. Once its move is over, that rule would no longer apply, so the unit would need to be outside of 10" range.
I decide to reveal the Grenadier unit and place it behind the hedge. It is just too good a position, and I need to put forces on the board to stop the drive on the communications bunker.

The German grenadiers are revealed
I need to keep RFPs on the recon jeep so that it cannot rally, so I fire the sniper at it again as my last German order for the turn. Unfortunately, the sniper did not like the idea of sticking his head out when staring at six machine guns and two 37mm cannons, and he missed the shot.

Turn 2

The Americans get two order and can act first while the Germans get one order.

The American give a fire order to the reconnaissance platoon. This allows the recon jeep to attempt to rally, but it doesn't succeed, so it does not get to fire with the rest of the teams.

The grenadier platoon – actually one specific team – is declared the target and any other team within 6" (and apparently, whether in the same unit or not3) can also be an eligible target if enough RFPs are scored.

There are, of course, no M8 armored cars defined in the game this early in the development cycle, so I use the M3 Stuart for the main gun stats and note that the M8 has two Vehicle MG entries.
M8 AC: armor off the scale at the low end
Main Gun: 16" range, ROF 2, AT 2
Vehicle MG x 2: 16" range, ROF 2, AVA -, AT -, May not fire if Main Gun is firing
It looks like it makes more sense to fire the MGs, given that main guns and vehicle machines guns – whether hull, co-axial, or the commander's AA MG – may not both fire. With the two M8s I would get eight dice @ -1 (concealment) as opposed to four dice @ 0 (no concealment when firing HE from main guns). The mortar jeep adds two more dice @ -1 for a total of ten dice @ -1. There are a total of five teams that can be hit and an astonishing five hits are scored!

Germans undergoing heavy fire from the American reconnaissance platoon

The Germans decide not to react, so play stays with the Americans, who think it is time to order a tank platoon. It is at this point that I realize only defending vehicle units can be hidden on board, and as there are no positions on the board for American vehicles to be out of line of sight, so that means they have to come on from off board.

Actually, I am good with that as the action so far has represented the reconnaissance platoon revealing the potential ambushes and now the cavalry is riding to the rescue. The Americans order a platoon of Shermans to move up the road. With their roll and the road bonus they move 14".

American Sherman platoon advances on the board

The Germans have one more order and the sniper again attempts to continue the recon jeep's suppression, this time succeeding to put an RFP on it.

With American tanks coming on the Germans need armor reinforcements. The Germans decide to use all three Hero points to obtain reinforcements and they succeed. The assault gun platoon can now be ordered onto the board next turn!

German StuG platoon ready to clank on the board

Thoughts So Far

Quite simply, I like the almost episodic style of the combat. Something occurs in one area until some event triggers, forcing focus to shift to another area. It feels like the battle is unfolding.

Note that there are only two turns played. To be honest, it took me two days to get this far, but it was really my fault. I did not clean up from my last game. (I can leave games setup without fear of it being disturbed.) I spent a lot of time digging up and laying out the terrain. I organized my units in order to find certain elements I wanted to try, etc., etc., etc. It took me two tries to get a final army list for both sides. (I finally succumbed to using the Flames of War army lists and points system.)

I also have a habit of skimming the rules and deep reading a section when it finally comes up in play. That did not work very well here because the sections on setup and hidden units deeply affect play. These rules are like Peter Pig's PBI in that the defender's purchased force is not the force that you are going to have available at the start of the game. That alone caused me to reboot the game once.

I absolutely love the simple, yet effective way the author has made hidden unit deployment so accessible to the gamer. When I started the game I sat there for a few minutes thinking "Now what?" I was staring at a terrain-filled board with no enemy units showing. You had to start thinking about lines of sight and avenues of approach ... just like they taught you in the US Marine Corps manuals! If there is any negative to this approach it is that many casual gamers simply react to the situation whenever it is their turn to move. They would likely be stymied by this approach.

So far this has been very accessible playing solo. The "unfolding" aspect of it is what I think does it. Although the Hero die is supposed to be hidden information, it escapes me why it is. Who cares if you have six points? I as the opposing player am not going to change how I play one bit knowing that you have six points and I have two. Maybe I missed some bidding aspect of the rules in a section I skimmed over?

To Be Continued in Part Two…

Footnotes

1 As it turns out, this was incorrect. Vehicle teams on the attacker's side are not considered hidden. This is a case where one general rules says all attackers are hidden and then a later rule specifies that only the defender's vehicle teams are hidden. This is what I mean about the author's sometimes subtle style of rules writing.

2 Asked and answered. Yes, a unit can fire more than once per turn if given multiple orders. If it has enough orders it can fire multiple times in both the active and reactive phases.

3 Asked and answered. Yes, fire designated as being at a team with one unit can hit a team in a different unit as long as that second team is within 6" of the first team and within range and line of sight of the firers.

Sunday, November 06, 2016

Second World War Wargaming

Second World War Wargaming (SWWW) is one of the chapters, and thus a set of rules, from Neil Thomas' book Wargaming an Introduction.


I have a fair number of well-painted, 15mm WWII miniatures, all based for Flames of War, which I no longer play. (I don't know of anyone in the immediate area that still play those rules, although there are a number of people that have collections from when FoW was the "thing".)


I have been looking for quite some time for an alternate set of rules where I can use my troops, based as they are, and still get a good game going.


The latest attempt was using NUTS! Big Battles. I usually play rules from Two Hour Wargames incorrectly for at least the first three tries. I don't know why. But these did not feel right.


Previously, I had tried Peter Pig's Poor Bloody Infantry (PBI), but I always got hung up on the pre-game. So maybe "tried" is not the correct word. I thought about it a lot. A few people said I would probably need to make some additional LMG bases given that they are embedded in FoW and they are separate entities in PBI. Right or wrong, that sort of turned me off.


When I first read SWWW I noted that they were intended as "skirmish" rules (every miniature represented a single man, weapon, or vehicle) using singly-based miniatures, but included army lists in the classic Neil Thomas style, where you would have a variety of unit types and weapon systems befitting a battalion strength attack, but were playing somewhere in the platoon to company level.


As I indicated previously, that aspect of Neil Thomas' rules turned me off, although I admit I am warming up to it.


Well today I decided to actually try some of these rules that I purchased and see if they have the problems that you imagine they do when you simply read through them. I find that some of the issues that you flag turn out to be nothing. Either you missed a rule or a rule is more nuanced than you originally read, so the issue becomes a non-issue. Sometimes, however, there are issues that arise that develop from a game, and you realize that the rules don't cover the situation adequately. Such as this game using these rules.

Before I gave the rules a try I read a particular blog article about these rules. The article was over on Soldier's East and it provided a number of observations about the rules. One thing that struck me is that how to operate armored infantry in a half-track wasn't very clear to him either. As it happens, my scenario sort of pushes that boundary.

Battle for Some Village

This is actually the same board that a gaming buddy and I used for our test game of NUTS! Big Battles. The forces were pretty much the same too.

The Germans would have three large Pioneer squads entrenched outside a village at a key crossroads. Also in attendance was a single StuG III assault gun and an armored truck packing a quad 20mm anti-aircraft gun. The Germans would be defending the center plus the entrenchments to the west. On turn four a Gepanzerte Panzergrenadier squad would enter from the road to the east. On turn eight a second StuG III would also enter, from the same road.


The American forces consisted of a full armored infantry platoon, fully kitted out with weapons and half-tracks. They would enter the board, along with a single Sherman tank, from the west or the road in the northwest corner.


On turn ten two Sherman tanks would appear on the northwest road as reinforcements. As you can see by the force above, the starting American forces are pretty formidable. Six M3 half-tracks with six Bazooka teams, two LMG teams, one Mortar team, one Sherman, and a lot of infantry makes for quite a starting advantage.

My setup for the Germans was pretty standard. The AA is in the crossroads, ready to catch a marauding American aircraft trying to attack the StuG III. The StuG is hunkered down, ready to take a shot at anything that comes down the road. The three infantry squads are in entrenchments (pretty significant cover), while the platoon commander is resting in the shade in the small wooded area by the town.


When I played the Americans in FoW I frequently tried using the armored infantry mounted in half-tracks. I liked the looks of them, but was never really sure how they operated. I finally bought a copy of Osprey Publishing's World War II US Armored Infantry Tactics, but it was so confused (as it actually was during the war), that I did not get much from it. In fact, within the span of a few paragraphs you can read how the half-tracks were not and were used to support the infantry with their machine guns after the infantry dismounted.


Nice looking pictures though!

Put another way, I am never sure when to dismount my infantry: as soon as possible or ... until it is too late? (The latter usually happens to me, to be honest.)

So, one good way to test a set of rules is to do something ... 'stupid' ... and see what happens. If it works out, those are probably rules to step away from. My initial thought was to move infantry into the two farm houses on the west side and engage the entrenchments with fire. But then I decided to take a few squads and just run up on the entrenched troops and keep the infantry mounted. Let's see what happens!

Turn 1


First and Second squads swing around the south end of the western approach to the village. Because they moved more than a half move they cannot fire. Meanwhile the Third Squad and the Machine Gun Squad advance onto the board and dismount. Because they transported units are dismounting the half-tracks can only make a half move. The Mortar Squad sneaks down the wooded road from the northwest, but does not dismount the mortar team. The platoon headquarters remains in the center, hiding from the StuG. The Sherman barrels down the down to engage the StuG.
As a side note, all of Thomas' rules are eminently tweakable. For example, the American Shermans have gyro-stabilizers on them, allowing them to fire on the move. The normal rule for firing the tank main gun on the move is that the tank may only make a half move and fire. I decide that American gyro-stabilizers allow the tank to make a full move and still fire the main gun. Adds a little flavor without too much added detail.
The Sherman – being at very long range – misses the StuG.

The first thing that I note is that the ranges of the rifles and LMGs are basically only 12", with 6" being short range. So I actually have to move up to 12" before I can even fire. First surprise: the small arms firing ranges are not very long.


The Germans return fire with all of the infantry stands that they can and get nothing. At this point it was necessary to work out how the armored infantry in half-tracks would work. Shooting at the infantry is like shooting at a unit in cover, so you roll to hit on the Cover line. Once you have obtained a hit the infantry gets a save. Normally infantry can have anywhere from a 3+ save to a 5+ save, due to its morale state. But because armored infantry does not check its morale while mounted in its half-tracks, that means that its save while mounted is 5+. (Remember, the bonus for cover has already been accounted for in the To Hit roll.)

I fumble a bit trying to calculate the firepower numbers. That is basically because I am unfamiliar with my troops, they are a non-standard formation (in size and composition), and I keep changing my mind on what the figures represent (use WYSIWYG or a standardized formation?), plus there is the unfamiliarity with the rules.
Pro tip: don't print your rules double-sided. It only adds to the confusion in trying to find charts because then you have to look on both sides of the page.
The StuG fire also missed the very long range shot. Being an assault gun, the StuG cannot move and fire. The best it can do is pivot and fire. Meanwhile the AA truck repositions to south of the village in order to disrupt the armored infantry attack. I figure the half-tracks won't stand up to quad 20mm guns for very long.

Turn 2

The Americans continue to swing to the south of the village. This allows them to put the buildings and the small woods between their fragile half-tracks and the StuG. If the StuG crew wishes to fire at the attack, it will have to move, sacrificing its fire for at least one turn.


This is where the second surprise comes in. The armored infantry and machine guns from the half-tracks find out that you cannot obtain an effective hit against entrenched troops until you get to short range, or 6" or less! So again the armored infantry do not get to fire as they are still out of range.

The Sherman, however, switches to HE and lands a hit on one of the entrenched squads (indicated by the orange blast marker). This shell is equivalent to ten mortar shells(!), but again the chance to hit entrenched troops is so low that no hits result.

I decide to flank the turning flank of the American armored infantry with my AA truck. Going over the open ground with that vehicle is horribly slow! (I think I was mistakenly moving it as a Truck, rather than an Average speed half-track.)

I also decide to move one of the infantry squads out of their entrenchments so they can better get stuck in and support the center trench. Maybe not the best of moves against all of those mobile American pillboxes (the half-tracks), but I have to try something.


I decide to gamble and shoot at the flanking half-track on the north side of the village rather than shifting the StuG to the south. It misses.

Although several German units are firing, and there are a few hits at long range, all of the hits are saved so no American casualties have occurred yet.

Turn 3

I now understand that I have to move up to close range with my American armored infantry in order to effect any hits against entrenched troops. Now I know that the German pioneers don't have any panzerfausts, panzerschrecks, and such amongst them, but the Americans should have expected them to. Nonetheless, I continue to push forward on the attack in order to see just how much of a mobile pillbox these rules allow armored infantry in half-tracks to be.


I pour fire into the central entrenchment three half-tracks, a armored infantry squad, and the platoon headquarters and amazingly obtain four hits. Now we are getting somewhere! But rather than use my final half-track and armored infantry squad to pour fire into the exposed infantry, I only fire a few SMGs at them, obtaining one additional hit. The remaining fire goes against the (armored) AA truck, to know avail. Further, the Sherman again misses its shot at the dodging and weaving AA truck!

Turn 3

After making the morale checks, this is what the German units look like. Yellow markers indicate that the bases are suppressed, meaning it can neither move nor fire. But, it also means that the figures get a save of 3–6! Light green markers indicate that the bases are partially suppressed, meaning it can move half and fire at half effect, while it has a save of 4–6. (Note that Thomas never uses the term "suppressed" or "pinned"; that is just my description.)

By the way, I use red glass pebbles to indicate a hit that happens this turn (as a reminder for the unit to take a morale check) and then convert the hits to grass green markers to show previous hits.


The colors are a bit hard to distinguish in the photos, but the central squad is suppressed and the southern squad is partially suppressed.

Although it looked pretty bad for the Germans, between the AA truck unleashing its quad 20mm fire, and the remaining squads getting really lucky with their fire, you start to see what happens when you don't calculate the math of getting into close range. The American armored infantry were blown away.


Let's review the math, shall we? The armored infantry needed to get into short range as long range shots are totally ineffective against infantry entrenched. When in short range they hit on a '6' and the enemy saved on a '5–6'. When the infantry return fire they hit the armored infantry on a '4–6' and they save on a '5–6'. Basically triple the casualties.


I did two things wrong here though. I definitely did not mark the entire southern squad as partially suppressed, so 2/3rds of the squad fired at full strength. I also might have accidentally fired the central squad. It looks like an awful lot of casualties for a situation where the central squad could not fire at all. If I did that – and I am not really sure if I did – the central armored infantry squad (with seven hits) would have been unscathed.

That said, the AA truck counted as two HMGs (that had to fire on the same target), for a total of 12 dice. It had a good roll and combined with the fire of the southern squad, filled that half-track with holes. The fire against the headquarters half-track (top of the picture) was very lucky. The Germans landed all three shots and the Americans saved none. It happens.

With the attacking forces crippled, I draw a curtain closed on the scenario. (That and my gaming cave was getting a little chilly and the dogs wanted their dinner.)

Conclusions

I liked the game, but there was a lot of futzing about, and that was caused purely by using bases of multiple figures rather than singly based figures. The idea is that you look at the unit, count the rifles, count the SMGs, and count the LMGs and calculate the firepower. Easy to do with singly based figures and the suggested 1/72nd figures; harder with multiple 15mm figures on a base. The fact that I tried to use standardized squad sizes rather than the actual figure counts on the bases did not help, either.

If I were to do this again, and there is no reason not to, as it was a pretty fun game, I would do something like the figure below. I would put three numbers on the back of every base. The first number represents the number of rifles, the second the number of SMGs, and the third the number of LMGs. For each hit on the base I would remove one rifle until they are all gone, then one SMG until they are all gone, and finally the LMGs. I would not consider randomizing hits to see who goes unless I were using singly based figures.


This method would allow you to quickly see how many of each weapon system you have and calculate the Firepower. (I might even include a fourth number, which represents unarmed loaders, ammo bearers, etc.) You could also include the Firepower total, but would probably end up calculating anyway if the base has any SMGs.
UPDATE: after consideration, I think I would do what Neil Thomas does in his other rules: take hits until the unit has taken a sufficient number and then remove the unit. Until that number is hit, the firepower is not decreased. This simplifies things considerably.
A second change I would make would be to get rid of the two range bands for SMGs. Make no long range for SMGs; count it all as short range. The reason for this is convenience. As the maximum range for an SMG is the same as long range for rifles and LMGs, this allows you to calculate firepower much more simply. If you are at long range for rifles, don't count the SMGs. If you are at the rifle's short range, count your SMGs. Much simpler.
UPDATE: Further, instead of listing out rifles, SMGs, and LMGs, simply indicate its firepower with SMGs and its firepower without. This requires using the change to SMGs that I list above. Normally these rules do not change the firepower rating by range, but rather how much firepower can reach out to a given range.
The biggest question is: should half-tracks be forced to move to the rear when armored infantry dismounts or can it continue to provide support with its LMG? I think the latter is true. Re-reading my book on US Armored Infantry it seems someone was always manning the LMG (later the HMG) while troops were dismounted. But they would be in support, and certainly not leading the attack. In the end, you need a rule to wipe out the LMG gunner if the player decides to use it offensively. I think simply one unsaved hit removes the gunner, which then forces the driver to retreat with the vehicle.

One interesting point that came out of my reading is that the bazooka team was not an add-on, as it is with Flames of War army lists; it was a replacement for rifles. When the troop dismounted the squad leader called "Rockets out!" if he wanted the designated squad members to grab the bazooka and their rounds. This might be a little problematic with bases with multiple figures. You might have to do something like shown in the photo below.


If the unit deploys the two man bazooka base then the normal squad base only counts as having one rifle and one SMG, rather than three and one when the bazooka is not deployed.
UPDATE: If using the firepower ratings indicated above, rather than the weapon breakdown, then you could simply have a firepower rating with and without bazookas.
All in all, it was a fun game. I might well try it again, but with singly based 28mm figures. The main thing will be to try it without using entrenchments, which really made this scenario a tough nut to crack. I really just sat there for about five minutes trying to figure out how to approach it. (Must be the reason why one of my gaming buddies hated it when I purchased dug-in infantry in Flames of War.)

Blog Archive

Blog and Forum Pages

Popular Posts

Followers

About Me

My photo
Huachuca City, Arizona, United States
I am 58 yrs old now. I bought a house in Huachuca City, AZ working for a software company for the last three years. To while away the hours I like to wargame -- with wooden, lead, and sometimes paper miniatures -- usually solo. Although I am a 'rules junkie', I almost always use rules of my own (I like to build upon others' ideas, but it seems like there is always something "missing" or "wrong").