My blog about my wargaming activities. I collect a lot of 15mm miniatures for the American War of Independence and so collect a lot of rules for this period. I started miniatures with Napoleonics, so I have a number of armies in 6mm and 15mm figures for skirmishing. I have15mm WW II figures that I use for Flames of War, Memoir '44, and someday, Poor Bloody Infantry. Finally there is my on-again, off-again relationship with paper soldiers that I sometimes write about.

Showing posts with label Ganesha Games. Show all posts

Monday, August 14, 2023

Skirmish Scenario Design (Part One)

The game of Song of Drums and Shakos that I played at the last convention not only convinced me to play more skirmish games (where I can), but to possibly try my hand at running a game at the next convention I have lined up, SouthwestCon 2023 in Tolleson, AZ. To that end I decided to start designing a scenario to play and then do a few dry runs to refine it.

The first decision to make is what rules to use. Because the Song of engine re-kindled my interest, I am going to go with that. It is a relatively simple game that you can add as little or as much 'crunch' as you like, by adding in the special abilities. Also, every turn the player has numerous little decisions to make such as how many activation dice to use, so player engagement is relatively high.

The next decision is what period to play. My initial inclination was to use my wooden 43mm Dark Ages figures, to get them out on the table again. (The more I think about it, the more I realize I probably use them the most, of all the 43mm wooden figures I have.) Another alternative is Napoleonics. If I want to drop down to 28mm (and blow off some serious dust) I could make it WW II, but I would have to seriously tweak the Flying Lead rules (which I ranted about more than 10 years ago).


Several Playtests

So far I have played two Dark Ages and one Napoleonics version of a 'King of the Hill' scenario (where possession of the hill determines the victor) and the results brought up some interesting points, all of which make the scenario rather stale.

The Only Objective is to Eliminate the Enemy

The official scenario objective was "at the end of the game to have more figures on the hill than the enemy". However, there was always one overriding victory: elimination of the enemy, typically accomplished by them hitting a breakpoint and failing morale. If you did that, then it was assumed that you would take the hill unopposed after the enemy's rout.

In one scenario I remember losing enough figures early that I determined the only way to win was to break the enemy and thus capturing the hill was totally irrelevant. I ended up pursuing his leader attempting to run him down. If I had been able to accomplish that, half of the enemy forces would likely have routed and those that had not would either have vacated the hill, or if they had stood, been isolated and picked off.

Combat Becomes Static

Although this might sound like an inevitability with Dark Ages troops, as everyone gets into melee and maneuver essentially ceases, but it happens in Napoleonics too as troops settle into cover and start sniping at one another. This is either because the primary objective (the hill) is a static location or because everyone is 'stuck in' and movement only occurs when some figure is eliminated.

The Rest of the Board is Fairly Useless

Unless you both decide to ignore the primary objective and simply go for breaking the enemy force everyone is likely to be heading for the hill. Potentially terrain close to the hill might be of value as you snipe away at people on the hill, but in the end you have to be on the hill to win. But any terrain out of line of sight of the hill is essentially just window dressing.

A recent scenario is a good example of this. In the scenario depicted below, when I first reported about it, I left out all terrain detail, other than the town (in the lower right-hand corner). That is because everything other than the town was irrelevant. As it happened there were forests on the left, a ridge line on the French right flank, and roads. In this battle the town was worth 5 VP, a road on the enemy's baseline was worth 1 VP, all other terrain worth nothing, and destroying enemy troops worth variable VPs. (By way of comparison, I was able to score 3 VP for troop elimination against the enemy while they were able to score 2 VP against me.) I did not bother to draw other details because the town was the sole piece of terrain that mattered.

The 'King of the Hill' scenario feels the same way. Any terrain off of the hill just seems like window dressing.

Skirmish Scenario Design Objectives

So, what are the objectives of a good scenario design, especially for skirmish games? Let's start by taking a look at some rules and scenario books to see how they present victory conditions and scenarios.

Star Wars Shatterpoint Scenarios

One of my recent regrettable purchases was the game Star Wars Shatterpoint (SWS).

The game design looks good, but is just way too crunchy for my old brain. Like Star Wars Legion, but at a skirmish scale. The figures and terrain are really nice looking though, although some figures are a nightmare to assemble. I could have learned all of this had I watched more videos as content creators put them out, but I am generally a latecomer to rules and I wanted to be an early adopter this time. That will teach me!

SWS does have any interesting objective-based victory condition system. You start by picking a mission card, which defines where the objective markers are placed. All objectives are initially inactive (circles marked in gray).

SWS currently only has one mission card – the one shown above – and it evenly spaces out nine objective markers range 4 from the board edges and range 5 between each. If a marker appears where multi-level terrain is, it is placed on the upper level.

SWS has three different phases of the game, called Struggles. At the beginning of each Struggle a card is drawn which identifies which objective markers are active. In the example below, on the left, there are five objectives active, with the remaining four inactive throughout Struggle I. After the victory conditions of Struggle I are met, Struggle II is revealed, showing which objective markers are inactive and active. In the example below, on the right, a die is rolled on each player's turn to see which single objective marker is made active.

The net effect of this system is that it generally keeps players moving as they try and capture active objectives, keeping the enemy away from them. Between each struggle a winning position – in terms of who is successfully holding active objective positions – may turn into a losing one as the objectives have moved and you hold few or none of them. Players camp on positions, but generally not for the entire game.

Although an interesting concept and one that gives these rules the reputation for cinematic movement and action, one wonders how long before the shine comes off because players don't actually do anything at these locations, they just simply control them by outnumbering the enemy within a certain distance from the marker. In the example above, on the left, the objectives are supposed to be representing "stealing the secret plans", but there is no guarantee that there will be a computer terminal or a safe at each of these points; just an orange marker. Players are not required to have a figure perform an action, only that they are standing within a certain distance from it. They might have been full engaged moving or fighting. Still, it gets players to move into locations that might be out in the open rather than in cover, or have them move rather than make another attach in order to get 1" closer to the marker to contest. Put another way, it gets players to make sub-optimal moves rather than having them sit in heavy cover safely sniping away. At that it succeeds.

SWS has one of the best cures for people settling into cover and turtling there: you lose the game because you don't receive victory points for that. You get points for moving to and capturing points on the tabletop.

Intermission

You may not believe this, but it has taken me more than a week to write just this. My writing style is … chaotic. I sort of write in a stream of consciousness and edit it a bit afterwards. It is not so much that it is a lot of 'work', just that I want to get ideas out there and flowing and I sometimes wonder whether this is the best platform.

If I want to just send it out to you, with feedback limited to plain text comments, then I suppose this is the best method. But I am not sure that is what I want. I have been watching how Twitter/X has been changing as a platform and wonder whether that might be more suitable. I tried podcasting, but that is just as intensive as blogging – if not more so – and sort of limiting for the consumer. Twitter, on the other hand, is rather easy to consume. I can limit each thought to 280 characters (unless I get verified, then it is 4,000 characters I think). More importantly I have learned how to use the thread feature, so you can keep adding bits to a topic thread as ideas come to you.

I am thinking of trying that – maybe as a way of sorting out my thoughts and getting feedback – and then posting a completed thread here. There are lots of wargamers on there. If you are (or are not) interested, let me know. The account I use for this will not contain any personal posts, like vacation photos or political topics. Just straight up wargaming ideas. When I get the Twitter/X account sorted, I will post it here.

I'll pick up more on scenario design in the next post.

Tuesday, May 07, 2013

The Abominations Arrive!

Onslaught Miniatures announced that the next wave of their 6mm science fiction line is out, and I had to buy some. This time it is the Abomination, reminiscent of Genestealer Hybrids. As I loved the game Space Hulk (First Edition, along with all of the expansions, and the articles from White Dwarf magazine), I still have a collection of 28mm Genestealer Hybrids from Citadel Miniatures. These are not reduced sized copies of those original miniatures, but they definitely give you that feel, just as their Legion figures give you the feel for the Tyranid species without actually copying them.


First up are the three variants of the close combat Abominations. As you can see, two are four-armed and one is two-armed.


The body armor is well formed. I painted the armor a dark gray, then picked out the high spots with blue paint. For the flesh I primed the figures white, washed them in GW purple wash (the one no longer available; I have not tried the new ones), then picked out the high spots in sunburned flesh. If you click on the pictures, you will see a greatly magnified image.

Next are the Abominations with squad automatic support weapons.


As you can see, two are held slung low – the left hand actually holding a handle on top of the weapon – while the third uses a more traditional grip. The first figure is three-armed – he looks like a leader signaling with upraised claw – and the additional of a "bionic eye" lends to that aura. I like him; I need to add some markings to his armor indicating that he is a leader.

As with the previous figures the armor is well defined, making it easy to pick out the detail with a paint brush. I started getting a little better with the faces on these guys.


Finally, we have the Abominations with the heavy weapons. Two weapons look like the weapons on the GW Epic Orks with heavy weapons; they look like missile launchers to me, which is great, because it gives the unit some anti-armor capability. The last looks like a shoulder-mounted laser weapon.


It almost looks like I painted the teeth white on some of these guys, but that is just the purple wash not getting into the crevice of the mouth and leaving it white. I cannot see it with the naked eye, but I had to laugh when I saw the pictures.
The openings on the front and back of this weapon are well defined, so it warranted a wash in order to highlight it. I was worried that the wash would overpower the light gray color, so I used Army Painter's Soft Tone Ink. I probably could have gone darker, using something like an armor wash.

The 'sun glasses' worn by this figure is purely an accident of painting. But he does look cool!

All in all, these figures were very fun to paint. In all of the GW Epic figures that I have, I was never able to get any Tyranid forces on eBay, largely because others outbid me; they were very popular (and expensive). From a skirmish viewpoint, using something like In the Emperor's Name (ITEN), FUBAR, or Angel Barracks' KR16, the Abominations are probably a better force to collect. When gaming at a larger scale – where units are squads or platoons – the Legion are an excellent choice to represent mass attacks by the 'Bugs'.

New Science Fiction Rules

Speaking of which … Ganesha Games has come out with a new set of science fiction rules called SWATTERS! It has some interesting concepts for representing multi-unit combat (think Sixty-One Sixty-Five for science fiction) that I think can be applied across many genres. I hope to do a review and battle report soon.

Well, I need to keep off of the forums for awhile, so I hope to get back to the painting table and finish some sample figures of the rest of the Legion line (I bought the Gashers, Stalkers, and Winged Stalkers when I bought the Abominations). I have also painted up some Dark Realms figures, but I am a little unsure I like the results. The figures are great to paint, don't get me wrong, but I think I chose a bad color scheme.

Angel Barracks has come out with a new draft of his KR16 rules. They are free, so other than your time, there really is no cost to downloading them and trying them out. As far as I know, they are only available on the Angel Barracks forum on Yahoo. (If I am wrong, don't worry, Michael will probably correct me in the comments section.)

iPad Gaming

I got into the game Frontline Tactics on the Mac. It is a pretty repetitive game and you will probably find it additive for about 20 hours, but as part of an experiment with the online account, I downloaded the game it to my iPad. I had a point where I had to wait someone for awhile, so I started playing the game on my iPad to while away the time.

There is a new mobile gaming technology that I heard a podcast about that allows the developer to pop up an ad, at appropriate breaks in the action, while gives the gamer in-game rewards for play. It is not too annoying (it pops up at the end of each mission) and I have tapped on a few to see what they were offering.

I surprised the wife with an early delivery of flowers for Mother's Day. My wife used to not like to receive flowers, but now that she has a lot of land, she likes trying to see if she can take the cutting and get them to grow. I have not given her flowers in awhile so she was surprised by the gift. "Why did you decide to give them too me this year?" she asked. "Oh, just because …"

… just because it earned me 250,000 credits in the game Frontline Tactics, that is!

There is a board game called Eclipse that has been converted to the iPad. It has been a long time coming and greatly anticipated. As it was less than $10 ($6.99, I think?) I decided to pick it up, because of all the buzz.

Stay away! It is a huge time drain!

Seriously, the game is very fun and has gotten me interested in the board game itself. People that play the board games say that the iPad version has a few implementation issues (i.e. the rules are different from the board game), but only one crashing bug has been reported (that I have heard of) and it is apparently not likely to be triggered.

Money well spent (even if the time is not).

BattleLore

And finally … the BattleLore over Vassal tournament is finally over. (I love the gaming, but scheduling within a time limit creates pressure I really did not like. In the end I was starting to get irritated over the scheduling issues.)

I won both rounds, scoring 8-2 and 8-7. Yes, I won the tournament! As strange as it sounds, this was the first BattleLore over Vassal tournament that has ever completed, so that makes me the first champion. This for a game no longer printed and poorly supported by the license holder.

One of the things that came out of it, however, is how much Chris and I prefer the Epic version of BattleLore. It actually lowers the luck factor of the card draw, plus uses larger maps and more units. It seems like we will be using this format more often in the future.

New Readers

Welcome to new readers Les and Dehewes. Dehewes' profile pointed me a nice Kindle blog that shows new Kindle eBooks that come out and go on sale. Les has an interesting blog, Wargaming France 1940, where he games that subject in 6mm. He is also a solo gamer, so it will probably be a source for ideas for me for my Solo Battles blog.

I hope you guys enjoy the blog content. Feel free to leave a comment when something strikes you.

Monday, February 25, 2013

A Reader Responds

I got a great email from reader Simon Wright about my article on smoothing out activations in the Song of engine (from March 2011 … wow, was it that long ago?). Rather than keep the conversation in email, I thought I would post his original email, and my response. Simon wrote:
Hi Dale,

I've been reading your blog for the past few months, which I greatly enjoy. I've got some ideas I'd like to share. A year or so back you made a few posts about altering some of the Song of Blades and Heroes mechanics to allow for 'smoother' gameplay. In other words, tweaking the game slightly to avoid frustrating situations where the majority of a player's Warband (especially poor Quality models) do absolutely nothing for several turns (this can happen even when rolling only one die for activation, as an average Quality model still has a 50% chance of not getting an Action). While I (like many players) personally love the risk/reward concept behind the SoBH engine, like you I feel that it needs to somewhat less random so as not to lead to frustration due to randomization that's out of a player's control.

So here's my idea (well two, actually).

1) When a model activates, it can always perform one action. However, before this 'default' action is performed, the player can choose to 'gamble' for up to two more actions. To gamble, the player takes a Quality check on three dice. On two successes, the model gains a second action. On three successes, the model gains a third action. On two or more failures, the model gains no bonus actions, and after performing its default action, the player's turn ends.

2) Now I remember you were talking about how the turnover mechanic punishes the rest of a player's Warband, and not the model that caused the turnover. Well I was thinking, what about if the turnover just ends the model's activation, and not the player's? So when gambling for more actions as per above, if two failures are rolled, the model cannot perform any actions on that activation (not even the default action). Bear in mind that if the player wants to gamble for more actions, they would need to do so before they perform the model's default action.

I haven't done a whole lot of playtesting with the second idea. From what I have seen so far of the first idea though, it does the job of allowing low Quality models (like that Q5+ Troll that only ever seems to stand around and then suddenly bolt off the battlefield during a morale check) to actually do something without requiring constant Group Moves/Orders from a nearby Leader. This may make large hordes of low quality models too powerful though, and I'm working on coming up with something to fix this if it becomes a real issue. In the end this might change the game completely and require limitations on the amount of models in a Warband.

But that's it. I'm interested in hearing your opinion and criticism. Let me know what you think Dale, and keep blogging!

Kind regards from a new reader,

Simon
So, Simon brings up a really good point, that something really needs to be done to make lower Quality warbands more viable. It has been discussed a little bit on the Song of Blades and Heroes forum on Yahoo, but it seems like most people poo-poo the idea, or simply say "yeah, that is why I don't use low Quality warbands".

Let's Look at the Math

I can imagine some people has just skipped to the next blog …

Suppose you decide to always roll two dice, without fail, for every activation attempt with every figure in your warband. The chance of a turnover, by Quality, is as follows:

QualityChance to Turn Over
23%
311%
425%
544%
669%

As you can see, the odds do not go up linearly. It gets worse when you consider the number of times you roll for each quality level.

QualityChance 1 Can ActChance 2 Can ActChance 4 Can ActChance 6 Can Act
297%95%89%84%
389%79%62%49%
475%56%32%18%
556%31%10%3%
631%9%1%0%

Hopefully my math is not off that badly … just a lot of rounding in there.

You can see that larger, low quality warbands do not stand much of a chance of getting all of their models activated (at least with two or more actions) and smaller, high quality warbands really are not gambling all that much. I strongly suspect that the points system does not take these percentages into account, but in the end would it really matter? If you could buy 23 Quality 6 figures for every one Quality 2 figure (representing the ratio of turnover), you likely could not activate them enough to make those numbers count.

Option #1

Looking at Simon's option number one he is basically granting one action for free, but making it statistically harder to get a second or third action. I actually like that. With one free action Quality 6 archers will pin cushion a Quality 2 force. Hmmm … maybe that swings the pendulum too far the other way against Quality.

The problem is that the mechanism gets away from a core design concept of Andrea's that not everyone can act, even if they get to roll for activation. Even if you roll only one die, failure may not mean a turnover, but it does mean you cannot act. It seems like we need to keep that concept in.

What you need to do is describe the effect you would like to see, then develop the formula that creates those effects. So, if I were doing this, I would say that I want at least a 33% chance of performing one action, and the rest goes down from there. In order to accomplish this, I could roll one die of one color (let's say red for this example) and up to two dice of another color. If you add +1 to the red die's score you have increased the chance of the first success, but if the person gambles with the other dice, then so be it; they are at the normal Quality roll. Don't think it should be only 33% chance for one success? Fine, add +2. In all cases, a natural '1' always fails, even with the modifiers.

Option #2

The concept of applying the failure to the one that failed, rather than the rest of the warband, definitely changes the odds of the game because more people will mostly gamble with three dice for everything. Think about how many games where you automatically choose to roll three dice with the last figure in the warband for the turn. Why not? Even though you have increased the change of a turnover, who cares, because everyone else has moved.

The idea I had was to mark all units that "turned over" and they would forfeit their chance of activation the following turn. I think it is simple and elegant, but rather marker heavy, for those that don't like junk on the table. (I use a circle punched out of grass green colored foam sheet, so it tends to blend in pretty well, but not too much that you miss them.)

Well, I may have to try all of this out with a game. Give me a break from working on Mesoamerican Saga or playing BattleLore online.

Thanks again to Simon Wright for writing and the kind words. This is the kind of thought-provoking feedback that I enjoy.

Thursday, October 25, 2012

Song of Bolter and Chainsword (2)

Talk about "epic fail"! My battle using the Song of Bolter and Chainsword (SBC) rules in the last blog entry didn't produce a very good game, but not really because of the rules per se, but rather because I forget the scale of Song of Drums and Shakos. The rules really should be called Squad of Drums and Shakos, as a squad really is about the extent of the troops you should use for each side. My SBC game had 21 Chaos figures in four units and 27 Orks in four units and it failed miserably, mostly because so many figures could not move due to turn-overs. So, no report on that and back to square one.

Space Marines

Space Marine Sergeant:
Armor 3+, Bolter (AP 5, L, +3, +1, +0), Power Fist (AP 2)
Q 3+, C 3, Leader

Space Marines x 3:
Armor 3+, Bolter (AP 5, L, +3, +1, +0), Bolt Pistol (AP 5, S, +3, +1, +0), Frag Grenade (AP -, M, +1, S burst radius), Krak Grenade (AP 4, M, +4, no burst radius)
Q 3+, C 3

Tau

Fire Warrior Team Leader Shas'ui:
Armor 4+, Pulse Rifle (AP 5, L, +4, +3, +2), Photon Grenades (AP -, M, +4, S burst radius, special), Bonding Knife (acts as Flag Bearer without encumbrance)
Q 3+, C 2, Weak (-1 C in close combat), Leader

Fire Warriors x 5:
Armor 4+, Pulse Rifle (AP 5, L, +4, +3, +2), Photon Grenades (AP -, M, +4, S burst radius, special)
Q 4+, C 2, Weak (-1 C in close combat)

Photon Grenades cannot kill their opponents, but if they score a x2 or more combat result the target is knocked down and stunned (2 actions to recover from stunning and 1 action to stand up). No armor save is allowed.

Deployment

Space Marines will deploy on the South side (top of the photograph, here) and defending. The Tau are on the North side and attacking.

This scenario is really a simple meeting engagement, so attacking and defending only refers to which side will get to select their baseline (the Tau did).

The hills are made from ½" particle board. I had the local DIY shop use color matching to match the paint against my cloth (which is not the one used, but rather the one at the underneath, barely showing at the top of this photo). Pretty good, but a little off.

I use my 6mm trees as bushes and my 25mm trees as trees (albeit thin ones). I am playing as each tree and bush is "as is", so they are not to be moved around. Bushes can be moved over – as can trees, it represents brushing past them – but it slows you down by one stick (i.e. a Medium move becomes a Short move). In this game I made sure I spaced everything enough so that fat fingers could move troops around easily enough without moving the pieces too much.

Here is the Tau deployment, with the Shas'ui (team leader) in the rear. My plan is to use him to issue group orders and keep the squad as intact as long as possible.

One change from the Song of Drums and Shakos (SDS) rules – taken from Flying Lead (FL) – is that a group constitutes figures within 1S (short-hand for 1 Short stick in distance) of one another. Only one figure in the squad must be within 1L of the leader to get the group order, but each figure must be within 1L in order to get the +1 Q (short-hand for +1 to their Quality roll) for activation. And that is my plan: keep the leader within 1L of everyone, and within 1S of at least one other squad member for as long as possible.

The Space Marine deployment is relatively simple: everyone within 1S of at least one other, in a diamond formation, at least for the start.

As the Marines are all Q 3+ (meaning they activate on a 3 or more, unless other modifiers come into play) they activate on a 2+ if they are within 1L of the Sergeant. So rather than using group orders, I am going to push the Marines with three dice each turn if they are within 1L and then roll the Sergeant last (with three dice) and try and ensure he stays within 1L of as many Marines as possible.

So this battle will be one of quantity using group orders versus quality using individual orders. (Personally, I always like the latter.)

Turn 1

Movement on both sides, but the Marines come out a little better. They are formed in echelon with the point Marine heading into the underbrush.

Ultimately the question is: who will gain the cover of the hill first? Given that the Tau move first…

Note that the overhead photos will all be shown from the South (Space Marine) side.


Turn 2

The Tau reach the central hill with the Marines in sight, but not enough actions to take shots. The second line of Tau prepare grenades, anticipating the Marines will simply charge into hand-to-hand, where the Tau are the weakest.
Rule: the first contour of a hill does not reduce movement.

Rule: one contour between you and the firer provides you with cover. If your figure is against the contour your opponent does not get cover unless also against the contour.

Rule: two contours between you and the firer means you are completely concealed.
The Marines open fire, knocking down one Tau (armor save on a kill reduces it to a knock down), while the leftmost attempts to flank the position.
Rule: roll armor save for kills (only). Save indicates the result is changed to a knock down (two actions to get up). For a Gruesome Kill the armor save lowers it to a kill, unless you roll a natural '6', in which case it lowers it to a knock down.
Note that the white cotton balls represent a figure firing and generally "points" towards the figure it was firing at. It serves no purpose other than as an indicator for the photo.


Turn 3

The Tau turn is ineffectual, but the grenadiers are on overwatch. (Their overwatch points are indicated with a blue marker in the photo.)
Rule: overwatch costs 1 action to place a marker within LOS. Any target moving within S of the marker can be shot at -1. Similar to Flying Lead's overwatch rule, but costs 1 action instead of 2.
One Marine flanks the hill on the left and cuts loose with a mighty burst, scoring a gruesome kill, which the armor did not save!

The Sergeant turns over on two dice, so everyone else does nothing. (I am not quite sure why I rolled for the leader instead of the troops. It was not according to my plan, but sometimes that is just what happens in the heat of the moment!)


Turn 4

The Tau grenadier moves forward and tosses the Photon grenade at the Marine in the bushes, knocking him down and stunning him. Two Tau score Lethal hits on the downed Marine, but his armor saves him both times. The third Tau rifle knocks down a Marine with his fire. The Team Leader fires at the flanking Marine, but fails to score a hit.

The stunned Marine shakes off his stupor and stands up (3 actions), while the one knocked down also regains his feet. The Sergeant (shown in the photo to the right) charges the Tau grenadier (3 actions), but actually draws in combat!


Meanwhile the flanking Marine continues to advance and lay down fire, killing another Tau rifle! This Marine is becoming a dangerous threat as the Tau do not get the cover bonus against his fire, as they do with the Marines on the opposite side of the hill.

This situation at the end of the turn. The Marines have completely recovered and the Tau have lost two to fire and are likely to lose another in hand-to-hand combat.


Turn 5

The Tau rifle on the hill, seeing he is in trouble on his right flank, turns and shoots an aimed shot at the Marine, scoring a kill, but not good enough as the Marine's armor saves him. The Team Leader also takes an aimed shot at the now downed Marine, also scoring a hit (which is Lethal as the Marine is on the ground) but again the Marine makes an armor save!

The Tau in close combat turns over, so the last rifle gets no action! Probably bad timing on that.

The Marine Sergeant scores a gruesome kill with his powerful blow, and as the power fist has a high AP value the Tau gets no armor save.

The add insult to injury, the Marine behind the bush charges up the hill and cuts down another Tau with close range Bolter fire.

Time for a morale check! Both Tau fail two of three dice, so we draw a curtain to this skirmish.


Here is the final photo of the game, with the last two Tau high-tailing it off of the board. The Tau lost four dead and the Marines none.

Aftermath

That was actually fun. Although I was still working out a few rules in my head, what I like with my skirmish games are giving player choices and watching tactics come out in play. In this case the Marines flanking the Tau in order to remove the benefits of cover was the right tactic and worked well.

I intentionally played the Tau and the Marines with a different style. The Tau very much used group orders while the Marines rolled for each figure individually, relying on their high Quality. The typical turn found the Tau rolling two dice for the leader, using one order to give the group an order, which then rolled three dice for activation. It worked for awhile, but as usually happens, the leader falls behind.

The Marines, on the other hand, required a 2+ for those within the Leader's command range, so they rolled three dice every turn with the Sergeant rolling his three dice last. Only until the flanker got out of command range was there some decision on what order to roll and whether to roll less than three dice.

Armor is tough, but in 40K it is supposed to be. Although I kept cursing the Marine's saves, that what happens every so often so it did not bother me here.

I probably need to refine the rules a little, but it seems pretty clear that using Flying Lead as the basis for the SBC variant works better than SDS. I just need to commit a little more work on the stats. I still believe it is better to convert 40K stats to SBC stats and special rules, but use straight 40K values for the points system, than to use SDS or FL points values. The latter could easily change the dynamic between army lists, thus changing the flavor, something that seems to happen in In the Emperor's Name (ITEN).

I will have to get with Andrea of Ganesha Games and see what is an acceptable way of recording the variant that neither gets him in GW IP hot water, yet allows him to sell more copies of Flying Lead.

It was definitely fun blowing the dust off of my 40K figures and using my new hills. I have definitely got to try this one again soon.

Sunday, October 14, 2012

Song of Bolter and Chainsword

I decided to use my 6mm Epic Space Marine figures for another game, only this time using an unpublished variant of the rules Song of Drums and Shakos (SDS). I call the variant Song of Bolter and Chainsword (SBC). If I don't like how this turns out, I will try using Song of Blades and Heroes or Flying Lead to see if I get a better result.

The main elements to be determined for the variant are how armor comes into play and what the weapon values are.

Armor

In SDS, armor – the Cuirass special ability – subtracts one from the combat result if the armored figure loses. Thus if the figures loses by one point, the combat becomes a draw. It can also turn a kill into a beaten result, or a gruesome kill into a kill.

As there are so many levels of armor in 40K, you need more than just this rule. The easiest thing to test would be simply increase amount added if the armored figure loses.

40K ArmorSDS IncreaseNotes
6++1** Only applies against Blast weapons.
5++1None
4++2None
3++3Power Armor may have additional abilities assigned.
2++4Terminator Armor may have additional abilities assigned.

Note that this makes Terminator and Power Armor pretty tough, having to win by 5 and 4, respectively. That means that you cannot kill anyone in this armor, unless ...

Weapons

In SDS, weapons have two factors: range band size (Short, Medium, or Long) and range modifier. The range modifier not only specifies what the bonus (or penalty) is to fire at any given range, but how many multiples of the range band size the weapon is capable of (e.g. 2xS, 3xL, etc.).

Weapons in 40K have an additional factor: armor penetration. Put simply, the weapon is rated at how much armor is negated. In 40K an AP 2 weapon would automatically penetrate 2+ armor saves (or worse). In SBC, the AP rating indicates the armor level (the amount added to the combat result) that is negated.

WeaponRangex1 Modx2 Modx3 ModMax RangeAPNotes
BolterL+2+1+0x32None.
Bolt PistolM+2+0N/Ax22None.
Missile LauncherL+1+1+0x5-See missile type for AP.
Frag Missile-----2See Missile Launcher for range stats.
Krak Missile-----?See Missile Launcher for range stats.
Frag GrenadeS+0-2N/Ax22None.
Bike Shoota'L+4+2N/Ax22Range limited by firing platform instability.
'eavy Blasta'L+2+1+0x43Cannot move and fire, unless using powered armor.
Big Choppa'-----2Two-handed battle axe uses these stats.
Chainsword-----3None.
Power Sword-----4None.
Power Fist-----5Lethal. Power Klaw uses these stats.

Of course, there are many more weapons and I am not going to provide them all here, now. First I want to see if there are any problems with the variant. If it looks promising I will expand beyond the basic weapons I need for my test game of Orks versus Chaos Space Marines.

I am currently playing out my test game and writing it up. Expect that in the next post.

Monday, January 30, 2012

Drums and Shakos Large Battles Playtest

As always, let me start off by welcoming new reader TasminP. I hope you enjoy the read.

As I threatened in my blog entry about Drums and Shakos Large Battles (DSLB) being released, I am wary to completely grade a set of rules on just a reading; so many times I have found what looks good on paper does not always work on the tabletop. I have equally found that subtleties in a rule missed in reading suddenly dawn on you when you get whacked with their significance during a critical moment. I can start by saying that there were no negatives for me, but more than a few whacks on the fanny during the game.

The Scenario

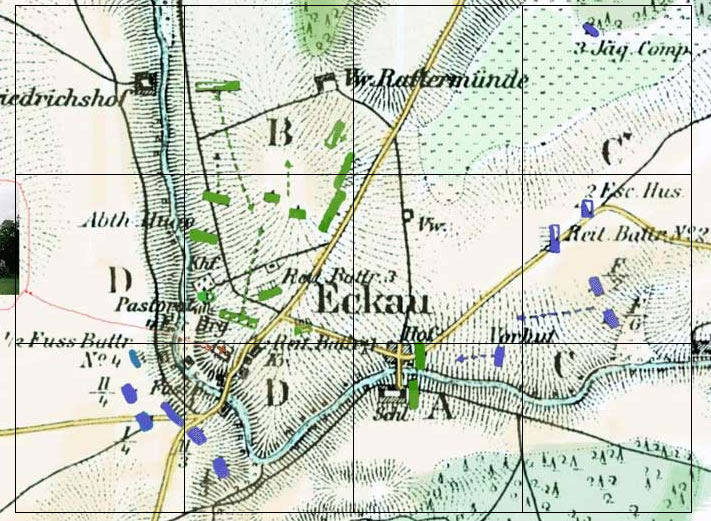
I decided to play the Battle of Eckau (18 or 19 July, 1812 depending upon the source), which is about 6,500 men versus 5,500 men – just the right size to try out the rules. George Nafzinger has a write-up of the battle in his book Napoleon's Invasion of Russia and there is an excellent map on a Latvian re-enactment web site. I also used Digby Smith's The Greenhill Napoleonic Wars Data Book for the order of battle.

First off, this is an unusual Napoleonic scenario in that it is Prussians attacking the Russians in what is modern-day Latvia (southwest of Riga). The Prussians (and Austrians) were part of Napoleon's Grande Armee in 1812 and were on the northern attack route. What is interesting is that there were several engagements and they did inflict casualties on one another. So, why did I choose this? To be honest it was that my French are way too far from being re-based, but my Austrians, Russians, and Prussians were not, so I dug through Digby and up came a battle just the right size. Historically the Prussians won, but the number of casualties was roughly the same (depending on the source) and relatively low.

Let's start with the map (click to zoom). As you can see, the Prussians (in blue) are attacking from both the southwest and the northeast, with the Russians (in green) in the central position and eventually retreating northward. (By the way, if you want to look at this area in Google Earth – and see how little it has changed – search for Iecava, Latvia, which is its modern name.)

According to the map, the river (creek?) is sunken and the ground slopes upwards away from it.

In translating this map to the tabletop I counted the water as difficult to cross – Nafzinger's description does not mention any particular problems with the Prussians crossing nor with being forced to assault across the bridge. The "town" (built-up area in DSLB) is on the Russian's left flank and includes a prominently large building (a school, I believe). Other prominent features include a hill to the Russian rear and a small knoll by the bridge.

The Forces

Prussian

Unit
No.
Q
C
Sk
Special
Notes
Musketeers
4
4
4
2
Drilled
Jagers add 1 to Sk
Fusilier
2
4
4
2
Light
-
Jagers
1
-
-
-
-
Jagers added to Musketeers
Dragoons
2
3
4
-
-
-1 to C for small size
Hussars
2
4
3
-
ร‰lan, Scout
-1 to C for small size
Horse Artillery
2
4
-
-
Light, Horse Artillery
-
Light Artillery
1
4
-
-
Light
-
Medium Artillery
1
4
-
-
Medium
-

The 1st Brigade was composed of the four Musketeer battalions and the Jagers (deployed as skirmishers). The Jager deployment was not historical – it was actually in the woods in the northeast corner – but the map shows a 1/2 Fusilier battalion that is not in Smith's OOB. That combined with the fact that I had not completed painting the Jagers convinced me to deploy them out!

The 2nd Brigade was composed of the two Fusilier battalions, the two Hussar regiments, and the two Horse Artillery batteries. Note that the Hussars are small regiments, two squadrons each, so they are penalized -1 C, as indicated in the rules (page 34).

The Reserve is composed of the two Dragoon regiments, the Light Foot Artillery, and the Medium Foot Artillery. As with the Hussars, the Dragoon regiments are penalized -1 C as they are two squadron regiments.

Given the size of the forces involved, the Prussian certainly seem to possess a lot of artillery, even if it is mostly light.

I intentionally chose to give the Prussians two small Dragoon and two small Hussar regiments, rather than combining both and making two standard sized regiments, as I wanted to see the effect of more but weaker units versus fewer but stronger ones.

Russian

Unit
No.
Q
C
Sk
Special
Notes
Musketeers
4
4
4
0
Drilled
-
Jagers
1
4
4
1
Light
-
Militia
3
5
3
0
Militia
-
Dragoons
1
3
5
-
-
-
Uhlans
1
4
4
-
Lance
-
Cossacks
1
?
5
-
Lance, Light, Opportunistic, Scout, Unpredictable, Wavering
+1 to C for large size
Heavy Artillery
2
4
-
-
Heavy
-

The Russian 1st Brigade consisted of one Heavy Artillery battery (on the knoll), three Militia battalions, and one Dragoon regiment. This mixture of militia infantry and cavalry is unusual and was only done because of the positions shown on the map. (I now realize that the unit positions may not reflect starting positions, but some unknown point within the battle, which may account for reserves being committed and Brigades intermingling.)

The Russian 2nd Brigade consisted of the Russian jager battalion and three Russian musketeer battalions. The Jagers and one Musketeer battalion are isolated from the rest of the Brigade as they are stationed in Eckau and the school.

The Reserve consisted of one Heavy Artillery battery, one musketeer battalion, the Uhlan regiment, and the Cossack pulk (regiment). Note that at 500 men, the Cossacks are a large unit, so they have an unusually high C. I made them Unpredictable, as the author suggests, rather than giving them a Q of 5. I added a few other special rules – Scout, Opportunistic, and Wavering – as I felt they fit. Opportunistic would offset a Q of 5, but seems deadly with Unpredictable, which I do not think fits. Wavering properly reflects their reluctance to Approach on the battlefield.

Deployment

Deployment was as indicated on the original map, save that the Prussian Jagers were dispersed amongst the Musketeer battalions, as previously noted, and the Prussian Reserve was allowed to choose whether to appear behind the 1st or 2nd Prussian Brigades. My opponent, Don, chose to put them behind the 1st Brigade, in the southwest corner of the board.

The Russian deployment is a bit muddled on the original map. The 1st Brigade was deployed forward and towards the southwest while the 2nd Brigade covered Eckau and the east. The Reserve was to the north and quite some way behind the lines.

Here is how the original map translated to the OOB I used from Smith.


The Battle

As the Prussians were the attackers historically, and they actually surprised the Russians to some extent,  so they moved first.

The Prussian Fusiliers attacked into the town of Eckau and drove out the Jagers from the first BUA sector with some hot die rolling (and a misinterpretation of the rules on my part). The horse artillery unlimbered are started bombarding Eckau from long range with little effect.
This was largely due to my having mis-/not completely read the rules on Built-Up Areas, so the Jagers yielded the town much too easily.
On the opposing flank the Prussian attack immediately stalled when the Russian heavy battery opened fire. One Prussian battalion took heavy fire as did the limbered reserve artillery behind it.
The Russians were able to bombard in reaction and then immediately reload and bombard in their turn. The dice for the Prussians did not help either. The battalion quickly accumulated DIS and with bounce-throughs and the retreating infantry, one battery to the rear accumulated DIS2.

The Russians, in turn, were able to move the Uhlans up from reserve while advancing their 2nd Brigade towards the bombarding horse artillery batteries.

One quickly finds out just how far cavalry can charge if the get a good roll. One Russian musketeer battalion had been sneaking up on a horse artillery battery (with a successful reaction roll) when the Prussian Hussars charged and rolled over the infantry, caught in attack column.
DSLB, like Command and Colors: Napoleonics, is pretty unforgiving of infantry caught in the open in line or column by cavalry. They stand a chance (less so in attack column), but the odds are against them, even if they have taken no DIS.
With a battalion of regulars quickly lost, the Russian left flank enters square in the face of two Hussar regiments. Unfortunately, this is also in the face of two horse artillery batteries (though at long range). In the 1st Brigade, the Dragoons move to try an flank the Fusiliers moving to secure Eckau, but it is too late, the Prussian Fusiliers chase down the Russian Jagers and drive them off at the point of a bayonet. The Jagers rout.


Suddenly, with a roar the Prussian infantry pushes up the hill and attacks the unloaded Russian battery on the knoll. With little effort they overrun the Russian position, ending up with their right flank behind the Russian Dragoon regiment. The Russians quickly react and turn their unit around, ready to charge the Prussians in the flank ... but somehow the Russians cannot muster the courage.
This is one of those "oh boy" moments when you have a great move and the dice just will not co-operate. The Dragoons, with a Quality of 3, and within Command Span of their Leader, need only a 2 or better to activate. I grab three dice and roll ... three 1's! The Dragoons and the whole Brigade stands frozen.
On the left flank the Russians realize that if they do not remove the cavalry threat their squares will get torn apart by the horse artillery. The Uhlans charge the first Hussar regiment and ride it down. In their breakthrough they charge the closest horse artillery battery, but are told off by canister.
Technically, a cavalry breakthrough puts the cavalry unit directly into Contact, bypassing the Approach, but my dice failed me and not my opponent's so it sounds better that I was told off by canister than to admit that my troopers were beaten by ramrod-wielding men!

As the Uhlans were recalled in great disorder, the Cossacks were finally committed to that flank in order to stop the remaining Hussar regiment from wreaking any havoc on the infantry. At this point the Russian 2nd Brigade is shaken. I only have a single heavy artillery battery in reserve now.

The Prussian advance at the bridge continues, with the Dragoons leading. The Russian Dragoons finally receive their orders and charge the still-exposed flank of the line infantry on the knoll, destroying them. The Russian Dragoons are then recalled to a position behind the knoll just as the Prussian artillery starts to site the position for fire.


The Prussian Dragoons stall at the river (they cannot use the bridge as they are deployed in line) while their artillery limber up and move towards the bridge. The Russians know that if the Prussians get past the bridge the position will be lost. The Brigadier orders the Russian Dragoons to charge, and save the command.

The combat between the Dragoon regiments is hardly a contest as the Russians have the upslope and the Prussians are caught in the water and a smaller regiment. The Russians cut through the Prussian Dragoons, routing them, then breakthrough into the limbered artillery on the road directly behind them, also destroying them. However, the Russians are recalled in great disorder, which confuses the Russian militia into thinking that the Dragoons are routing and a general panic ensues. The entire Russian line retreats, ending the battle.
Note that a recall cannot caused a rout, this is just literary license. What happened was that I had pushed the Dragoons into one combat too many and they were recalled with DIS3 on them, which tipped the Brigade over the edge and caused it to be Shaken, which tipped the Division over the edge and caused it to reach its Breakpoint. I lost because I won. How ironic!

Summary of the Game

I really enjoyed the game even though it felt a bit slow at first. I attribute that to our not being used to the rules, the unusual setup (surrounded on two sides, split commands versus interior lines, etc.), and to getting used to the Reaction rule.

Let's start with that rule. Essentially, in Ganesha Games designs the player gambles by deciding whether to use 1, 2, or 3 dice to activate, then rolling them against a target number to count successes and failures. In other designs, the number of failures is significant only if you roll two or more; in DSLB every failure is significant in that the opponent gets to roll a number of dice equal to the failures to see if he can activate to react to the opportunity of your failure. (Two or more failures also represents a turnover by that Brigade.)

This "reaction to the opportunity of your failure" is abstract, however. The unit testing to react does not have to have any relation to the unit failing. For example, it does not need to be the unit or Brigade acted against, within a certain of the failing unit, or even within line of sight. It is not even restricted to reacting to the unit that failed. Simply put, the acting player gambled and lost, and the reacting player can take some action in consequence. It is a simple extension of the risk versus reward decision that the player has to make every turn for every unit acting.

The reason this rule is significant is because it makes game play very fluid. Most activations, unless lucky or using few dice, fail at least once, giving your opponent something to do (if only to pick a unit and roll). This made it feel much less like an IGO-UGO game. As I stated in my initial rules review, a reaction die might allow a player to form a hasty square in the face of a cavalry charge or allow the defender to launch a counter-charge to block a charge against a particularly vulnerable unit. In short, it relieves the author from writing a score of special case rules (like forming emergency squares, counter-charging, closing fire on a charge, charge evasion, etc.) by providing one simple elegant solution.

All that said, my opponent definitely did not like the rule, at least not the aspect of the reaction could be taken by any unit anywhere. In correspondence with the author, he indicated that some of his "old school" gamers initially objected to the rule too, but eventually saw the utility of the rule and accepted it.

Final Analysis

Naturally, with any new rules you need to get used to them. The second game will generally always be better than the first as you will in all likelihood play the rules more consistently as you correct your mistakes. This was the Heads Up rating given in the initial review.

So, to review my review let's go down the points I raised and the final ratings.

I've discussed the reaction rules above and I think my initial assessment was correct in that this solves more problems than it creates. It saves the author from writing, and the player from remembering, a rash of special rules to deal with the problems of a traditional IGO-UGO turn sequence. The Lasalle rules addressed this by turning the traditional Move-Fire-Melee turn sequence on its ear; DSLB shows that there is another, more elegant method. (Now all I have to do is convince my opponent of the superiority of it without diluting its effectiveness too much by adding house rules limiting its use.)

Movement is an area where the players must be scrupulous in execution, otherwise the game is thrown off. Oblique moves maintain facing, wheels only turn the front and have no straight movement, and pivots simply change the direction faced. If you move 'sloppy' like the free movement with a DBA element, you essentially blur the distinction between a line and a column, thus giving the line a tremendous advantage. This is especially true of the Approach and Contact moves; these must be straight ahead only, so if a unit is not pointed 'dead on' you must burn an action pivoting or wheeling to line up correctly. This can make the difference between a successful charge or not, but can also often negate the cavalry's ability to overrun skirmishers (which must be done in the first action).

So there you have it. In actual game play, it rarely came up, except when a unit is forced to retreat through another unit (it usually cannot clear the unit and 2VS in one retreat move).

Combat - Bombardment, Approach, and Contact - went very smoothly. Once you understand the basics, and the number of Combat Dice to throw, you really don't need the reference charts. The number of modifiers are few and are easy to remember. That said, I still had not gotten the hang of what winning the first, second, or third die meant by the end of the game. Probably in another game I will. What makes for some issues are the special cases: Cavalry automatically takes a DIS after contact if it did not acquire one during combat, who retreats how much, infantry takes the position on winning but cavalry does not, etc. Eventually it will become second-nature, so let's just call this a learning curve. Not at all steep, but one nonetheless.

Design Choices

I noted in the initial review that I wanted to discuss the Proximity Rule with the author, and here is what he wrote:
I made some design choices, to reflect what I consider to be a "wrong" way to play, and is allowed by all rules out there. The Proximity rule is about this. All players I know - when they attack or defend - cram every single square inch of the table with units, so that sometimes you cannot tell one unit from another. I've seen people overlapping one base with another in order to fit both in the same space. That is not what happened on the battlefields. If you want (as I wanted) to avoid this you have no other way than to write an easy rule that plainly says that players can't do that. That's what I did. By the way, many Italian players who have played the game told me that the table looks "more realistic" and "orderly" with this rule. In all, they say it's more "Napoleonic".
In other correspondence with the author he shared some of his design choices with me, which might help you determine if DSLB has the right historical flavor for you.

Attack Columns – it is the author's opinion that the proper method of attack should be using the attack column for speed, switch to line and then approach to weaken the opponent, before going in with the bayonet. If the opponent is sufficiently disordered, the attack column formation can be maintained, allowing them to keep their momentum for a minimum number of actions used.

The French predilection for close combat is modeled with the Determined special rule, which allows a re-roll of a die during Approach. This is not restricted to a particular formation.

Cavalry versus Infantry (Not in Square) – Put simply, the author believes that cavalry, especially battle cavalry (dragoons and heavy cavalry), should be greatly feared and that infantry – even those units that are fresh, in line, and facing the charge – should get into square or face destruction. The math is such that only an exceptionally lucky infantry unit can stand in line in face of a battle cavalry charge; all others will be destroyed.

As I reflect upon other rules, most recently Command and Colors: Napoleonics (CCN), this is also generally the result, so it is not an unusual perception. Perhaps what struck me is that: 1) the odds are greatly in favor of the cavalry in DSLB while it is less so in CCN; and 2) the potential distance that a cavalry unit can charge from 3L plus 1S or 62 cm, where an "average" move might be 12 cm. That is a charge five times the distance of an infantry move in column. (Please note that 62 cm is an exceptional roll, but I was caught by the equivalent of a 44 cm charge, as was my opponent.)

So, I need to add a new factor in rating rules: Fiddly Geometry. This is a rating where small measurements or angles play a role in whether some action succeeds or not. A game like Pirates of the Spanish Main rates Very High; DSLB rates Above Average. Why? Whether a charge is lined up perfectly to 'clip' a unit or an artillery unit is lined up to bombard can be by a few degrees simply because there is no 'arc'; it is straight ahead or nothing.

This is why I say that playing with 'sloppy' movement actually hurts the game. As it is relatively easy to roll two successes with heavy cavalry, burning one action to pivot and 'line up the charge' means a difference of 18 cm that the unit has to use for charging.

By the way, one other comment my opponent made was: "this might be a good game to convert to hexes." That would certainly solve all of the the Fiddly Geometry issues.

Final Grade

So, how do I rate DSLB overall? Easily four out of five stars for me, as I like the level of tactical decision making that the player is presented with, which have definite risks and rewards; no decision is without tangible consequences. The sole detraction was the Fiddly Geometry rating, which has always been the bane of my gaming. I think the fiddly nature of bombardments can easily be solved: allow a battery to pivot up to 45ยบ when performing a Bombardment action.

As for stopping the long range cavalry charges, well, I think you just have to be a stickler with those angles. Having to burn one extra action to line up makes a world of difference. The best solution – one that will lead to the fewest arguments – is what is always recommended for Flames of War games: declare your intentions. If you intend to be lined up with a unit at the end of your move, declare it as such and ask your opponent to verify. If the enemy unit does not move during its turn, gently remind your opponent that you were lined up as you roll three successes with your Cuirassiers!

Will I game with DSLB again? Absolutely. (In fact, I know I am going to be playing this very scenario over again, as it seems like an interesting one, and one that would play differently now that I am used to some of the rules and their impact on tactics.) Given the options available, it is not a game easily taught to new players. You will probably have to figure a way to ease players into it. The rules complexity is on the lower side of Intermediate. The real draw is the uncertainty and excitement generated from activations and reactions. It takes the standard Song engine to a whole new level of decision making.

And that is a Good Thing.

Blog Archive

Blog and Forum Pages

Popular Posts

Followers

About Me

My photo
Huachuca City, Arizona, United States
I am 58 yrs old now. I bought a house in Huachuca City, AZ working for a software company for the last three years. To while away the hours I like to wargame -- with wooden, lead, and sometimes paper miniatures -- usually solo. Although I am a 'rules junkie', I almost always use rules of my own (I like to build upon others' ideas, but it seems like there is always something "missing" or "wrong").