One-Hour Skirmish Wargames: Fast-Play Dice-less Rules for Small Actions from Napoleonics to Sci-Fi (OHSW [not an affiliate link]) is a new book from Pen and Sword in the vein of Neil Thomas' One-Hour Wargames (OHW), sort of. Basically it follows the mantra of stripping away the minutiae of detail that, in the author's opinion, doesn't lend to the decisiveness of the action. Keep it simple, keep it moving, make it fun.
Let me start by addressing three things that leapt out at me with OHW and compare them to OHSW.
- The rules for OHW were very simple. Basically it came down to rolling a D6 number of hits when combat occurred and when the number of hits on a unit totaled 15, the unit was removed from the table.
- The scenarios were the main attraction. Many were similar to Tabletop Battles and other classic scenario books, but they were clean and precise on what they wanted you to do.
- The number of units was small and force composition was randomized.
- Although the rules are still simple, they are nowhere near as lacking in detail as OHW. These rules you might really want to play. (OHW rules never attracted me at all.)
- There are no generic skirmish scenarios. There is one specific scenario designed for each period presented (Napoleonics, Colonial, Post-WW I (Interwar), WW II, Cold War, and Pulp Action). There are no variations to those scenarios.
- There are no army lists, force composition tables, or any of that. The force composition for each scenario is specific, with no variation. There is a points system, and the points allocated for each side in each scenario. It is expected for you to use this if you wish to modify your forces.
Dice-less
Let's address this elephant in the room. The first review thread I saw on The Miniatures Page immediately jumped on that part of the title and many members condemned it, simply because they believed these sorts of games need dice.Just because there are no dice doesn't mean there is no element of chance or a randomizer. OHSW uses cards for its chance element, the idea being that the probability of success is built into the cards; you just need to know the card combinations used to indicate success for each action.
Basically, cards are used for everything random.
- Who goes first in a phase.
- When a turn ends.
- How many action points each player has to spend in a phase.
- Combat resolution.
- Casualty resolution.
I am always worried, when reviewing rules, that I am providing enough information for you to make an informed decision on whether the rules are 'for you' or not, without giving away all of the good stuff from the rules. Authors work hard to write their rules, so I don't want to be a party to giving it all away. If you feel like I don't explain clearly enough the rules concepts below, let me know in the comments section.
Initiative
Who goes first? Both sides flip a card, high card is the first player. The turn sequence is:- Determine initiative.
- First Player gets action points, spends them, and resolves all actions.
- Second Player gets action points, spends them, and resolves all actions.
- Assuming the turn did not end, start over at step 1.
Ending a Turn
Step 4 indicates that ending the turn is variable; there can be one or more Action Phases per turn. In fact, it is possible that players may have an uneven number of opportunities to act.The turn immediately ends when either player has to draw a card and a Joker turns up. Given that there are two decks and each has two Jokers, and cards are being drawn for all sorts of action resolution, ending the turn can happen at any time. Immediate ending also means that the current action is not completed, say if you were resolving a combat.
Action Points
There are two basic actions: moving and firing. Each figure can act only once per Action Phase and it must finish all of its intended actions before moving on to the next figure. You can spend action points on as many figures as you have action points, but know that moving and firing are separate actions, each costing points.Each figure must complete all Move actions, if it is going to move, before taking a Fire action. As the author indicates, this is so cowardly players do not try and Fire and then move out of line of sight.
A figure can move up to three times, but the third Move action costs more action points than the second, which costs more than the first. So moving three figures costs fewer action points than moving one figure three times. This encourages using more figures in a single Action Phase than trying to create a super-move with one or two figures.
So, how many action points do you get? Draw a card and the card's value (1 to 13) indicates the number of points. This makes for an incredibly wide spread of available points.
Combat Resolution
Here is the interesting part to me because people were tripping on the 'dice-less' moniker. Everything done in OHSW with cards could be done with dice, but they would be done with a four-sided die and a 13-sided die, which would be weird. Given the way the author uses probabilities, cards are more readable.
Basically combat is very simple: each player draws a card and the highest value card 'wins'. In close combat winning means your opponent is killed. In shooting winning means your target is 'downed' if you are the shooter, or you are missed if you are the target.
Varying probability is handled by drawing more cards. Skilled shooters draw more cards when shooting and targets in cover draw more cards when being shot at. Take the highest value card and discard the rest.
Some weapons have more than one 'shot' with a Fire action. This usually represents a rapid-firing weapon, multiple rounds, or an exploding round. So the first shot may miss, but the second may get the target. If the first shot gets the target, subsequent shots can go against an additional target within 3" of the original target, allowing you to simulate automatic weapons spraying, getting hit with canister, or getting hit by a grenade.
So, combat is very simple – highest draw (or if it were dice, roll) wins – and thus very quick to resolve. Very few figures get additional cards for being a skilled shooter or close combat expert. Weapons with multiple shots are dependent upon the period you are playing, so generally either everyone has that weapon or no one does.
The author intentionally stated that he did not want there to be any math involved with combat resolution. The situation determines the number of cards each side will draw, the players choose the highest drawn card, the two cards are compared to determine who is the winner.
Casualty Resolution
In the above I said that in close combat the loser is killed – the author indicates that close combat is intentionally made more decisive – whereas in the more common case of shooting, a hit target is 'downed'. A downed figure is laid on its side. It may not longer take any actions for the remainder of the turn. (Remember that a turn consists of one or more Action Phases.) Once the turn is complete, you determine the status of all downed figures by drawing a card for each. Red is Dead and Black is Back (stand the figure back up).
Casualties impact the morale check taken at the end of the turn (but before Casualty Resolution). If you fail this end-of-the-turn morale check, you have lost the scenario.
Movement
This is a free movement game. Because this is a skirmish game – which by the author's definition means that not only does one figure equal one person (or crewed weapon, or vehicle, or whatever), but each figure is a unit that is ordered separately – each figure is ordered and moved separately. So figures can only stay in formation if you have the action point to maintain it. There are no 'follow me' or 'group move' commands.
Infantry moves 6" per move, cavalry 9", crew-served heavy weapons cannot move (but may pivot), wheeled vehicles 6" off-road and 24" on-road, and tracked vehicles 12" per Move action. Any figure or model designated as 'Fast' moves an additional 3" per Move action. For Sci-Fi you can pretty much define whatever you want, so flying, skimmer, jump pack, and submersible movement would be additional modes to consider.
Terrain is defined as Area or Linear. Basically infantry is not affected by Area terrain unless it is declared Impassable. Basically players are required to clearly define and agree to terrain impacts prior to game play.
Well, there you have it. The basics of the OHSW rules. Let's try a test game (solo) to see how it plays out before rating it.
Test Game – Napoleonic Scenario "Capture the Cannon"
The Napoleonic scenario included with OHSW has the British attempting to recover an abandoned French cannon and the French rearguard returning to retrieve it. The cannon is in the center of the map, on the road. The British have the left half of the board in the picture below (bottom in all other pictures), while the French have the right quarter of the board (top in all other pictures).
The British have four riflemen (one of whom is a Sergeant and one of whom is a officer-killing sniper) and seven line infantry (one of whom is a Sergeant and one of whom is a close combat brawler). The rifles are significant in that they have an infinite range and take 2 action points to fire and reload. Muskets have an 18" range and take 1 action point to fire and reload.
The French have five mounted Chasseurs (sabers and carbines), nine line infantry (one of whom is a Sergeant), one artillery man (no difference than the line infantry man, just wanted to use him to retrieve the artillery for color), and one mounted Officer.
The British win by having a figure within 6" of the cannon at game's end (five turns or the breaking of either force), while the French win by breaking the British force. Any other result is a draw.
I am treating the tree models as individual trees, so the tree model is Impassable and provides light cover (they are thin trunks). Figures must move between the tree models. The hills are rises in the ground that provide heavy cover and can be seen and fired over. The road provides no movement bonus. The cannon model provides light cover.
Note that cover modifiers only apply if the line of fire passes over the model providing cover, so cover can be flanked.

Setup
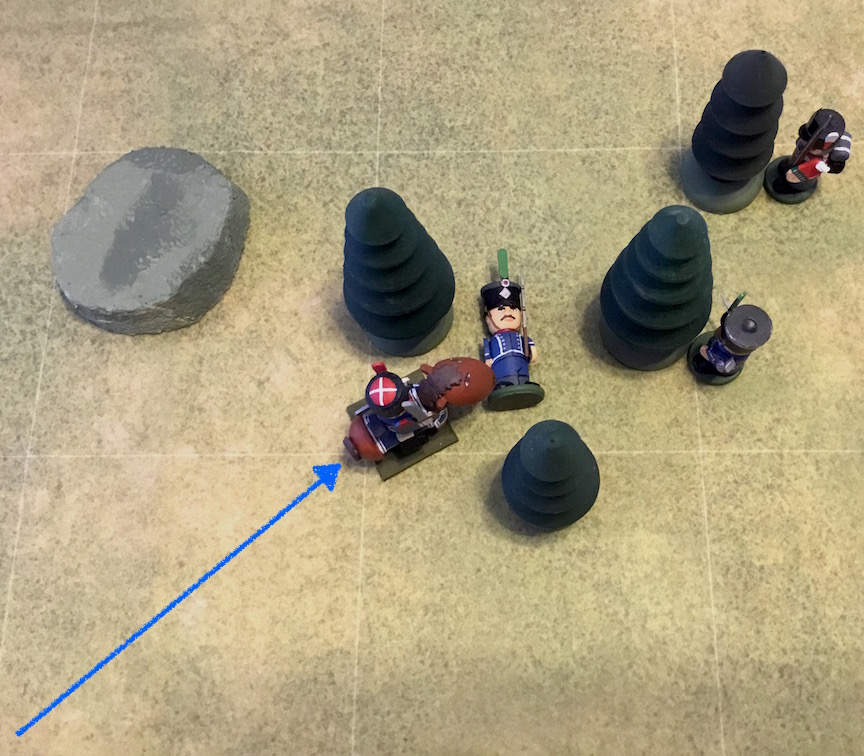
I set the British up first as they are defending. For the most part I put the riflemen on the left flank, where their infinite range can come into play better, behind individual trees. The sniper (in a firing pose) is on the far left and the leader is nearer to the center.
The British line are setup on the right flank and center. The close combat brawler is distinct in that he is wearing a blue uniform (a Portuguese soldier who has lost his family to the French). He is forward, behind the hill, and ready to pounce on the cannon.
The French line infantry mass in the center, around the road, and are going to march straight in and take the cannon in force. The cavalry operates on the French right flank against the rifles. The hope is that they will tie up the rifles, distracting them from firing on the French infantry.
Turn 1
The French get the first action phase, but they draw a miserable 3 for action points (AP). I decide to move with one of the cavalry and fire at the sniper (and missing), while moving forward with a second cavalryman.

The British draw and get 10 AP. Each rifle takes 2 AP to fire and reload, so firing the left three rifles consumed 6 AP right off the bat and they all missed! Three of the line infantry maneuver (once each) and one fires on the flank of the French infantry formation, also missing.

Because we have completed the Action Phase (one go for the First Player and one for the Second Player), we draw for Initiative again. This time the British act first.
The British get 12 AP this time! Two of the British rifles fire, each downing one French cavalryman. The Portuguese soldier cannot stand the temptation and rushes out to bayonet a downed cavalryman.
In close combat, if your opponent is Downed, it automatically loses. The result of close combat is that the loser is automatically killed, so this meant that all the soldier needed to do was contact the figure at the end of movement. (Close combat is not a separate action, but done at the end of a Move action in which the moving figure ends in contact with an enemy figure.) Because it took two Move actions to reach the first cavalryman, a third Move action was too expensive for the soldier to bayonet the second cavalryman. (Remember, it costs an increasing number of AP to make a second and third move with a figure.)

The infantry on the right fire into the French formation, this time hitting two figures and putting them down. The French now have one casualty and three down.

The French get a good card and also get 12 AP. A Chasseur charges forward at the Portuguese soldier, not only to protect the downed Chasseur, but to take revenge on the brother-in-arms lost. He cuts the soldier down with ease.
Actually, it was a somewhat dicey move. The Portuguese soldier was a close combat brawler so he gets an extra card in both attack and defense. A cavalryman also gets an extra card over an infantryman, in addition to the extra card gained for attacking. So the cavalryman had three cards while the infantryman had two.

Spinning his horse, the Chasseur does a second Move action and cuts down another rifleman (who, for the sharp-eyed, looks suspiciously like a French Voltigeur). Although the French have the AP to spare, that ends that figure's move.
With the remaining AP, two French infantry take cover behind the rise and return fire at the British in the woods. Four other infantry march down the road towards the cannon.
Lots of risky moves by the French. Can they get the initiative for the next Action Phase?

Unfortunately for the French, no. The British retain the initiative.
The British draw 13 AP. The Sergeant of the Rifles shoots down the charging Chasseur, Meanwhile, after some maneuvering with the line infantry, they lay down fire into the French line marching up the road. The take two more soldiers down before a Joker is drawn, immediately ending the turn.
This is a good example of the asymmetric game play in that the British had three Action Phases while the French only had two. Further, the French only had 15 AP to spend while the British had 35 AP (although they did not get to spend the last 7 AP because the Joker came up).

Morale is checked for each side. Note that downed figures are not casualties; we have not determined if they are casualties or to be brought back. So when we check morale, they do not go against the casualty count.
The morale check is fairly simple. Draw a card, add the side's Motivation to the value. (Motivation is indicated in the scenario, or determined by the amount spent in a points-based force.) This number must exceed the number of casualties taken. Again, because the cards are valued from 1 to 13, unless you get a really low draw, it is easy to beat it, especially as leaders allow you to draw more than one card for the check. Both sides pass.
After the morale check you determine the fate for the downed figures. Red is Dead and Black is Back, so at the end of the turn one French soldier is dead, for a total of three figures lost, against two lost for the British.

End Turn 1
That should give you an idea of how One-Hour Skirmish Wargames plays. Let me say that more than one hour went into this game so far – although it included terrain setup, placing figures, game play, taking pictures, documenting moves, and fumbling around – but given that this is turn 1 of a five turn game, I cannot see how this would be considered a one-hour wargame, even counting only time for game play. That said, I am okay with that.
Next time I will show you how the game turned out, discuss how I think it all fared, and give my ratings for the rules.

Nice write up without giving too much away. Certainly sounds an interesting approach with cards. I have the book ordered and expecting delivery soon. Can't wait!
ReplyDeleteOutstanding Dale!
ReplyDeleteOHW are actually a superb set of rules coupled with the scenarios. I have OHSW and will be playing them next month hopefully.
ReplyDeleteHonestly Simon, I have never attempted to play the OHW rules. I looked at them and discarded them instantly. Then I found out a local gaming buddy was using them solo, so it made me reconsider. Perhaps there was something I was missing in a simple reading? Most of my experience with NT was through his Ancients, Napoleonics, and 19th Century rules. OHW was nothing like them, although I could see how he progressed in scenario design from his 19th Century book to OHW. I may someday get to a OHW game, but this came along first. :)
DeleteHey Dale,
DeleteI at first declined playing the OHW, but later chose to play them several times to establish a base line before I changed things. This actually was quite productive time spent, and I have new respect for their simplicity, albeit that it comes at the expense of failing to explain key game mechanics like Line of Sight, Unit Contact, etc. I did these myself at my medieval blog here:
http://darkages40and25.blogspot.com/2017/05/whats-missing-in-one-hour-wargames.html
batrep with RAW:
http://darkages40and25.blogspot.com/2014/12/neil-thomas-one-hour-wargames-battle.html
Hope these encourage your playtest of them!
Super. Thanks for this... great report.
ReplyDeleteI ordered this book simply on the basis of this post, so thank you. A very clear explanation of what looks like an interesting set of rules. I do like book/rule combinations, specifically because they contain explanations for the decisions made, which is always helpful to see for someone who likes to tinker with and design games.
ReplyDeleteOne question (which I'm sure the book will answer) - when doing end of turn checks for things like casualties and force morale, is a Joker ignored?
I could not find the answer to that question, but I addressed it in Part 2. The Jokers are Red and Black and the casualty resolution is a Red/Black check, so there is no reason to ignore the Joker in that instance. For the morale check, however, it uses the card's value and the value of that card is unstated. Because it is a 'negative' card (turn ending), I decided to give it a value of 0, but it never came up in play.
Delete...and a narrative style is a pleasure tip read.
DeleteHello Dale
ReplyDeleteThanks for the review. I saw the announcement it was coming and new nothing else other than it was generic, fast and used cards. The rules seem to be two of those three (missing the fast bit). I see part two has been posted and look forward to reading it.
Attribute the lack of 'fast' to my fumbling, not just with these rules, but getting into the swing of gaming and reviewing again. Plus the room was cold! :) Part two shows the rules are indeed fast.
DeleteA late post, but I've finally got the book and have been reading it :)
ReplyDeleteYou say:
"Close combat is not a separate action, but done at the end of a Move action in which the moving figure ends in contact with an enemy figure"
I suspect you're right, but the rules themselves don't seem clear on this. They simply say that close combat is resolved when a model moves to contact an enemy, but it's not stated if this then ends the move.
As I say, resolving the close combat at the end of a move action makes sense (since you don't have to remember remaining move distance), but it is something that's not entirely clear. The idea that if you want to do multiple attacks you use a move action for each makes sense, and limits such activity as well.
Kaptain Kobold said: "They simply say that close combat is resolved when a model moves to contact an enemy, but it's not stated if this then ends the move."
ReplyDeleteYou are correct that I made an assumption that it ended the Move action, given that there is a card resolution for the Close Combat. There is no reason to assume, though, that a Move ending in Close Combat stops you from taking additional Move actions, up to the limit of three. That said, you may want to limit it anyway. I find that if several enemy are downed, each within 6" of each other, a figure could sweep in with 9 AP and instantly dispatch 3 enemy soldiers, which is pretty powerful. Maybe too powerful. Even if it did forbid further Move actions, there would be no rules justification for denying the model a Fire action.
My point, however, was that OHSW breaks the typical turn sequence model of Move-Fire-Close Combat-Morale by making Close Combat a part of a Move action.
"a figure could sweep in with 9 AP and instantly dispatch 3 enemy soldiers, which is pretty powerful"
ReplyDeleteIf you drop the assumption that a close combat resolution ends the movement, you could sweep up a whole bunch of figures in a turn :)
It hard to gauge the intent, but I suspect you have it about right, in that that you stop a move for close combat but, unlike shooting, that doesn't end all movement activity for the figure. However there is the line on Page 6 under 'The Player Phase' - "I don't want players shooting a model then moving into a place of safety without their opponent getting a chance to retaliate". In practice you could use a pair of movements to run out of cover, dispatch an enemy (or fight one in close combat) and then run back into cover, whilst nearby enemy figures stand and watch you. So maybe a close combat should be treated as firing - engage in one and the figure ends all action for the turn.
"So maybe a close combat should be treated as firing - engage in one and the figure ends all action for the turn."
DeleteI suspect this is the authors intent. This is a shooting focused game and melee should not be so over powered.
For those that see these comments later, the author answered my question about this topic and I posted the answer here: https://daleswargames.blogspot.com/2019/04/one-hour-skirmish-wargames-and-close.html
DeleteVery interesting review. Thanks!
ReplyDeleteJust came across this. Going to order this asap. I love your review and demo of it. I play a lot and I mean a lot of skirmish games, and it's just too many rules to remember all the time. I've always passed over the 1 hour rules thinking "How can this be?" I play casually, with my kids 6 & 10, and play a lot solo as well, to learn rules and tactics. I see you play solo as well, and it hones one's skills. Thank you for the awesome rules.
ReplyDeleteHey Dale, There's an error in your summary of the rules:
ReplyDeleteInitiative
Who goes first? Both sides flip a card, high card is the first player. The turn sequence is:
Determine initiative.
First Player gets action points, spends them, and resolves all actions.
Second Player gets action points, spends them, and resolves all actions.
Assuming the turn did not end, start over at step 1. [error - you start over at step 2, per p.6].
In essence, it is an IGO-UGO with the amount of AP available widely varied, 1-13, and the only time you can go twice in a row is at the change of Turn.
Hope you are well, best, Alex