When Shaun and I played the first time we assumed that "entry via the north road" meant that the first square the unit had to move through was C1. This meant that, at best, you were going to occupy four squares on turn 1. (B2 and D2, only if you had Cavalry; C2 if you had Cavalry or Skirmishers; and C1. Basically all of the squares indicated by Red arrows in the image below.) Note that it means that by the end of turn 1, Red would only have one Infantry unit on board, two by the end of Turn 2, etc. Given that the Blue defenders could start in C3 and D4, and could theoretically push into C2 and D2 on their turn (although would be unlikely to do so), they could really jam up Red forces until this first line of defenders was eliminated. As was shown in the last blog post, if they do not accomplish that quickly enough, Blue can reinforce the line such that Red will never reach the town, having to break through two lines of defenders.

So, what's the alternative? Shaun and I talked about the concept of using an off-board square, in this case square C0. The idea is that all of the Red units start in the square north of the northernmost road square, just off board, i.e. square C0. If you did that, the number of squares that you could move to on the first turn are not only the ones with red arrows, but the blue ones too. More importantly, units with a 6" movement can move on and occupy squares B1, C1, and D1. This is three times the number than if you consider square C1 is the first square of movement (red arrows only).
How will this affect the game? Quite a bit.
The Game
Red's first turn looks a lot better than the last game. There are four units on rather than three, two of those being Infantry. (If I had rolled two Cavalry, I would have had another unit on the board too.)

My basic plan is to use the Skirmisher unit to flank Blue defensive line and break it faster. (Interestingly, Ross MacFarlane played the same scenario and had the same force that Shaun had when playing Red, used his Skirmisher to also make a flank run, but to secure the town instead.)
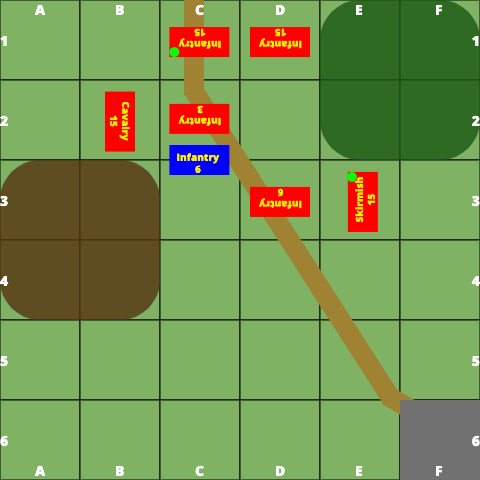
By turn 3 everything was engaged.

By turn 5, Red breaks through the portion of the line closest to the town.
Just in time for Blue to bring on their first reinforcements. Mind you, by this time in the first game it was obvious that these reinforcements could make it close to the original battle line, but Shaun, seeing that I had already broken through, decided not to advance but rather to occupy the town.
Infantry in the Ancient period take 1/2 hits as it is, with defending a town yielding another 1/2 hits. It is going to take some time digging them out. In fact, the only way to win is probably by attacking it from two directions.
As a side note, in square grid combat you have to attack from F5 and E6. If the attack comes from E5 (which is legal) it essentially makes an implied pivot that 'hides' its left and right flanks (squares E7 and G5).Turn 8 saw the Blue Cavalry charge out and attack the Red Infantry that was attempting to move on its flank. This was a strong move by Shaun because with the Cavalry in E6 and its front facing D5, that puts its right flank in square F5.
Again, that is a quirk of the square grid rules we use, but the best way to look at it is that OHW only allows one unit to attack per face and to get on the flank each unit must have a square in between each attacker. So a unit could be in square E5, but it would not be able to attack the Blue Cavalry.

By Red turn 10, Red had the attack on the town secured. (I am not sure why Red Infantry in C5 is facing South and not West.) The Blue forces coming on can only enter from A6 or B6 and with the hill impassable, they have to go through me to disrupt the attack on the town.

By the end of Red turn 13, the town was secured.

This was a far-cry from the result in the first game (turn 10).

Summary
To me this was a huge difference in the result. The pendulum swung dramatically from "no way for the attacker to take the town" to "no way for the defender to retake the town". All because of the change of a single rule. (Shaun may disagree, but I remember that neither side had better rolls in either game, but this second game did result in both sides having bloodier results.)
I am curious. How do you interpret the rule that "all Red units must enter the board via the road"? When playing the scenario without a grid, you probably use the same method as we used here, which is that all Red units are artificially stacked up on the point where the road intersects the board edge. This is equivalent to the "square C0" concept Shaun and I used.
More importantly, does anyone map out the road march order and penalize the rearward units movement based on how far back in the march order they are?

If it says they come on the road, then they come on in a long march column with suitable intervals. I generally reckon 3" is deep enough for OHW. I've always done road entry like that, as it is how military units move along roads.
ReplyDeleteI assumed they had to come on along the road but allowed them to do wheel before and after moving so could enter at an angle which allowed me to get 3 units on.
ReplyDeleteIf Blue had advanced to attack it would have slowed the flow of troops but at least there was no risk of a recoil forcing Red off table. However, because I had manged to bring on three units, one of Red's units would have been flanked in short order if he had advanced and for better or worse, having started earlier, the battle on that side of the table would have been over earlier.
Hello Dale,
ReplyDeleteI am not sure the pendulum swung so much. The first game was definitely no way Red can get the town, but the second game could have gone differently if I had gone for a different bottleneck force of Infantry and Skirmisher, freeing up another infantry for the town defence. With only 6 units a side, the force you roll has an enormous impact on tactics (as we have discussed).